Abstract
Exposed static IAM keys are one of the most common security risks for AWS accounts. Avoiding the use of static keys is a best practice that can be hard to achieve in hybrid cloud environments where access needs to be given to external systems. IAM Roles Anywhere is a service that help mitigate this risk. In this article I detail the problems and risk associated with static keys, how IAM Roles Anywhere can solve this problem, and walk through how to setup the complete solution.
- The Keys Problem
- IAM Roles Anywhere Solves the Keys Problem
- How does IAM Roles Anywhere Work?
- Setting Up IAM Roles Anywhere
- Configuring the External System
- Making the Connection
- Closing Thoughts
- References
The Keys Problem
One of the more pesky problems to solve when managing an AWS environment is granting access to external systems in a secure manner. External access to the AWS console can be handled via username and password (or even better, leverage SSO login via IAM Identity Center!). Unfortunately, this method doesn't work for API access from machines and applications outside your AWS environment.
Why this is bad
The most common solution for providing external access is not awesome. You generate an IAM access key pair for the application or system and pass those credentials over to your developer for use. Afterwords, you keep your fingers crossed that they do not share these keys with other folks or store them in plain text on their computer. Even worse would be if they put these credentials directly into their code and then commit it to a git repo.
Without a doubt this last scenario happens all the time, and consequently it is something that hackers are constantly scanning GitHub repos to find and exploit to get access to your AWS accounts.
The Toil of Managing Keys
Let's say you are able to avoid these credentials getting exposed accidentally. You still have to make sure you are performing good security practices on these keys by rotating them regularly. For example, in my environment we rotate keys every 75 days. Then you have to go through the process of securely exchanging the keys with your developers again, and they have to update their application to use the new keys. Wash, rinse, and repeat this process every few months and that adds up to a lot of toil just to keep your keys secure.
What about IAM Instance Roles?
This problem has been solved for years for systems running inside of AWS with IAM Instance Roles. This feature allows you to assign an IAM Role directly to an EC2 instance (or container or Lambda function). As a result, the EC2 instance then dynamically retrieves an access token for the role via the EC2 Instance Metadata service. Very slick and no static keys required!
No Solution for External Systems
However, the very nature of the way this service works requires that the calling system be inside AWS. For external systems you had no option beyond static keys. Thankfully, that all changed in July 2022 when AWS announced IAM Roles Anywhere.
IAM Roles Anywhere Solves the Keys Problem
IAM Roles Anywhere makes it possible to use IAM Roles on systems outside of AWS. It provides a mechanism for external servers, containers, and applications to obtain temporary AWS credentials in a manner similar to EC2 Instance Roles. Thus it eliminates the need to create and manage static access keys and dramatically improves the security posture of your AWS accounts.
How does IAM Roles Anywhere Work?
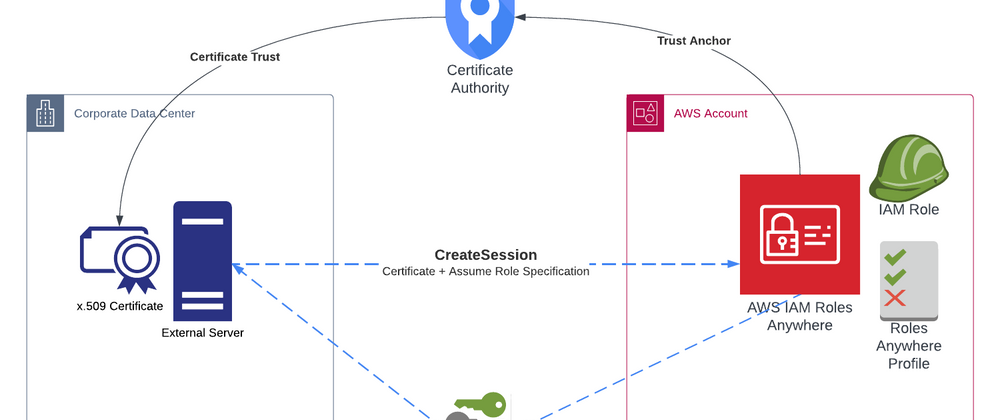
IAM Roles Anywhere leverages public key infrastructure (PKI) as a mechanism to establish trust between your external system and your AWS Account. Systems sitting outside of AWS hold X.509 Certificates that they present as part of a CreateSession request. Next these certificates are validated by IAM Roles Anywhere and then a temporary set of credentials are returned to the client.
IAM Roles Anywhere Components
There are six basic components to the IAM Roles Anywhere architecture.
- Certificate Authority (CA). The CA is the heart of your public key infrastructure and is responsible for issuing certificates. For IAM Roles Anywhere you can use a CA provided by Amazon Certificate Manager, or you can use an existing External CA.
- Certificates are digital documents that securely associate cryptographic key pairs with a system. A certificate contains the public key and a signature that has been encrypted with the private key. This allows a third party to verify that a certificate is valid by decrypting the signature using the public key. Certificates also contain a trust chain that links the certificate back to the CA that issued it.
- A Trust Anchor is used to establish a trust relationship between IAM Roles Anywhere and your Certificate Authority.
- An IAM Role. You probably already know that a Role is an IAM identity that contains specific permissions you wish to grant and that can be assumed by anyone who needs it. In order to use a role with IAM Roles Anywhere, your role must be configured to trust the IAM Roles Anywhere service principal.
- Profiles are used to specify which roles IAM Roles Anywhere can assume and what your workloads can do with the temporary credentials that are issued. You can specify a session policy to limit the permissions created for the session.
- Lastly, the IAM Roles Credential Helper is a downloadable tool provided by AWS that allows you to request temporary security credentials via the CreateSession API.
IAM Roles Anywhere Architecture
Here is a diagram that illustrates the components of the IAM Roles Architecture:

The components of the architecture work together in the following way:
- A Trust Anchor is established between IAM Roles Anywhere and the Certificate Authority (CA). This CA can be running inside of AWS or externally in your own data center or even another cloud provider.
- The CA issues an x.509 Certificate to the external system, where it is installed in the local store.
- The IAM Role is created and configured to trust the IAM Roles Anywhere service principal.
- A Roles Anywhere Profile associates the IAM Role with Roles Anywhere and can set session restrictions if desired.
- The External Server issues a CreateSession request and provides it's Certificate along with specifying the role it wishes to assume.
- IAM Roles Anywhere validates the Certificate is valid and tied to the CA contained in the trust anchor.
- Once these validations are complete, the system is now authenticated and IAM Roles Anywhere will create a role session via STS and pass the session credentials back to the external system.
- The external system can now use these temporary credentials to make any AWS API calls that are allowed in the IAM Role.
Setting Up IAM Roles Anywhere
Now that I've gone over the basic architecture of IAM Roles Anywhere, next I'm going to walk you through an end to end deployment of this solution. For my lab deployment I will use AWS Certificate Manager Private CA as our Certificate Authority. As a result the first thing I will walk through is how to stand up the Private CA.
Setup AWS Certificate Manager Private CA
AWS Certificate Manager is AWS' fully managed Certificate Authority service. You are probably most familiar with this service as a method for issuing public certificates for use with other services like CloudFront and API Gateway, but the service also has the capability to act as a Private CA, allowing you to setup entire managed CA hierarchies without the headache of managing your own CA (and trust me, having setup my own private PKI hierarchies in the past, it neither fun to setup nor maintain).
Steps to Setup the Root CA
First, we need to setup the Root CA
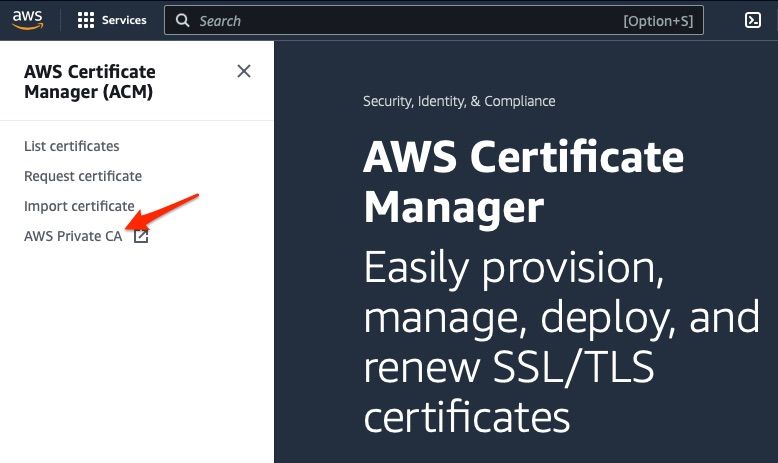
To get started, login to your AWS account with the appropriate credentials and navigate to the Certificate Manager service. From the Certificate Manager home page, click the link for AWS Private CA on the left hand navigation bar
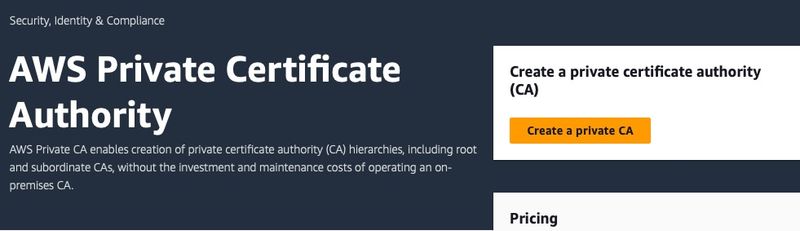
On the resulting page, click the orange Create a Private CA button to get started creating your new Private CA.
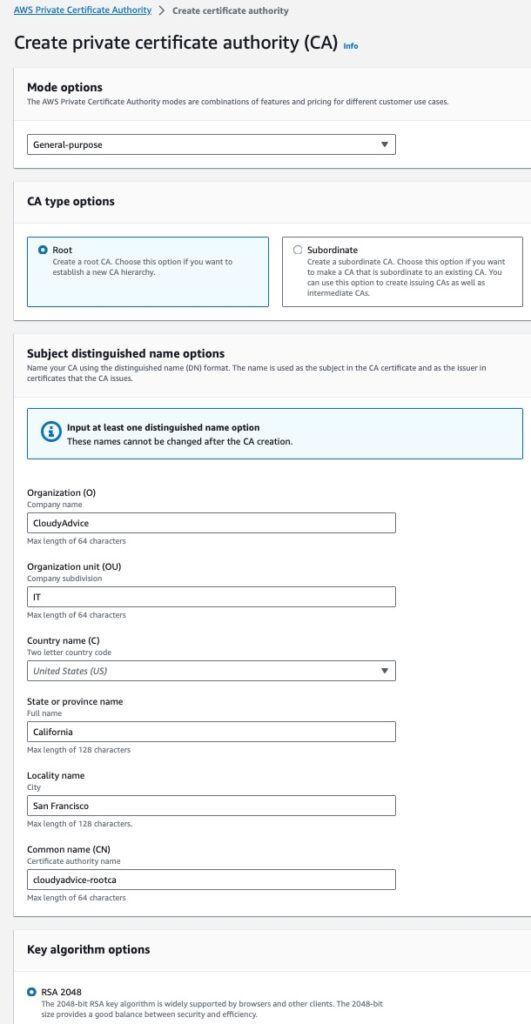
After clicking the button, you will be presented with the Create a private certificate authority wizard page. Here we will be configuring all the required options to stand up our private Certificate Authority.
- For your CA Mode options, select General Purpose. NOTE: if you are following along and setting this up in a lab environment be aware of Amazon Private CA pricing. A General Purpose private CA will cost you $400/month! I have not tested the option to use the short-lived certificate mode, and it certainly would not work for a production deployment as the certificates would expire too quickly.
- For CA type, select Root
- Fill in your Subject DN options as you please with Organization, Organization Unit, Country, State, Locality and Common Name.
- Set your key algorithm as desired, e.g. RSA 2048
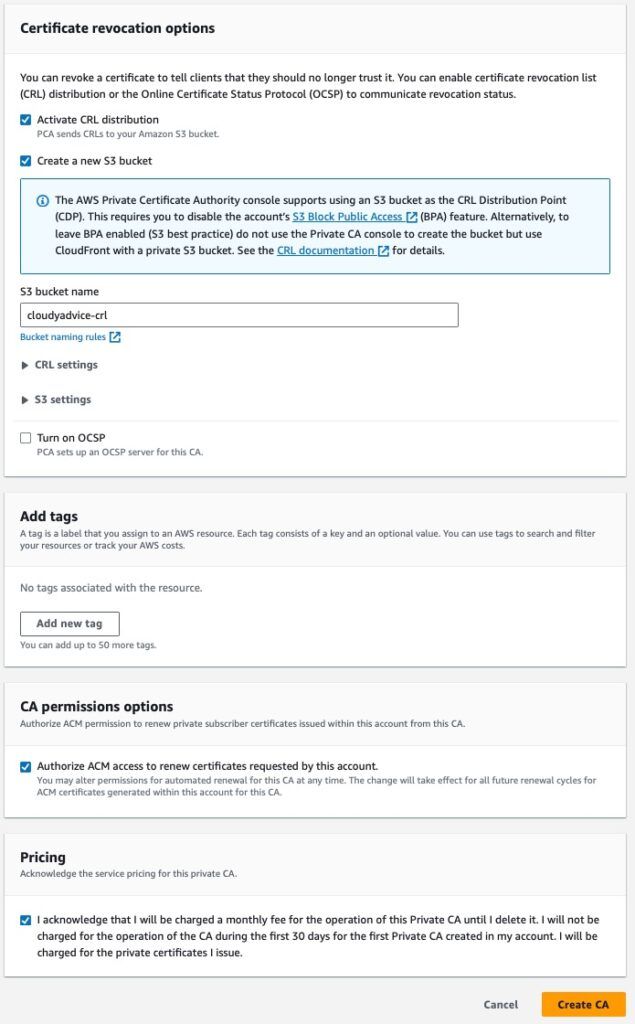
- Next we need to setup a Certificate Revocation List distribution point so we can have a place to publish certificates that are no longer valid. All properly configured CAs must have a CRL location for the CA to be trusted.
- Check the boxes for Activate CRL Distribution and Create a new S3 bucket.
- Enter a new bucket name in the S3 bucket name field.
- You can leave the other CRL settings as default.
- Add tags as desired
- Under CA permissions options, ensure that the check box for Authorize ACM access to renew certificates is checked.
- Finally, check the box acknowledging the pricing for ACM and click the Create CA button.
Our Root CA is now created, but to finish activating it we need to Install a CA Certificate. From the Actions menu in the top right corner of the Certificate Authority homepage, you should choose Install CA Certificate. On the resulting screen accept the default 10 year validity period and SHA256 signing algorithm and click the Confirm and install button.
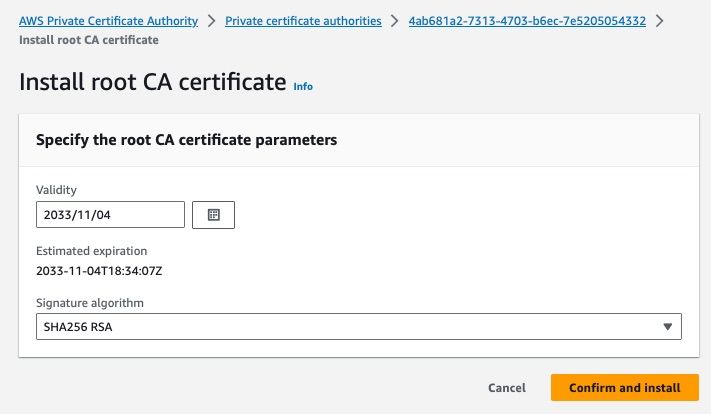
After completing these steps, you now have a functioning Root CA that is able to start issuing private certificates.
Important Note on CA Hierarchies
From a PKI best practices perspective, you normally would never issue client certificates from your Root CA. Instead you would setup a subordinate "Issuing CA" that trusts the Root CA and that would be used to issue all your client certificates. However in the interest of simplifying this blog post and avoiding the additional cost of running multiple CAs, I'm going to skip that step here and move on to configuring IAM Roles Anywhere. Just be aware of this for your production Certificate Authority deployment.
Configure IAM Roles Anywhere
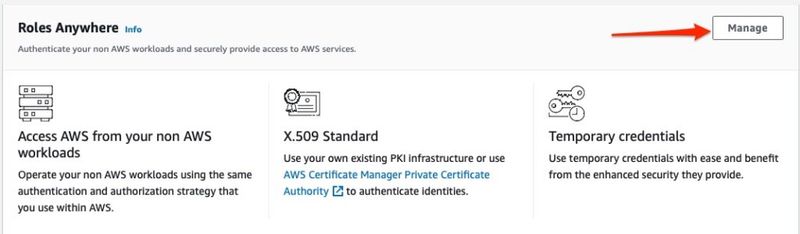
Now that we have a functioning Certificate Authority, let's get into setting up IAM Roles Anywhere. To get started with this task, navigate to the IAM service page in your AWS Console. Next, click on Roles on the left side navigation bar. At the bottom of the resulting page you will see a section for Roles Anywhere. Click the Manage button to get started setting it up.
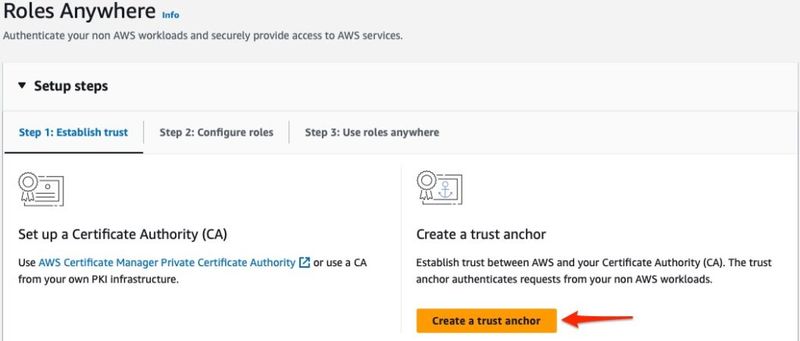
Establish Trust Anchor
The Roles Anywhere page has a very nice Setup wizard that will walk you through the process. The first thing we need to do is create a trust anchor to the Private CA we setup in the previous step. Click the orange Create a trust anchor button to get started.
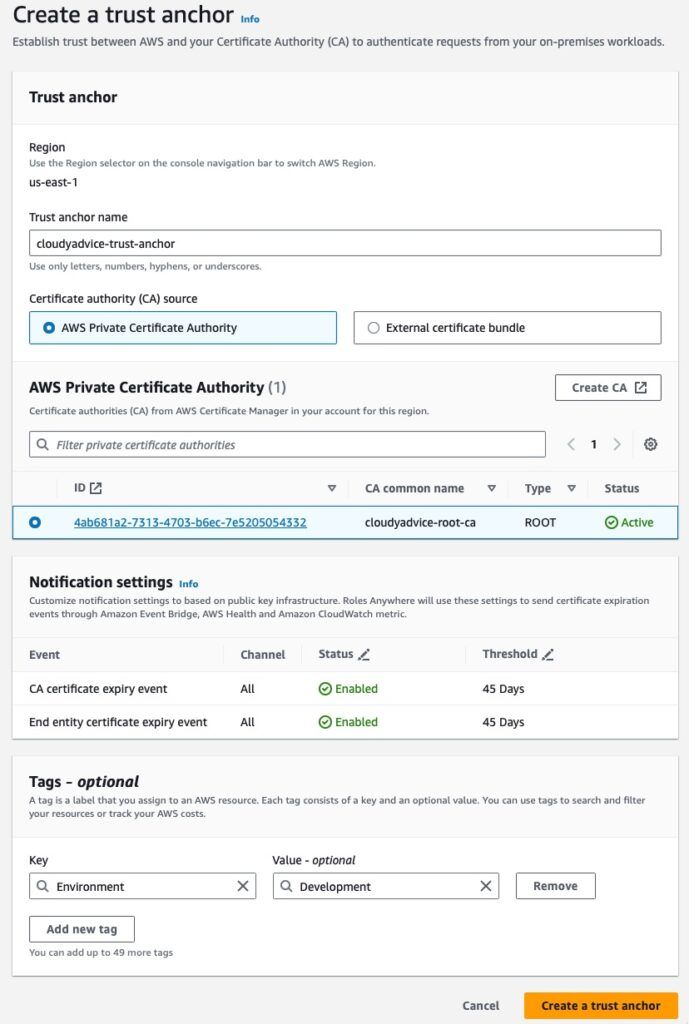
You will be taken to the Create a trust anchor wizard page.
- First, enter a friendly name for your trust anchor.
- Next you will choose your CA source. Here is where you can specify an external CA to trust via uploading a certificate bundle, or you can go with AWS Private Certificate Authority, which is the default option.
- Below in the next section you will see a list of AWS Private Certificate Authorities in the account. Click the radio button next to the root CA we created in the previous step.
- Leave notification options as default and add tags as appropriate.
- Finally, click the orange Create a trust anchor button to complete the process.
Configure Role
After you create your trust anchor, the Setup wizard will move to the next step, Configuring roles. If you have an existing role, you can easily configure it for Roles Anywhere by adding the required trust statements to the role. For our demo, let's make things simple and create a new role for use with Roles Anywhere. You can do this by clicking the Create a new role button.

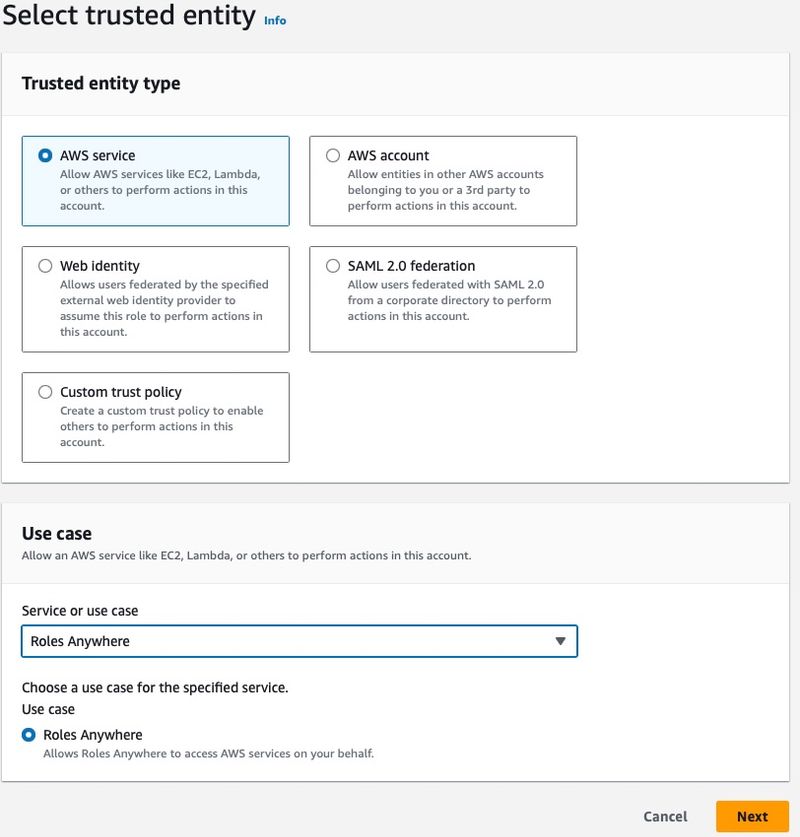
Clicking that button will take you directly to the IAM Role creation wizard. Step 1 is Select trusted entity.
- Click the button next to AWS Service.
- From the Use case drop down menu, select Roles Anywhere.
- Click Next.
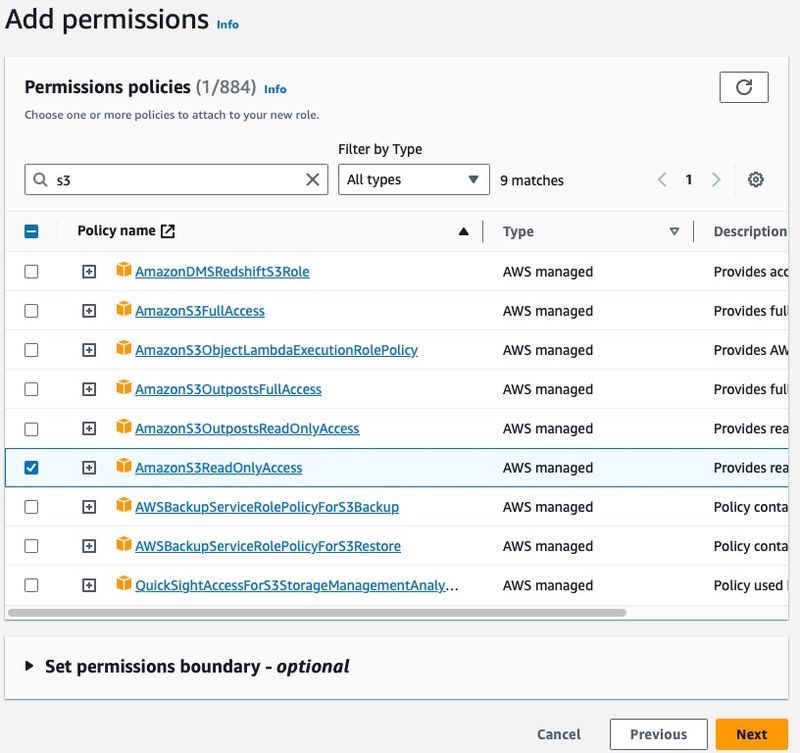
From here we need to add permissions to the role. This will control what API actions the external system is able to use via Roles Anywhere.
- You can attach any existing IAM policy in your account, AWS Managed policies, and even attach multiple policies.
- For this demonstration I'm going to grant the AmazonS3ReadOnlyAccess managed policy and click Next.
To complete the wizard, give your new Role a name and description, review the trust policy and permissions you just setup, assign tags and then click the orange Create Role button.
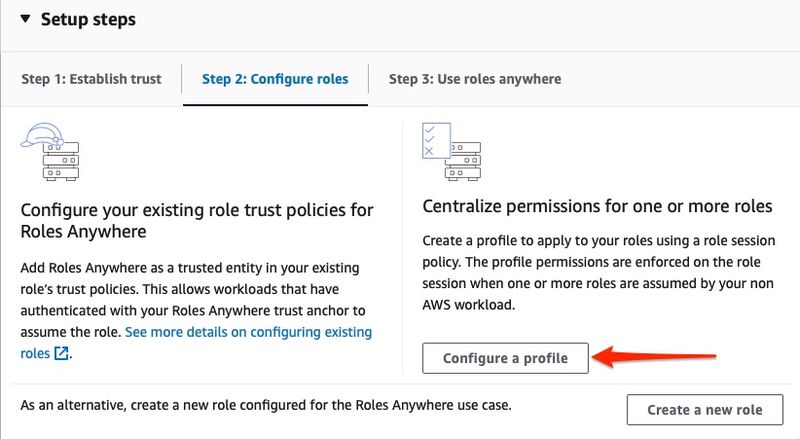
Configure a Profile
After you role is created, navigate back to the Manage Roles Anywhere screen. The final setup step is to create a Profile that will associated your IAM Role for use with Roles Anywhere using a role session policy. To complete this step, click the button that says Configure a Profile:
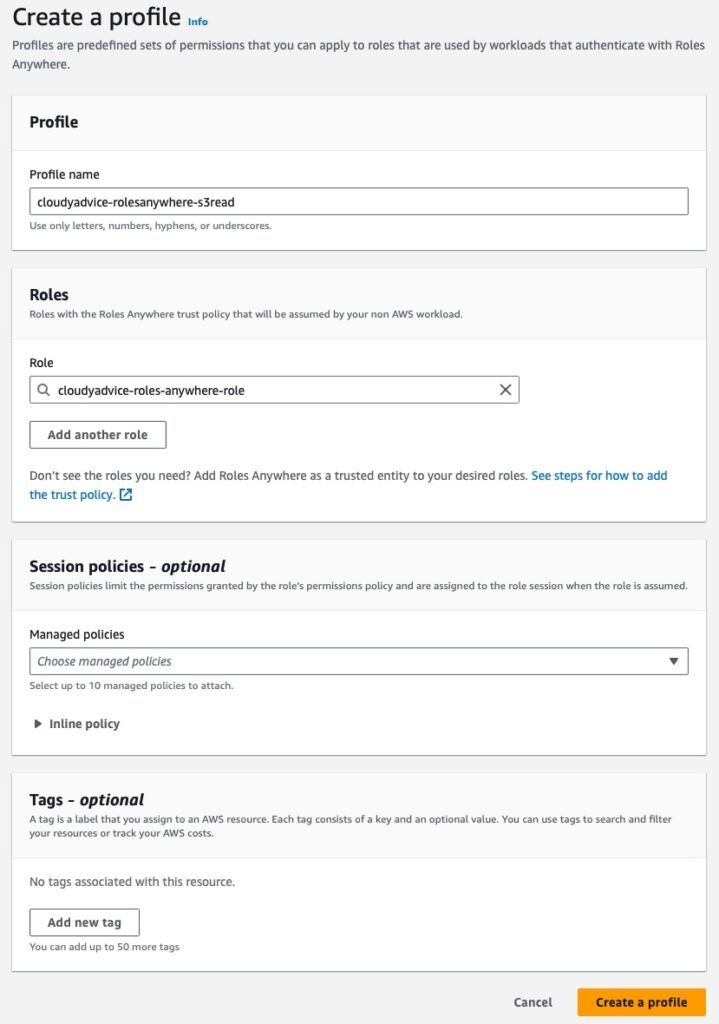
Time for yet another wizard page! Here you will complete the following steps:
- Give your Profile a name
- In the Roles section, chose the role we created in the previous step
- In the Session Policies section, you can optionally limit what permissions are granted by the role for the session created via Roles Anywhere. For our case we will remove the default inline policy that is present, as it grants ALL access.
- Apply Tags
- Finally click the Create a profile button to finish the wizard.
At this point we have successfully completed all the setup tasks to get our IAM Roles Anywhere backend configured.
Configuring the External System
With our Roles Anywhere backend up and running, let's move on to configuring the external system for access. The first step for this is to issue an x.509 certificate for our external system to use for authenticating to IAM Roles Anywhere.
Generate Client Certificate
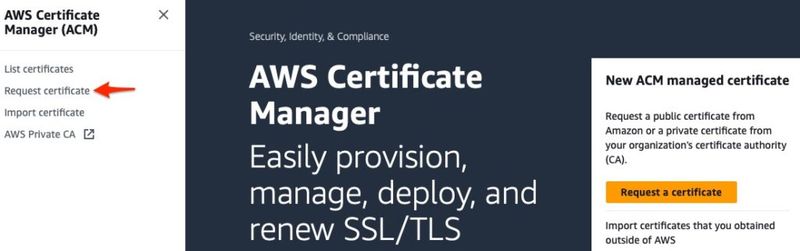
In the AWS console, navigate back to Amazon Certificate Manager service. From the service home page, click Request Certificate on the left side navigation bar (or click the big red orange button on the right):
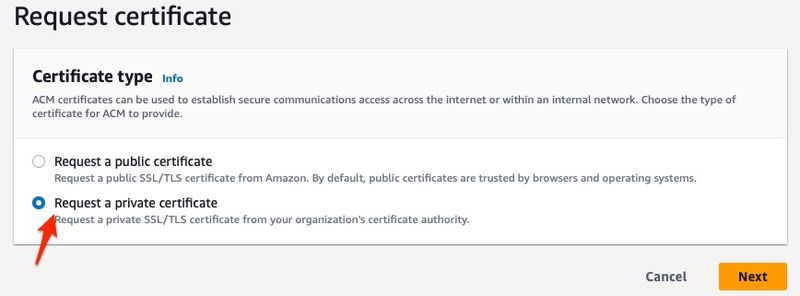
Under Certificate type, choose the option Request a private certificate and click Next:
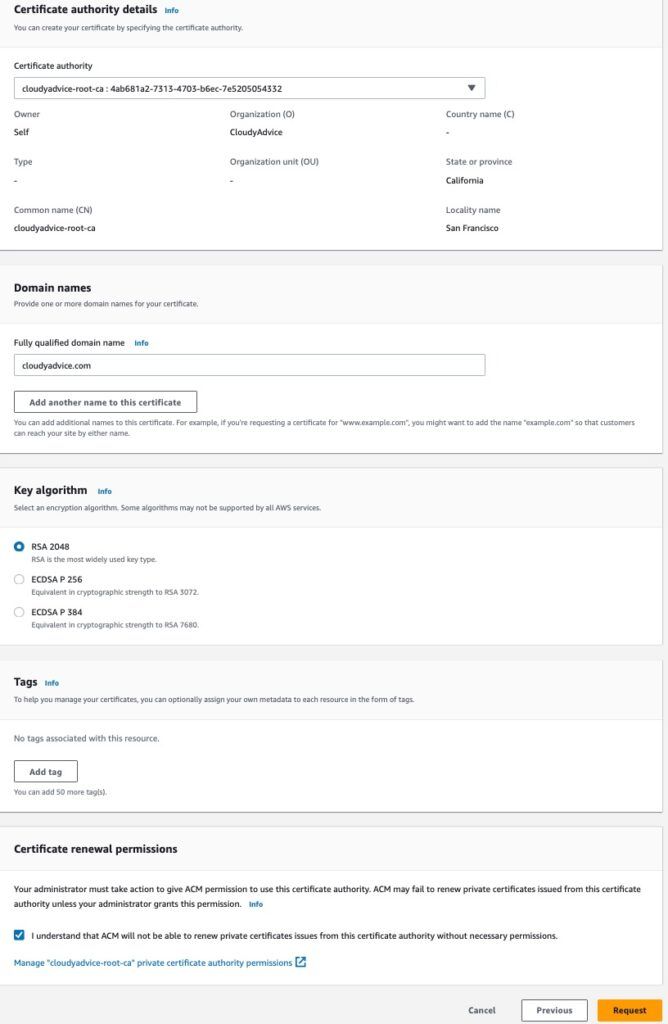
You guessed it, it's wizard time! From this wizard we will be completing the required properties for our certificate request (CSR).
- In the Certificate Authority drop down menu, select the private CA we created earlier.
- Enter your domain name for the certificate in the Domain Name section.
- Choose your Key algorithm. In this case I'm going with the default of RSA 2048.
- Add tags as desired.
- Under Certificate Renewal Permissions, click the box to acknowledge that ACM will need permissions to rewew this cert. (you may remember we already granted this permission when we setup the CA originally).
- Click the orange Request button to complete the request.
Export the Certificate
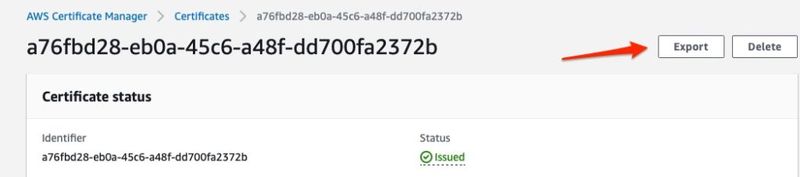
Your certificate will get created and after a few moments the certificate status should update from Pending validation to Issued in the Certificates list. Once the certificate is issued, we need to download it so we can place it on our external system. Click on the certificate in the list and from the details page click the Export button.
On the Export Certificate page you will need to add a passphrase so that the private key can be encrypted. Next, click the checkbox to acknowledge that you will be charged for exporting this certificate:
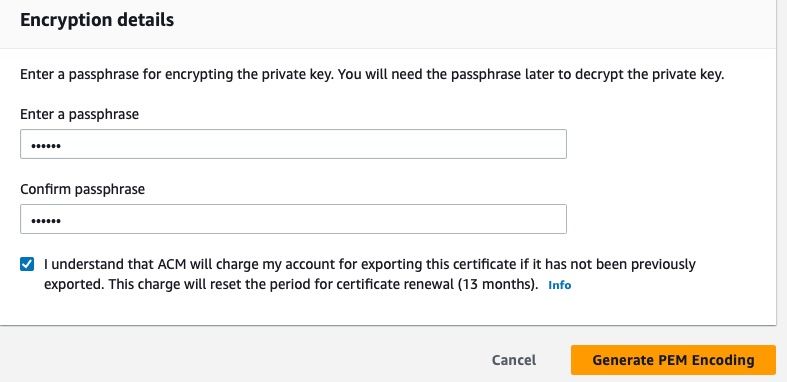
After you click Generate PEM encoding, the service will return to you three items, each with Download links:
- Certificate body
- Certificate chain
- Certificate private key
Now you will need to download each of these to your local system. You can do this by either clicking the download buttons for each item, or creating text files on your local system and copying the text into them. Place all these files in a folder on your system. After downloading the files, you will need to rename certificate.txt to certificate.pem and private_key.txt to private_key.pem.
Decrypt the Private Key
Once the files are downloaded, next we need to decrypt the private key using the passphrase we entered when we performed the export. On a Mac or Linux system we can do that easily with openssl. Here is the command to use:
openssl rsa -in private_key.pem -out decrypted_private_key.pem Openssl will run and prompt you to enter the passphrase you created, and then decrypt the key to the designated output file:
Enter pass phrase for private_key.pem:
writing RSA key
Success! We've now created a new certificate for our system in Amazon Private CA, exported it our system have it ready for use with the IAM Roles Credential Helper.
Install IAM Credentials Helper
As mentioned before the IAM Roles Credentials Helper is a downloadable tool maintained by AWS. The tool is used to create a SigV4 signature with your certificate and make a call to the Roles Anywhere endpoint to obtain session credentials. Next, the Roles Anywhere endpoint then returns the credentials to the calling process in JSON format. You can download the latest version of the tool from the IAM Roles Anywhere User Guide, where there are packages for Linux, Windows, and Darwin (MacOS). Download the helper and place it in the same directory where you placed your certificate and private key. First, you'll need to make the package executable before you can use it:
chmod +x aws_signing_helperWith this last step done, we've completed all the end to end setup work needed to use Roles Anywhere. To wrap up the article, I'm going to demonstrate how to make a CreateSession API request using the credentials helper.
Making the Connection
There are three things we will need to have in order to use the AWS IAM Roles Anywhere Credentials Helper to make a CreateSession request.
- Roles Anywhere Trust Anchor Amazon Resource Name (ARN)
- Profile ARN
- IAM Role ARN
The first two items can be obtained from the IAM Roles Anywhere management page, while the IAM Role ARN can be found by examining the details of the Role in the IAM Roles page. You will also need the filenames for your certificate and decrypted private key that we downloaded in the previous step.
Manually request and set credentials
You will combine all these items as the options for our rather long aws_signing_helper command:
./aws_signing_helper credential-process \
--trust-anchor-arn arn:aws:rolesanywhere:us-east-1:111111111111:trust-anchor/49d455a6-deec-4cfc-9c12-2c75217ea49a --profile-arn arn:aws:rolesanywhere:us-east-1:111111111111:profile/d0119c28-ecfa-4ad2-88c7-cacfd61bb268 \
--role-arn arn:aws:iam::111111111111:role/cloudyadvice-roles-anywhere-role \
--certificate certificate.pem --private-key decrypted_private_key.pem
Note I've modified the account numbers here, you should replace with the proper values from your ARNs. If all goes well, AWS will return you an Access Key ID, Secret Access Key, and Session token in JSON format, like so:
{"Version":1,"AccessKeyId":"ASIAVFPLXXXXXXXXXXXX","SecretAccessKey":"+ZCVCbiRHXwCOBZCi0JVv/XXXXXXXXXXXXX","SessionToken":"IQoJb3JpZ2luX2VjEC4aCXVzLWVhc3QtMSJGMEQCIFgE1/1OZjanZDOiMnVkxgKMXsoZVlQl3QJy2POXadb/AiAm7EqPHvXslugCqcaS6wCtquf/XIaMTg1YbJg3ywfXDCqIBAhmEAIaDDM1NTM2NDgyOTg2NCIM0BYAV8uBV1afYXAuKuUDMXS8VhT4SnBqg+S4yqtOj0TSZdbp/z4AKJeovB6u9g/5f2SA1tAG3hkByq/PEiuLFGN0kIgkWT66CPDNHS5iuPVXhiHIghaNqVDXzGXvWcxp5SPLbIIAQxfyQTmNiBhqg82VDaEUEutSh2kd8CdvTtlP39tEFE0q8poWbNCnDCwg1Wj50LaH7IQb3jYoTxHAnHEkTmtlqmoeYIM7UVc1RQ2Fox37nnMZVqaeY0tCyxyfmQn8tCEmaFRTxYWweCfxB7WIjptGwQGUchEBbISHnJulKU9Pv8lgct3HENWqyQcVKSWRZDvIAuFjpfq8cahcAVHrzM20KNMO3OxfZyXhBgSNalxO6c0pGoBDgmlH1o8yEVky2GSzYncSwyL++KPAzb/+FeNiT4aJeSyd3ns0Ewp/s30JbC8fuID6UuuuSfNa7VetSFBanSfIkjDhUnefjyYFyz2f+7k2X5HPYeAmT/zjwOGpNY7KcIJqZQHERhaMWn5Gy0RvjvAoVVAgyEwqwBff76TEwmxh6DMN4o/LRuOnflommJojT0BmVtfBD5Ykp53xZXPCQctF7ijN40Ud18w8ZIBF/6QUAdQe1Lp32kIH9HPq3Lg4YlvJzdsMX6BXemDWHCFLCE1BfFQXXBRRs0p8Ci8wgueaqgY6lAHD/crexcd3uBsB87czp6kyYV8iH4BMPPpxbIs3fAgjOkJMta2pROF72YKR9FRF9ixciFkBCpnACjWGSDSuwx/+elwoDJ3zlCOad7SYX0J8CBxAKKAQ564MOiYrB9wdf3N2sQd+dKJkmPSZxEN1sWnMnD/D+HrWB7A0ULsW3phER50gisns8G/KsE4q4gtz1QOrOIP6","Expiration":"2023-11-04T22:11:30Z"}% As you can see, Roles Anywhere has sent you back a send of temporary credentials in the form of an Access Key ID, a Secret Access Key, and a Session Token. You can simply use these values returned here to set as temporary environment variables for your AWS credentials, and then issue calls to AWS using those environment variables. For example:
export AWS_ACCESS_KEY_ID=access-key-id-value
export AWS_SECRET_ACCESS_KEY=secret-access-key-value
export AWS_SESSION_TOKEN=session-token-value
Once that is done you can issue AWS CLI commands, e.g. get a list of S3 buckets:
aws s3api list-bucketsWhich should return you a list of S3 buckets in JSON format.
Leverage Roles Anywhere in AWS CLI Config
Manually requesting credentials is a great way to test, but rather laborious to do on a regular basis. Fortunately you can leverage the aws_signing_helper as a custom credential_process for the AWS CLI. To do this, you simply need to add it as a new profile entry in your AWS CLI credentials file to invoke it. First, copy the certificate files and the aws_signing_helper executable to the same directory where your AWS CLI is located, typically ~./aws. Next, you add a new profile to your ~/.aws/config file that leverages IAM Roles Anywhere. The profile entry should look something like this:
[profile rolesanywhere]
credential_process = /users/cloudyadvice/.aws/aws_signing_helper credential-process --trust-anchor-arn arn:aws:rolesanywhere:us-east-1:111111111111:trust-anchor/49d455a6-deec-4cfc-9c12-2c75217ea49a --profile-arn arn:aws:rolesanywhere:us-east-1:111111111111:profile/d0119c28-ecfa-4ad2-88c7-cacfd61bb268 \
--role-arn arn:aws:iam::111111111111:role/cloudyadvice-roles-anywhere-role \
--certificate certificate.pem --private-key decrypted_private_key.pem
Obviously, you would need to replace the dummy values shown here with the proper values from your own environment. Once you've added this new profile to your ~/.aws/config file, you can call it for use with any AWS CLI command with the --profile flag, for example:
aws s3 ls --profile rolesanywhereNow AWS CLI will leverage Roles Anywhere to mint dynamic temporary credentials when you execute commands using this profile switch. Totally awesome!!
Closing Thoughts
I was so excited when IAM Roles Anywhere was announced because it solves a real world problem I often have to deal with in my day job. As a result I was glad to finally got around to testing it out and writing up this blog post.
Obviously, this was a fairly long blog post covering a pretty complicated setup. AWS IAM by itself is a very complicated service. Then when you add public key infrastructure into the mix, things get even more complicated. To help with this complexity, I've done my best here to walk through the steps in an easy to follow fashion so you can start experimenting with this powerful service.
I hope that you will see the benefit of this great service and use it to make your own AWS environments more secure. Are you already using IAM Roles Anywhere in your environment? Share your experiences and thoughts in the comments!
References
AWS Security Blog - IAM Roles Anywhere Launch Post
AWS Security Blog - IAM Roles Anywhere with an external certificate authority
AWS Security Blog - Enable external pipeline deployments to AWS Cloud by using IAM Roles Anywhere
AWS IAM Roles Anywhere User Guide
YouTube - AWS re:Inforce 2023 Managing hybrid workloads with IAM Roles Anywhere, featuring Hertz

Top comments (3)
Wow, @cloudyadvice! This is such an awesome resource for people getting started with this new IAM anywhere option. Thank you for spending the time to document and share it!
Exposed IAM keys can be a big security risk, but IAM Roles Anywhere is a smart way to fix it. Excited to read how to set it up and keep accounts safer.
Free Fire Advanced enhances gameplay with improved graphics, exclusive skins, and powerful weapons. It offers faster matchmaking, new maps, and strategic modes, delivering a more competitive and thrilling battle royale experience. Visit Now: apk