GitHub is a great version control platform, which helps you store your code for later use or collaborative needs.
If you find yourself needing to delete a repository, whether it's to declutter your profile or start fresh, this guide will walk you through the simple steps to permanently remove a repository on GitHub.
💡 If you'd prefer to follow a video tutorial you can do by clicking on the video below.
Step 1: Navigate to Your Repository
To get started, log in to your GitHub account and navigate to the repository you want to delete. Once you're on the repository's main page, look for the "Settings" tab on the right side of the menu bar. Click on it to access the repository settings.

Step 2: Scroll Down to the Danger Zone
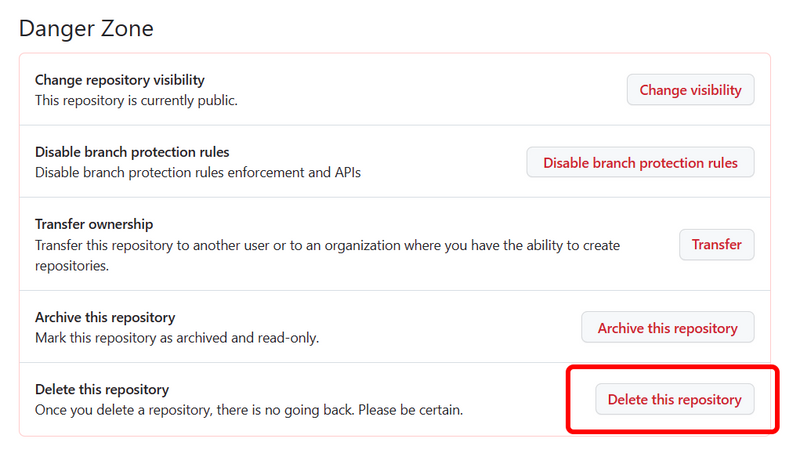
Within the Settings page, scroll down until you find the "Danger Zone" section. GitHub intentionally labels this section to emphasize the irreversible actions you are about to take. In the Danger Zone, locate the "Delete this repository" option.
Step 3: Confirm Repository Deletion
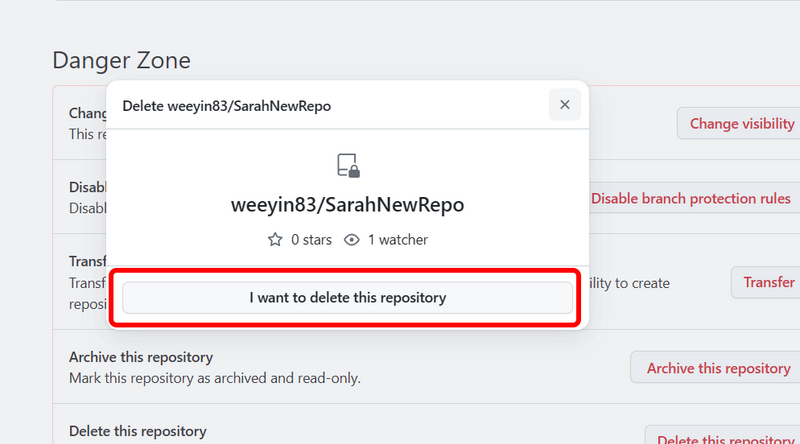
Before proceeding, GitHub requires you to confirm your intention to delete the repository. Click on the “I want to delete this repository” button.
Step 4: Double-check
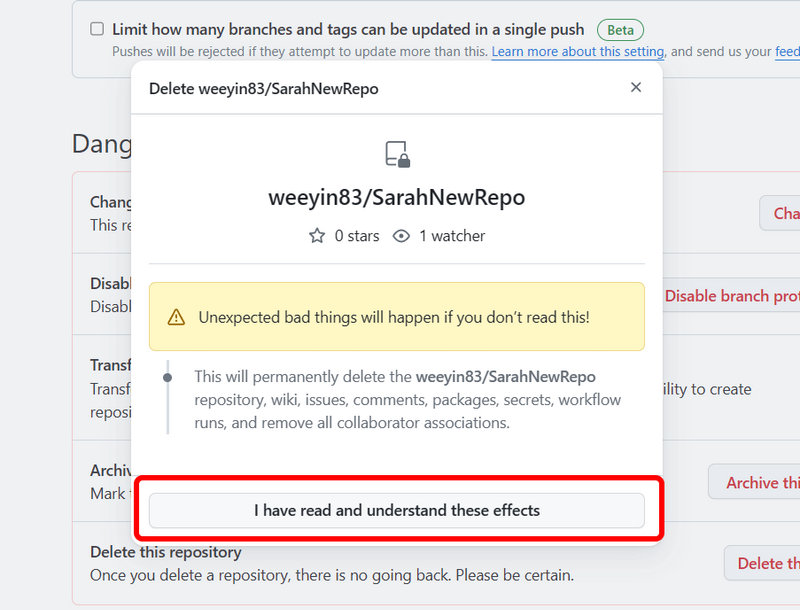
GitHub will prompt you to double-check if you want to delete this repository, it will remind you that deleting the repository removes all code, wiki, issues, comments, packages, secrets, workflow runs and collaborator associates.
If you wish to proceed click on the “I have read and understand these effects” button.
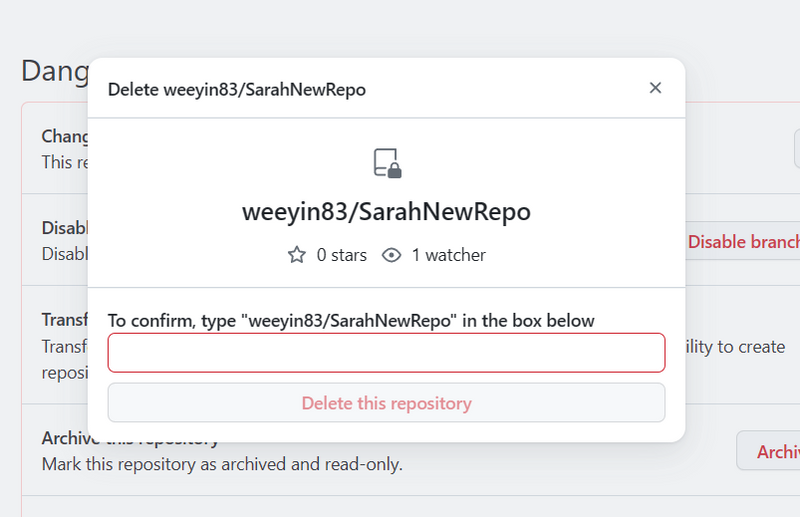
Step 5: Confirm the name of the repository
To finalize the deletion process, GitHub requires you to enter the name of the respiratory manually. This is an added security measure to prevent unauthorized deletions. After entering your repository name, click on the "Delete this repository" button.
Step 6: Repository Deleted Confirmation
Congratulations! You've successfully deleted your GitHub repository. GitHub will provide a confirmation message to let you know that the repository has been deleted. Additionally, you'll be redirected to your account's main page.
Step 7: Update Local Repositories (Optional)
If you have a local clone of the repository on your computer, you may want to update it to reflect the changes on the remote GitHub server. Use the following Git command in your terminal or command prompt:
git remote update --prune
This ensures that your local repository is synchronized with the changes made on GitHub.
Conclusion
Deleting a repository on GitHub is a straightforward process, but it's crucial to approach it with caution due to its irreversible nature. Always double-check for any dependencies and ensure you've backed up essential data before proceeding. With this step-by-step guide, you can confidently manage and declutter your GitHub profile by removing repositories that are no longer needed.

Top comments (17)
Really helpful tutorial! I appreciate how you've broken down each step so clearly - it makes the whole process much less intimidating. The detailed instructions are exactly what I needed. Thanks for making this so accessible and easy to follow! AI Image Editor
Can you share more about how to restore the repository if you accidentally delete it? Or is there a way to “archive” it temporarily instead of deleting it permanently? I think this is also a problem that many people are concerned about when they are not ready to delete it completely.
Among Us Online
This is a super helpful guide! I admit I was a bit scared to delete repos on Github, but with these clear instructions, I feel more confident in cleaning things up. Thanks a lot! Try TinyFun btw! btw!
Thanks for the guide! Super helpful for cleaning up old projects. Speaking of creating new content, have you ever tried using an AI Create video generator. It's amazing how quickly you can generate short videos now, perfect for quick tutorials or promos!
Deleting a repository removes data that is no longer needed, saving storage space on your GitHub account, especially if the repository contains many large files. Slither
The soy fea test is a popular AI face analysis trend where users upload a photo to get a fun evaluation of facial features, symmetry, and overall appearance 😊
Great step-by-step guide! Very clear instructions, making it easy for anyone to safely delete a GitHub repository. Thanks for sharing this helpful resource! Supermaker
Because of the way you arranged your ideas, your insights are clear and understandable. Play skribbl io game.
If you love quick action and real-time competition, IO games are perfect for you.
Convenience of downloadable basant club APK 2026 download apps Engaging and fast-paced gameplay