This article is part 2 of a series of articles focused on building a company's infrastructure on AWS using Terraform. You can read up Part 1 where we introduced the topic, basic setup, wrote terraform code which creates our VPC and public subnets. By the end of this article, we would understand and write codes that would create the following resources:
- Private Subnets
- Tags
- Internet Gateway and NAT Gateway
- EIP and Routes Tables
- Security groups
- Certificate from amazon certificate manager
- Autoscaling groups
- Storage and database
Code from Darey.io
Networking
Private subnets & best practices
Create 4 private subnets, keep in mind following principles:
- Make sure you use variables or length() function to determine the number of AZs
- Use variables and cidrsubnet() function to allocate vpc_cidr for subnets
- Keep variables and resources in separate files for better code structure and readability
main.tf private subnets code block:
# Create private subnets
resource "aws_subnet" "private" {
  count = var.preferred_number_of_public_subnets == null ? length(data.aws_availability_zones.available.names) : var.preferred_number_of_public_subnets
  vpc_id                     = aws_vpc.main.id
  <!-- cidr_block                 = cidrsubnet(var.vpc_cidr, 4 , count.index) -->
  cidr_block                 = var.public_subnets[count.index]
  map_public_ip_on_launch    = true
  availability_zone          = data.aws_availability_zones.available.names[count.index]
}
variables.tf private subnets variable:
variable "preferred_number_of_private_subnets" {
  default = null
}
terraform.tfvars private subnets variable:
preferred_number_of_private_subnets = 4
- Tag all the resources you have created so far. Explore how to use format() and count functions to automatically tag subnets with its respective number.
TAGS
- In
terraform.tfvarsfile, add the following:
tags = {
  Enviroment = "production"
  Owner-Email = "owner@mail.com"
  Managed-By = "Terraform"
}
- In
variables.tffile, add the following:
variable "tags" {
  description = "A mapping of tags to assign to all resources."
  type        = map(string)
  default     = {}
}
- Now we can tag our resources with the tags we have defined in the
variables.tffile like this:
tags = merge(
    var.tags,
    {
      Name = "Name of the resource"
    },
  )
Benefits of tagging with this approach: we only need to change the tags in one place (terraform.tfvars) and we can easily see what resources are tagged with what tags.
Internet Gateways & format() function
Create an Internet Gateway in a separate Terraform file internet_gateway.tf
resource "aws_internet_gateway" "ig" {
  vpc_id = aws_vpc.main.id

  tags = merge(
    var.tags,
    {
      Name = format("%s-%s!", aws_vpc.main.id,"IG")
    }
  )
}
We used format to dynamically generate the name of the resource by using format() function.
The first part of the %s takes the interpolated value of aws_vpc.main.id while the second %sappends a literal string IG and finally an exclamation mark is added in the end.
NAT Gateways
Create 1 NAT Gateways and 1 Elastic IP (EIP) addresses
- create a new file called
natgateway.tf.
Note: We need to create an Elastic IP for the NAT Gateway, and you can see the use of depends_on to indicate that the Internet Gateway resource must be available before this should be created. Although Terraform does a good job to manage dependencies, but in some cases, it is good to be explicit
resource "aws_eip" "nat_eip" {
  vpc        = true
  depends_on = [aws_internet_gateway.ig]

  tags = merge(
    var.tags,
    {
      Name = format("%s-EIP", var.name)
    },
  )
}

resource "aws_nat_gateway" "nat" {
  allocation_id = aws_eip.nat_eip.id
  subnet_id     = element(aws_subnet.public.*.id, 0)
  depends_on    = [aws_internet_gateway.ig]

  tags = merge(
    var.tags,
    {
      Name = format("%s-Nat", var.name)
    },
  )
}
We used the element() function to select the first element of the array of subnets.
element(list, index)
element(aws_subnet.public.*.id, 0)
Fetches the first element of the array of subnets.
AWS ROUTES
Create a file called route_tables.tf and use it to create routes for both public and private subnets.
Now we Create a route table for the public subnets and a route table for the private subnets.
- aws_route_table
- aws_route
- aws_route_table_association
# create private route table
resource "aws_route_table" "private-rtb" {
  vpc_id = aws_vpc.main.id

  tags = merge(
    var.tags,
    {
      Name = format("%s-Private-Route-Table", var.name)
    },
  )
}

# associate all private subnets to the private route table
resource "aws_route_table_association" "private-subnets-assoc" {
  count          = length(aws_subnet.private[*].id)
  subnet_id      = element(aws_subnet.private[*].id, count.index)
  route_table_id = aws_route_table.private-rtb.id
}

# create route table for the public subnets
resource "aws_route_table" "public-rtb" {
  vpc_id = aws_vpc.main.id

  tags = merge(
    var.tags,
    {
      Name = format("%s-Public-Route-Table", var.name)
    },
  )
}

# create route for the public route table and attach the internet gateway
resource "aws_route" "public-rtb-route" {
  route_table_id         = aws_route_table.public-rtb.id
  destination_cidr_block = "0.0.0.0/0"
  gateway_id             = aws_internet_gateway.ig.id
}

# associate all public subnets to the public route table
resource "aws_route_table_association" "public-subnets-assoc" {
  count          = length(aws_subnet.public[*].id)
  subnet_id      = element(aws_subnet.public[*].id, count.index)
  route_table_id = aws_route_table.public-rtb.id
}
AWS Identity and Access Management
IAM and Roles
We want to pass an IAM role our EC2 instances to give them access to some specific resources, so we need to do the following:
- Create AssumeRole
Assume Role uses Security Token Service (STS) API that returns a set of temporary security credentials that you can use to access AWS resources that you might not normally have access to. These temporary credentials consist of an access key ID, a secret access key, and a security token. Typically, you use AssumeRole within your account or for cross-account access.
Add the following code to a new file named roles.tf
resource "aws_iam_role" "ec2_instance_role" {
name = "ec2_instance_role"
  assume_role_policy = jsonencode({
    Version = "2012-10-17"
    Statement = [
      {
        Action = "sts:AssumeRole"
        Effect = "Allow"
        Sid    = ""
        Principal = {
          Service = "ec2.amazonaws.com"
        }
      },
    ]
  })

  tags = merge(
    var.tags,
    {
      Name = "aws assume role"
    },
  )
}
we are creating AssumeRole with AssumeRole policy. It grants to an entity, in our case it is an EC2, permissions to assume the role.
- Create IAM policy for this role
resource "aws_iam_policy" "policy" {
  name        = "ec2_instance_policy"
  description = "A test policy"
  policy = jsonencode({
    Version = "2012-10-17"
    Statement = [
      {
        Action = [
          "ec2:Describe*",
        ]
        Effect   = "Allow"
        Resource = "*"
      },
    ]

  })

  tags = merge(
    var.tags,
    {
      Name =  "aws assume policy"
    },
  )

}
- Attach the Policy to the IAM Role
we will be attaching the policy which we created above, to the role we created in the first step.
resource "aws_iam_role_policy_attachment" "test-attach" {
    role       = aws_iam_role.ec2_instance_role.name
    policy_arn = aws_iam_policy.policy.arn
}
- Create an Instance Profile and interpolate the IAM Role
resource "aws_iam_instance_profile" "ip" {
    name = "aws_instance_profile_test"
    role =  aws_iam_role.ec2_instance_role.name
}
CREATE SECURITY GROUPS
We are going to create all the security groups in a single file, then we are going to reference this security group within each resources that needs it.
I've taken a codesnap of the block of code for this resource as it's quite lengthy, this would be done for any lenghty code for the remainder of this series. I would leave a link to my repo at the end of this article should you need to look through.
- Create a file called
security.tf - Add the following code to the file.
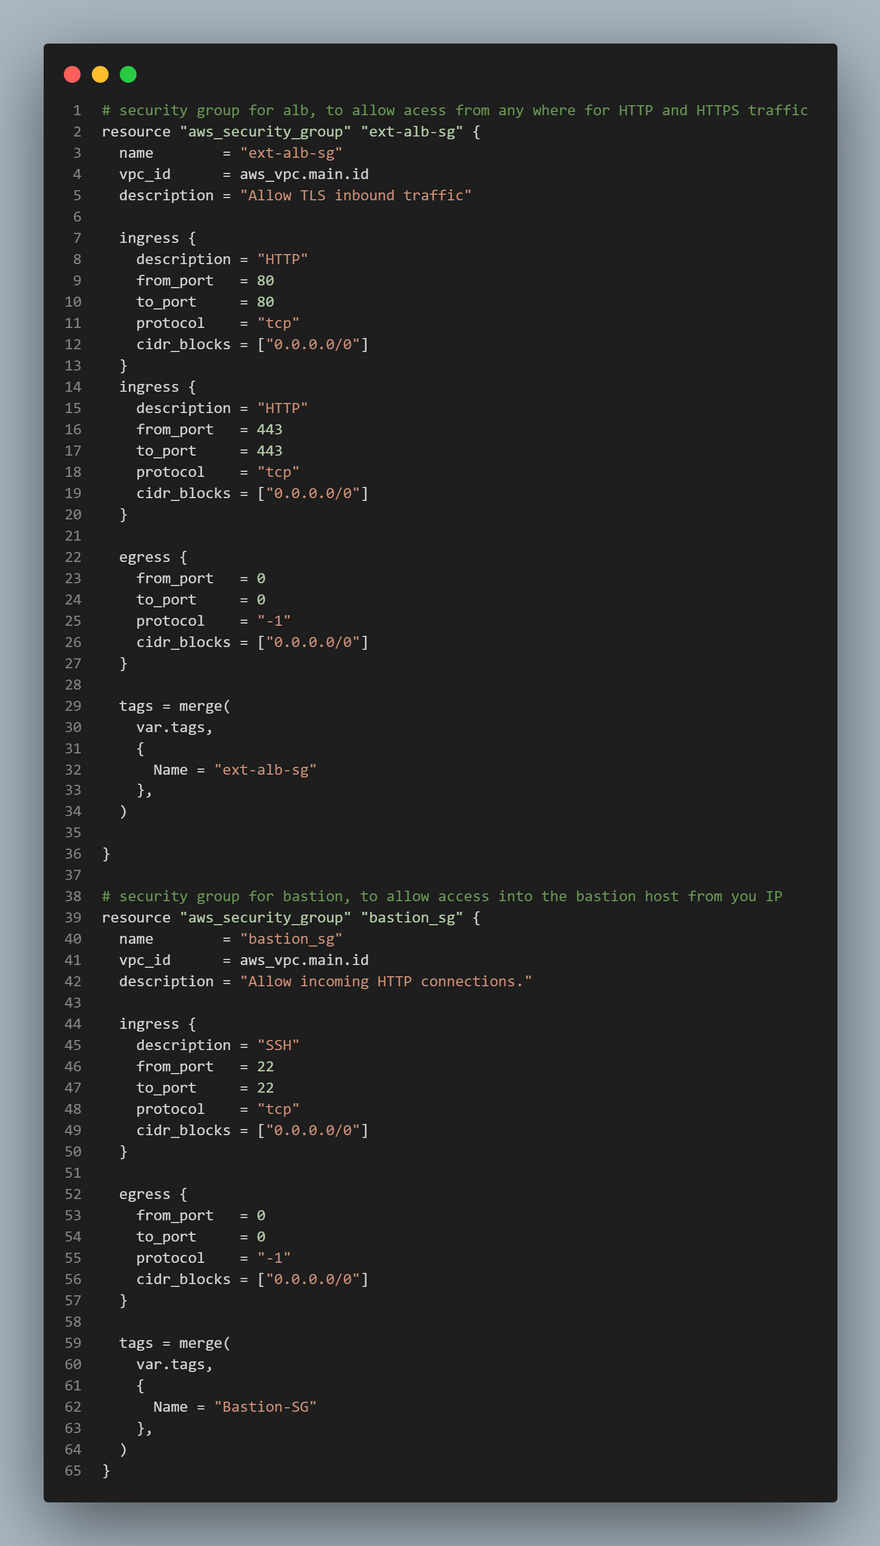
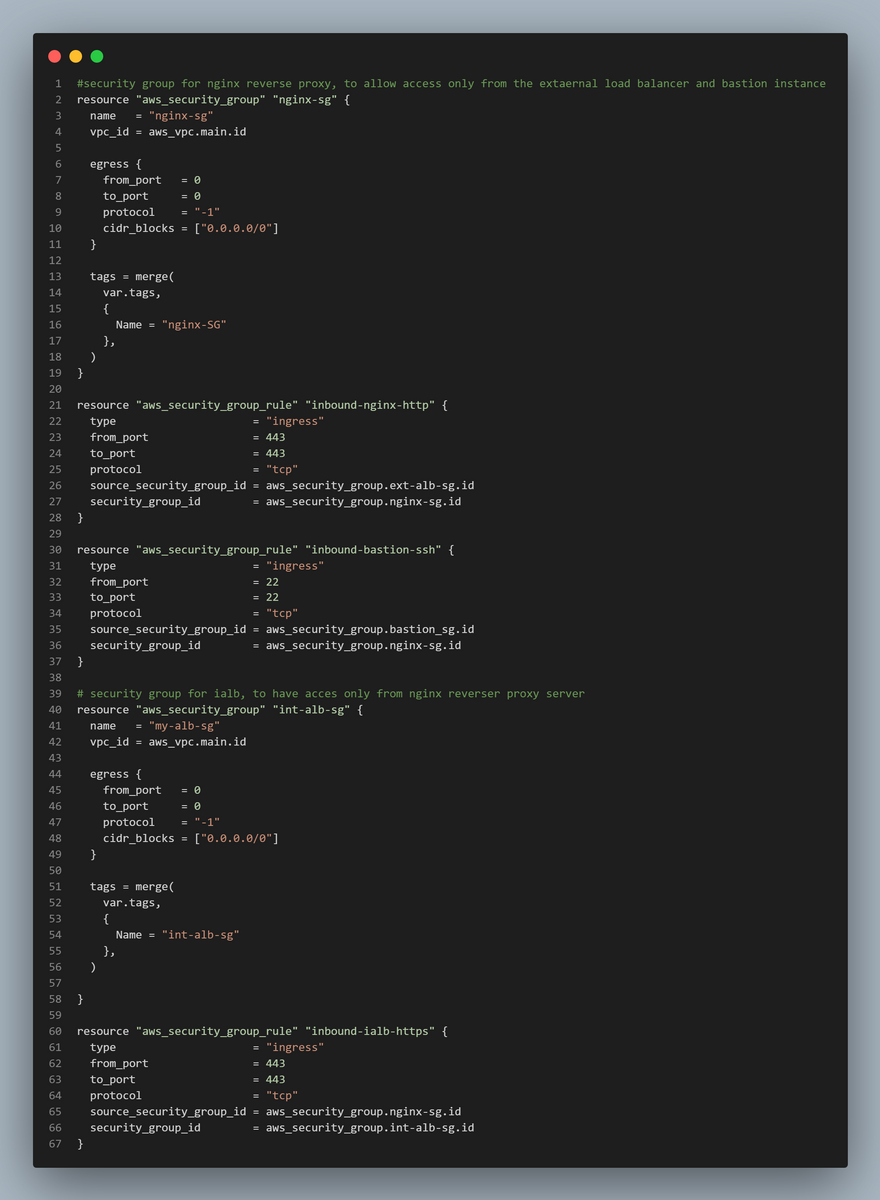
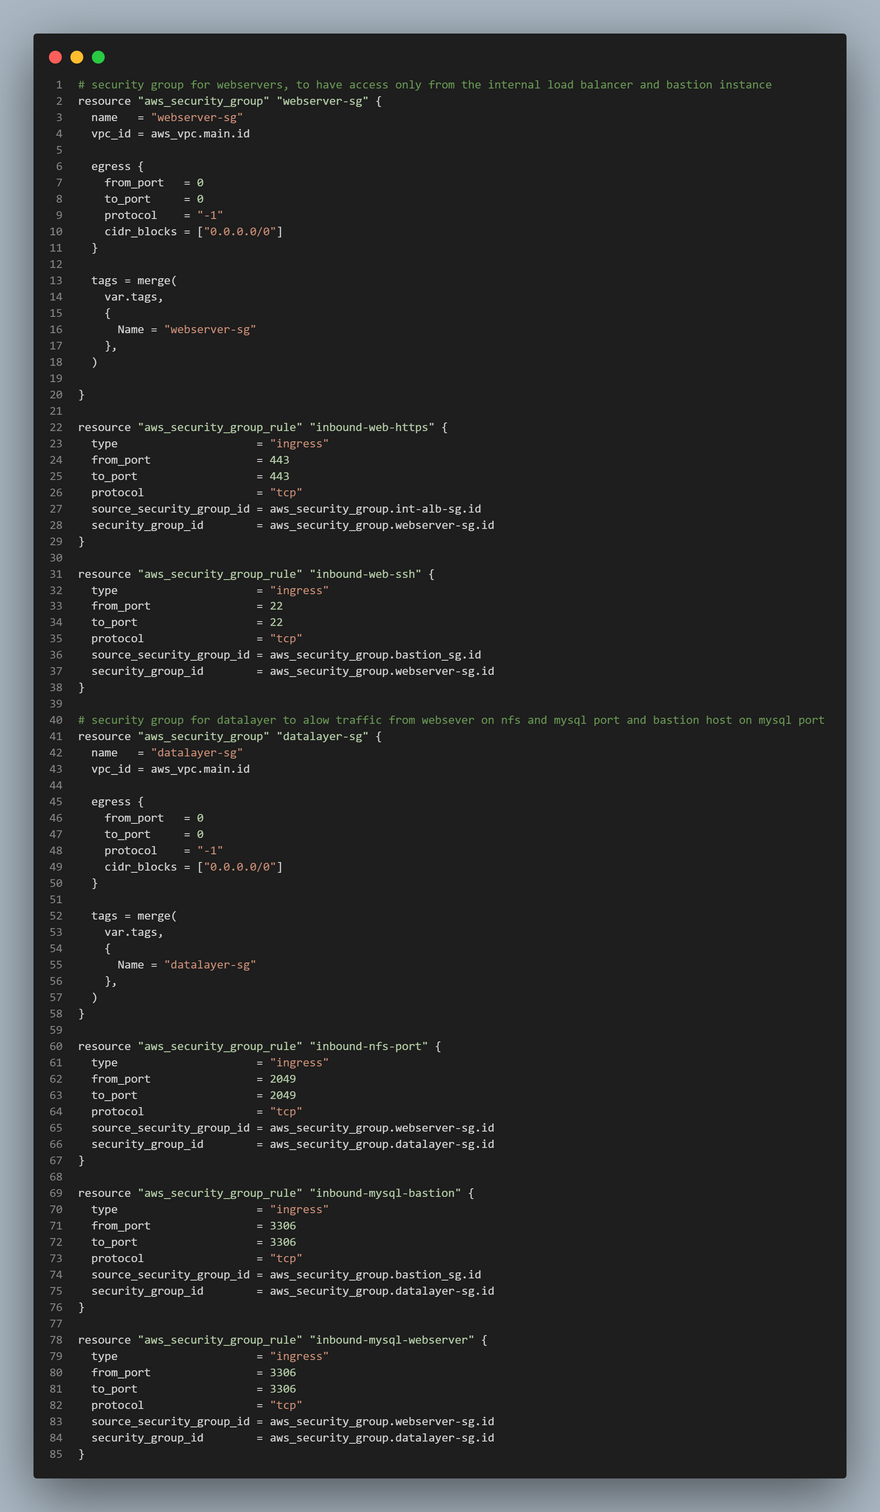
NOTE: We used the aws_security_group_rule to reference another security group in a security group.
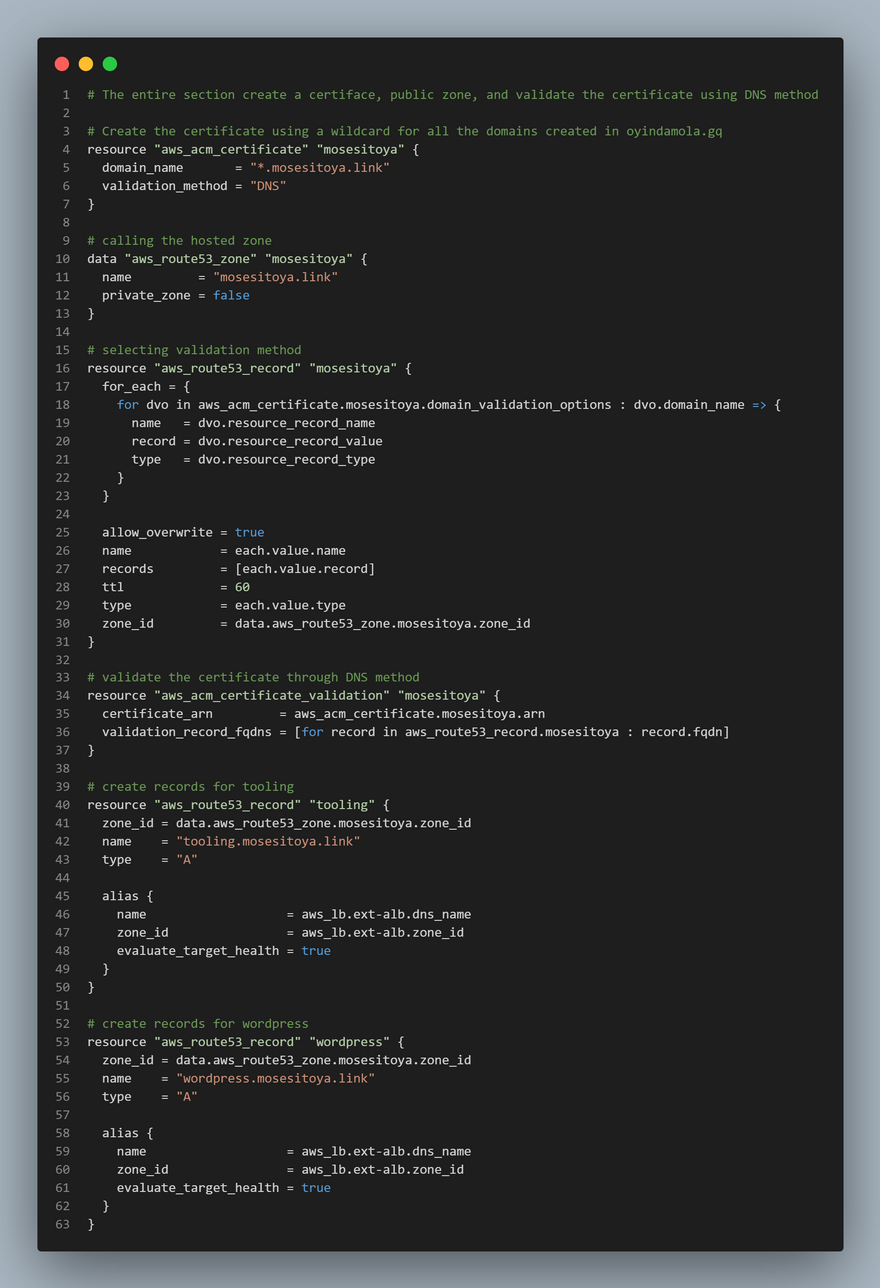
CREATE CERTIFICATE FROM AMAZON CERIFICATE MANAGER
- Create
cert.tffile
Create an external (Internet facing) Application Load Balancer (ALB)
- Create a file called
alb.tf
First of all we will create the ALB, then we create the target group and lastly we will create the listener rule.

Create an Internal (Internal) Application Load Balancer (ALB)
This follows the same set up as external ALB
- Add the following Code to
alb.tf

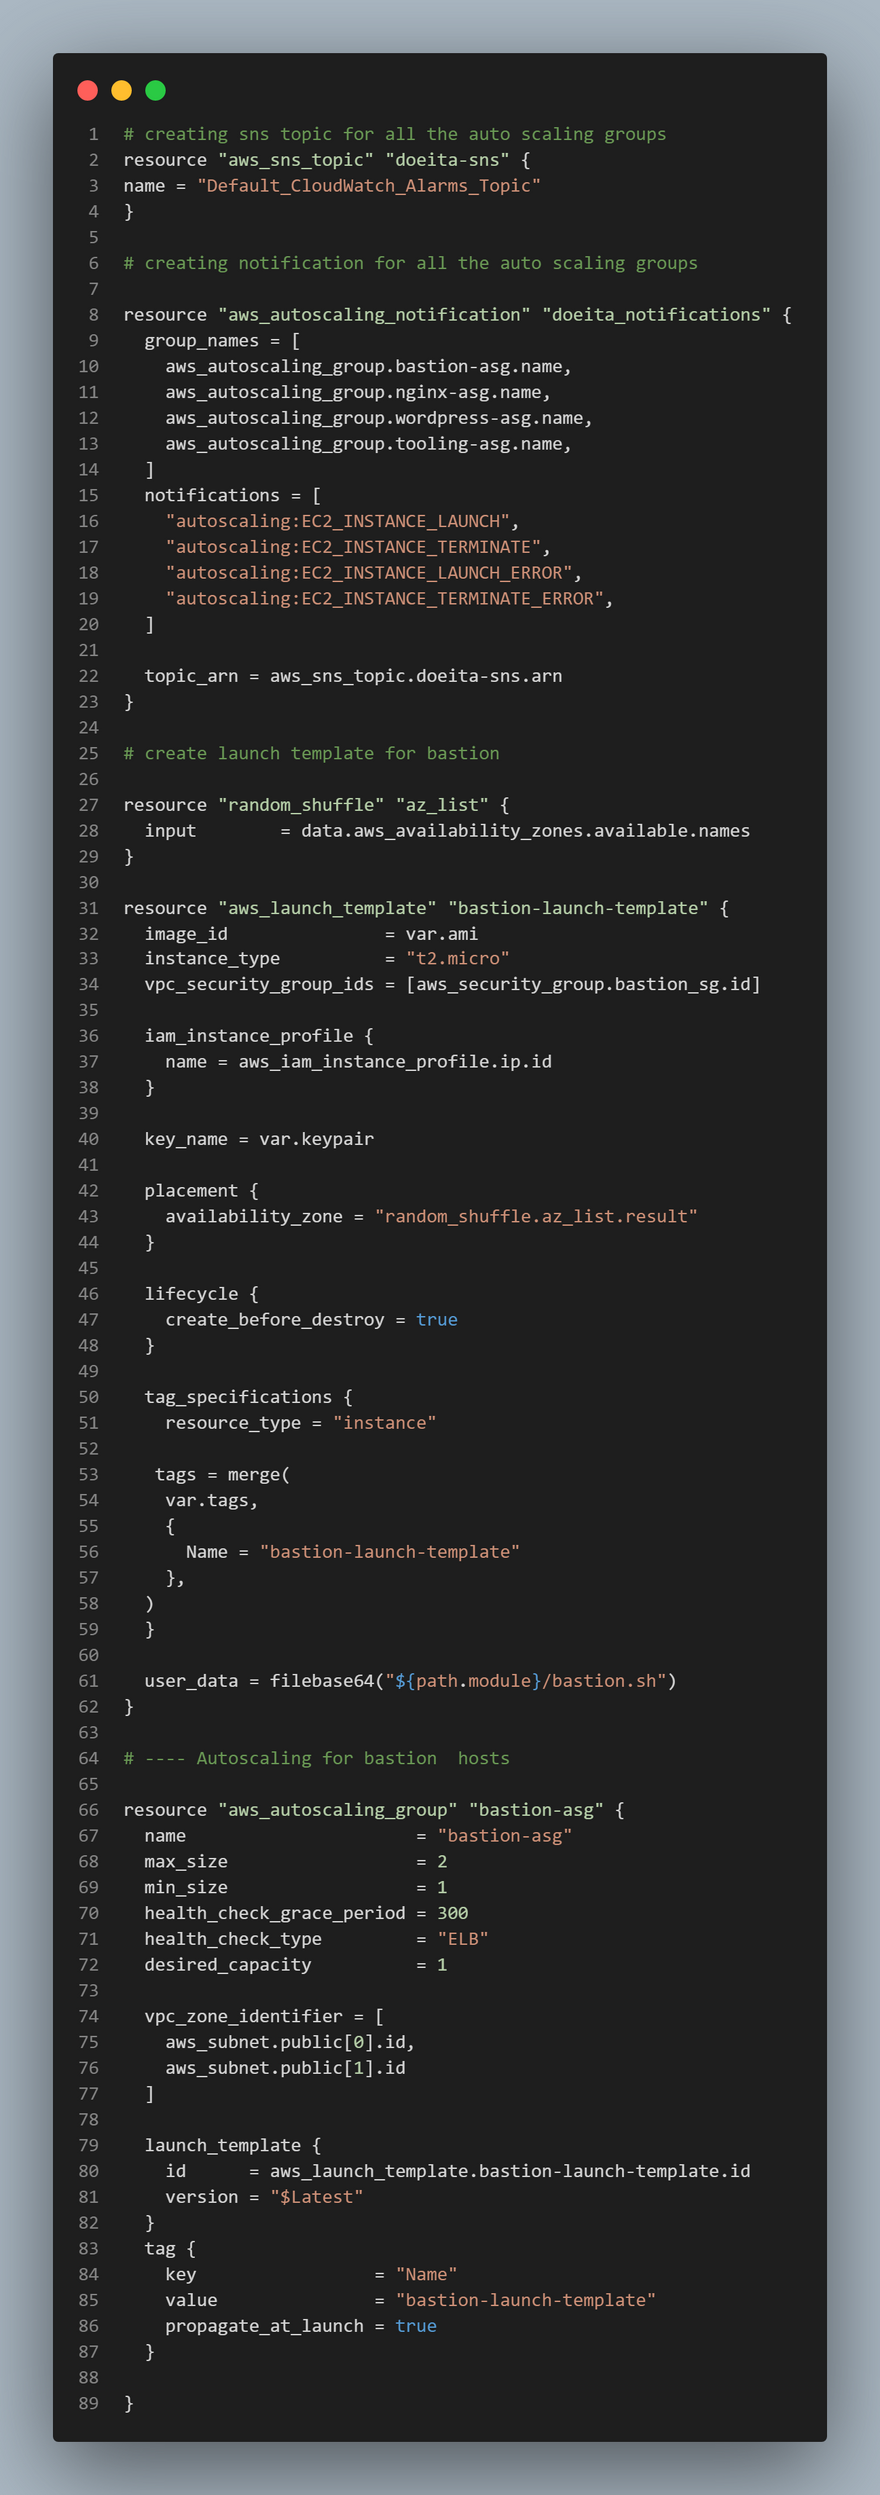
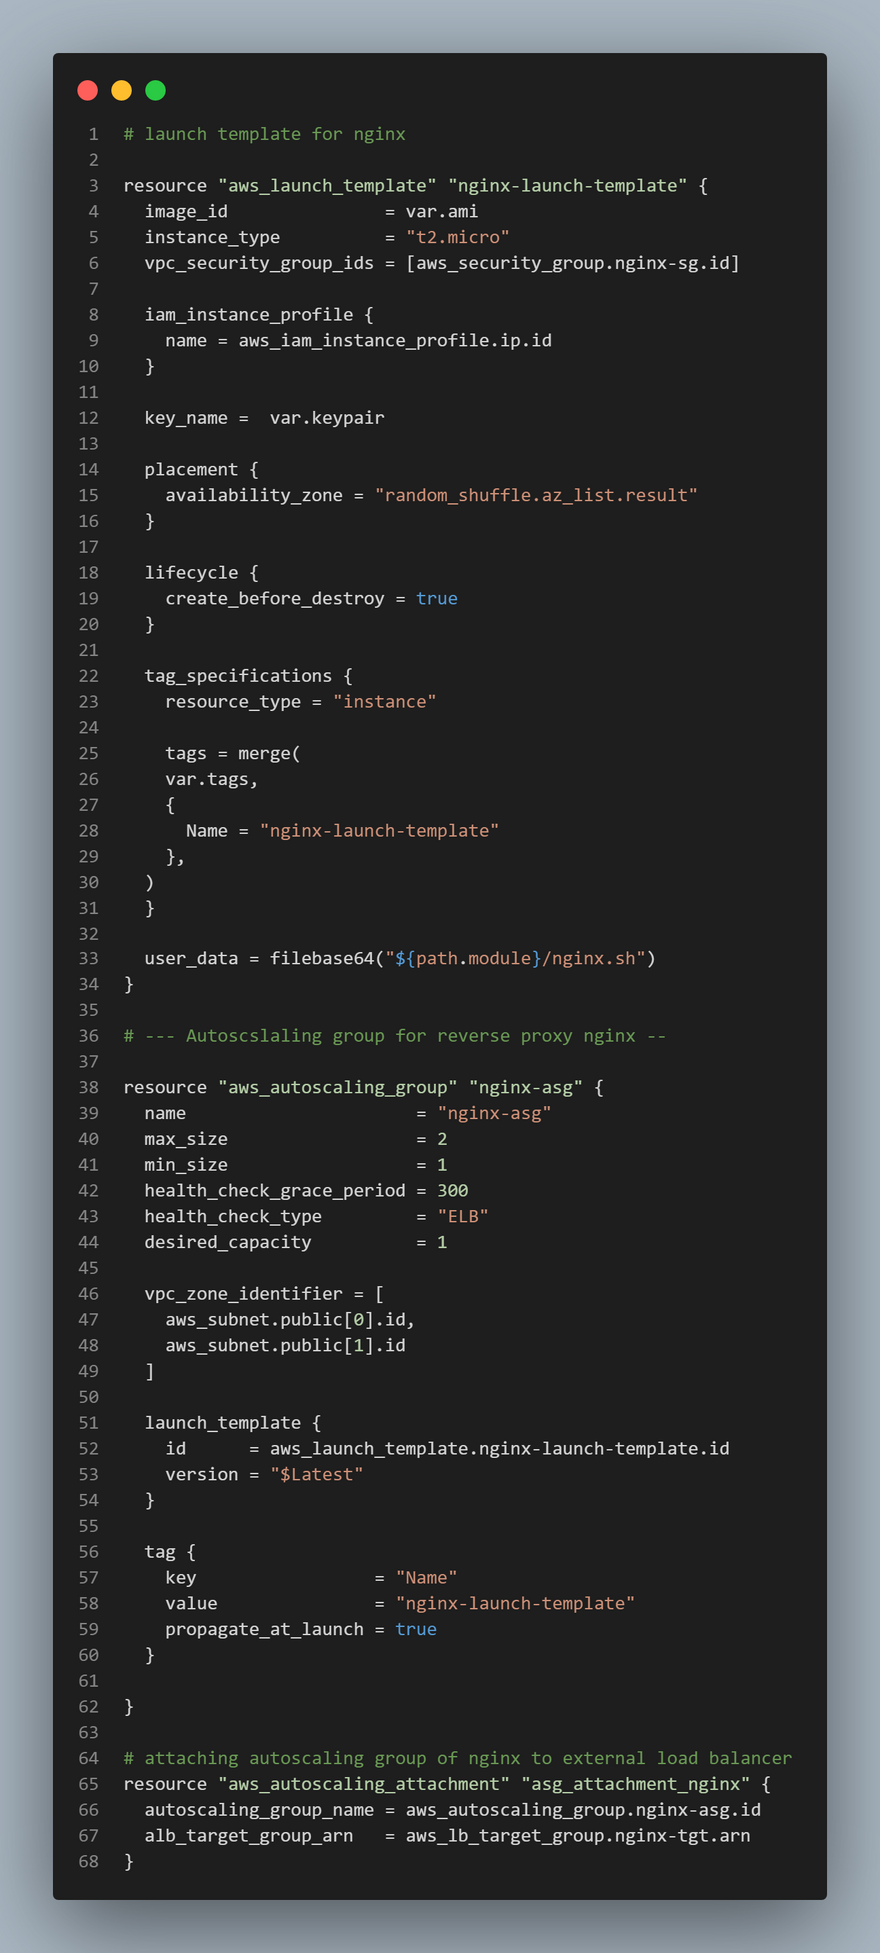
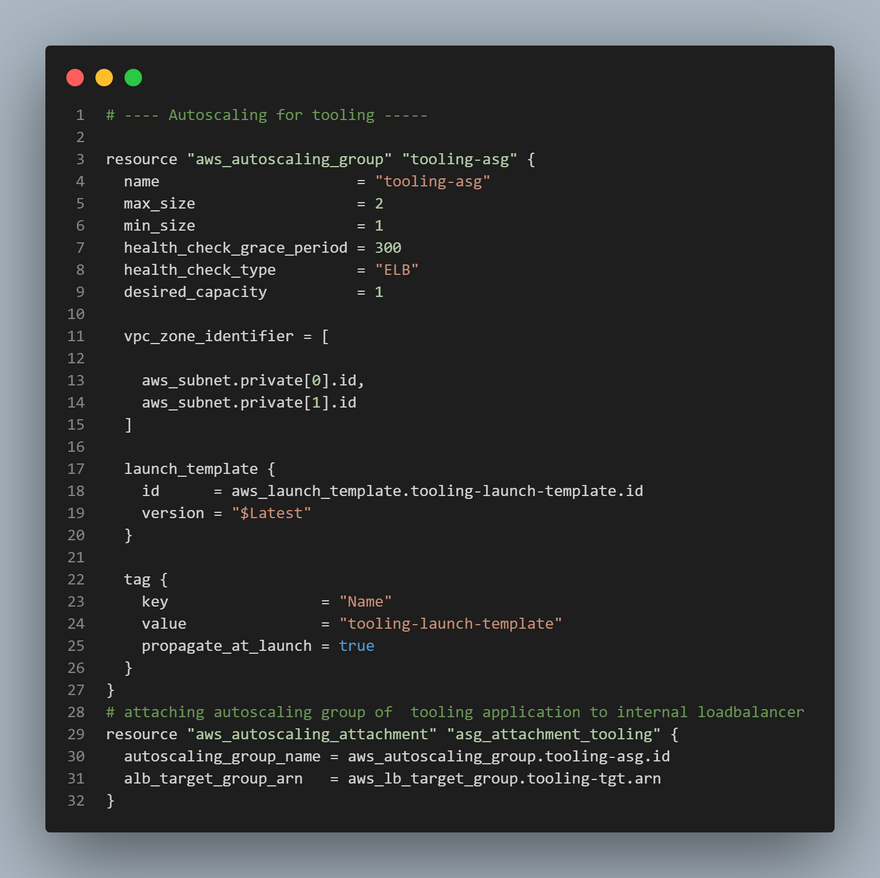
CREATING AUSTOALING GROUPS
We need to configure our ASG to be able to scale the EC2s out and in depending on the application traffic.
we need to create the launch template and the the AMI before creating the ASG. For now we will use a random AMI from AWS.
Based on our Architetecture we need for Auto Scaling Groups for bastion, nginx, wordpress and tooling, so we will create two files; asg-bastion-nginx.tf will contain Launch Template and Autoscaling group for Bastion and Nginx, then asg-wordpress-tooling.tf will contain Launch Template and Autoscaling group for wordpress and tooling
- Create
asg-bastion-nginx.tfand add the following
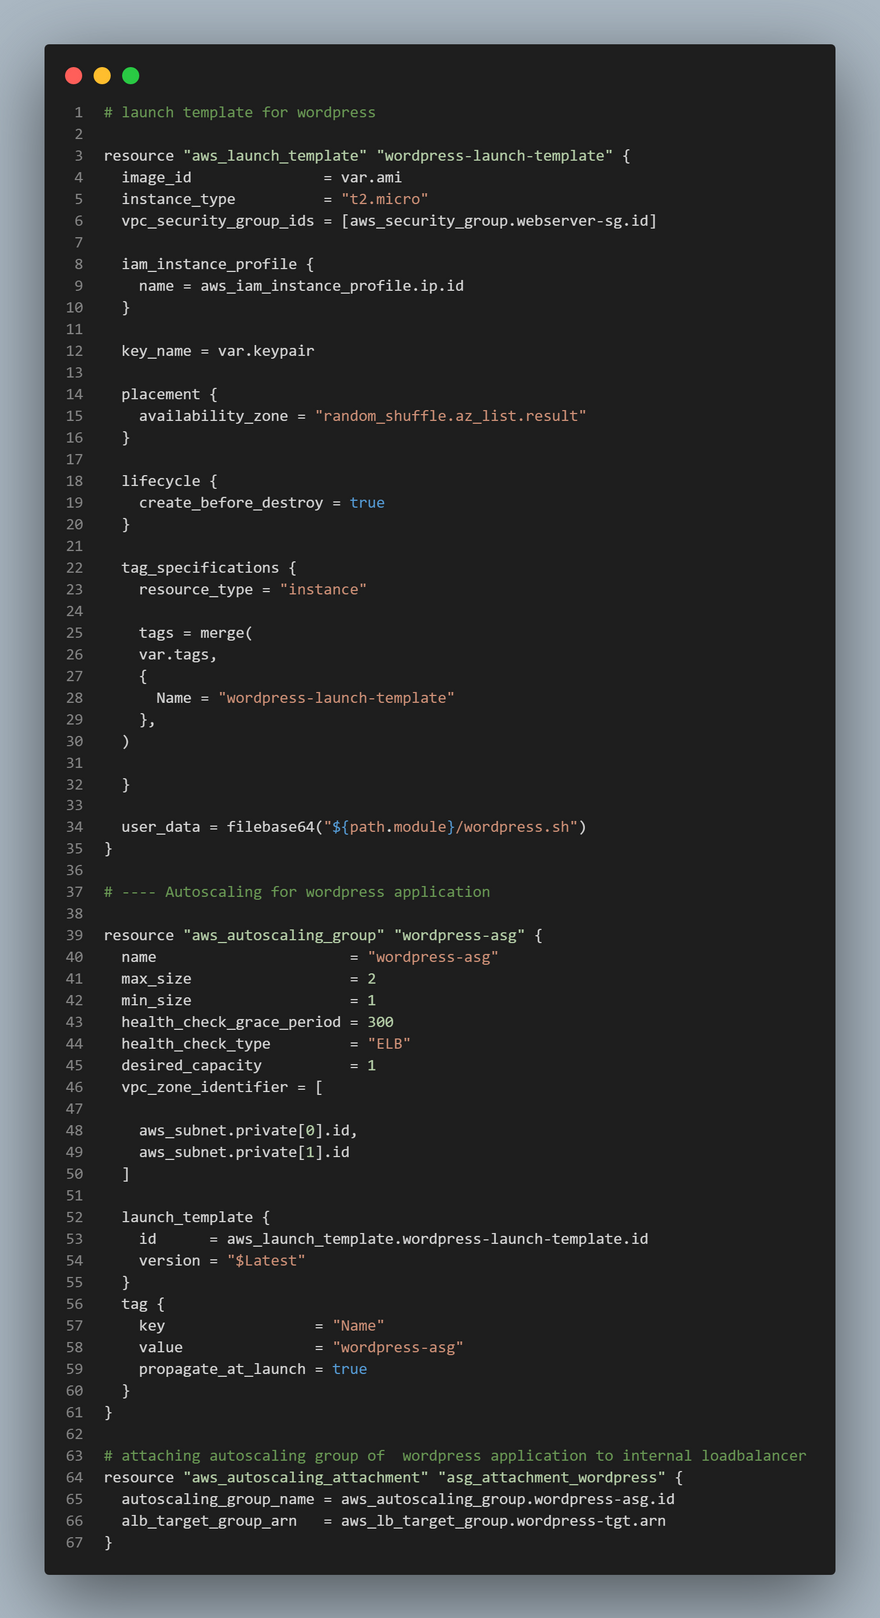
- Create
asg-wordpress-tooling.tfand paste the following code
STORAGE AND DATABASE
We will be creating RDS, EFS and KMS for the resources. Here
Create Elastic File System (EFS).
Create a
efs.tffile: In order to create an EFS you need to create a KMS key.Add the following code to
efs.tf

Create RDS instance
- Create a
rds.tffile and add the following code to it.

- Update
variable.tfto include the variables we've used so far. The file should look like this:
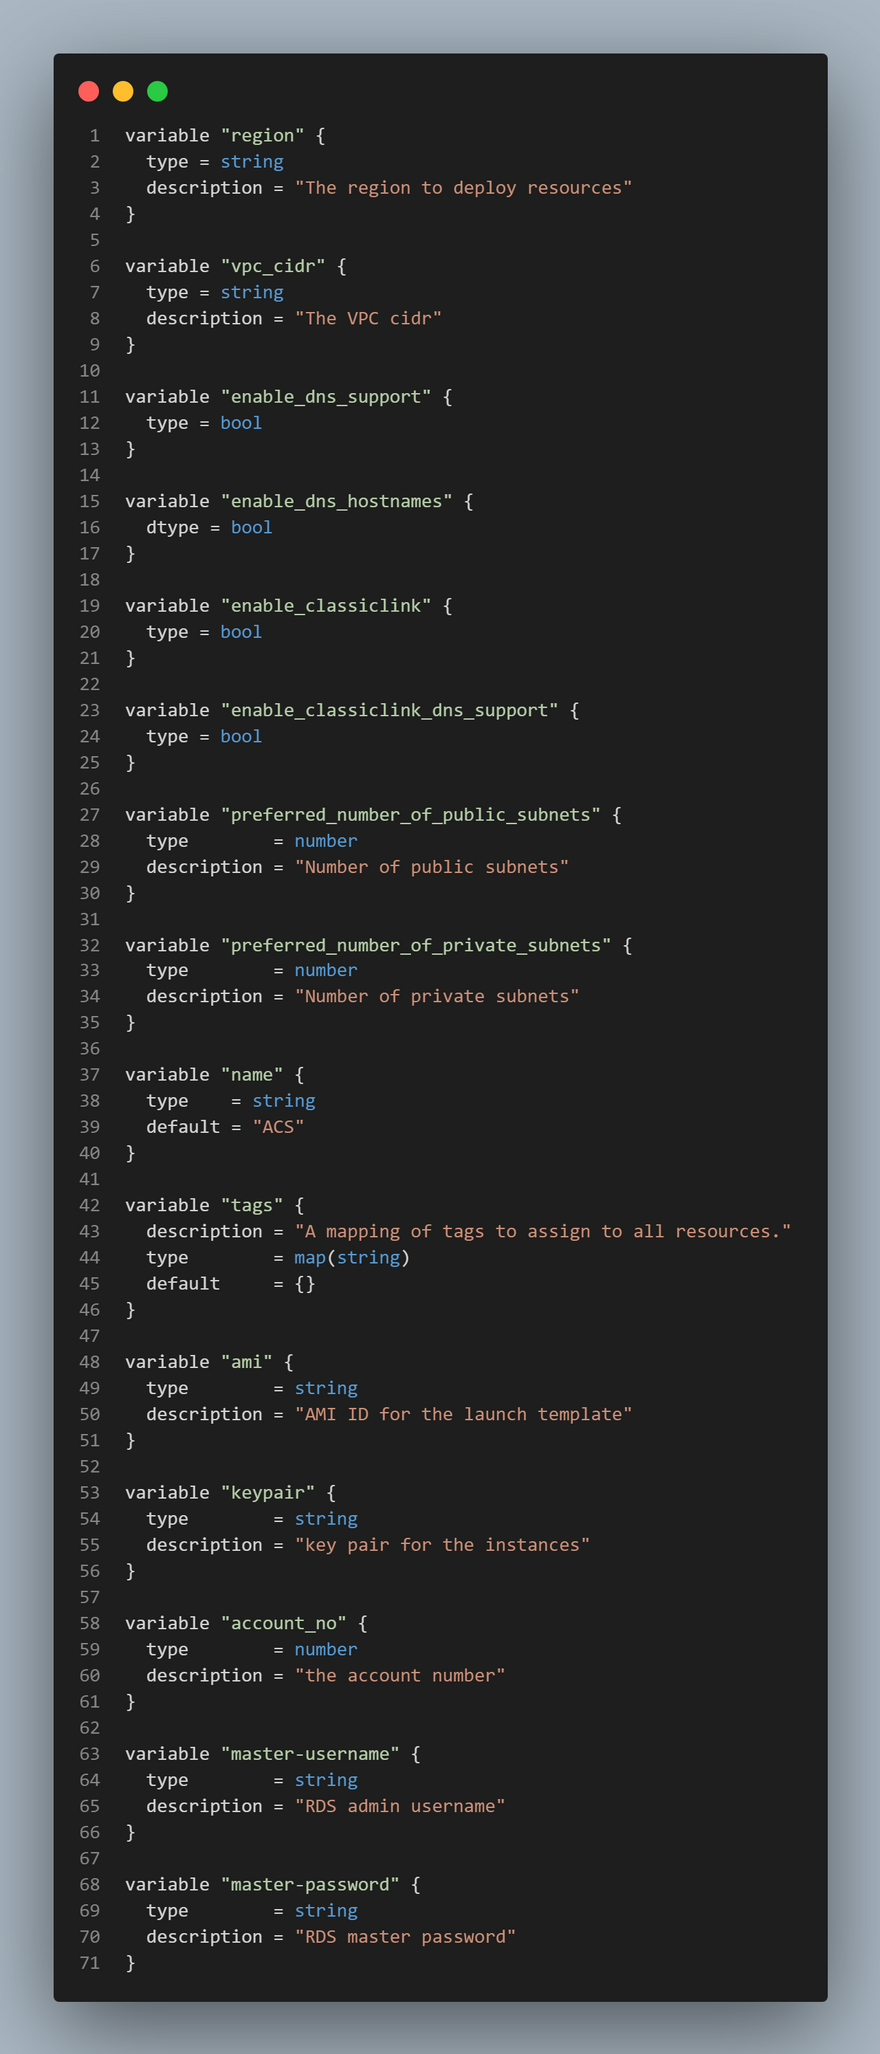
- Update
terraform.tfvarsto include the variables we've used so far. The file should look like this:
region = "us-east-1"

vpc_cidr = "172.16.0.0/16"

enable_dns_support = "true"

enable_dns_hostnames = "true"

enable_classiclink = "false"

enable_classiclink_dns_support = "false"

preferred_number_of_public_subnets = 2

preferred_number_of_private_subnets = 4

environment = "production"

ami = "ami-0b0af3577fe5e3532"

keypair = "terraform"

# Ensure to change this to your acccount number
account_no = "012345678901 "
tags = {
  Enviroment      = "production"
  Owner-Email     = "name@mail.com"
  Managed-By      = "Terraform"
  Billing-Account = "1234567890"
}

master-password = "admin12345"

master-username = "admin12345"

db_name = "Doeita-db"
Pheew! That was some long lines of codes and less story, I know I know! Well, our infrastructure is quite a complex one, so it should be expected. The code we've written so far is pretty much a large percentage of the entire code needed. Moving on, we would be introducing backend storage of our terraform state file on amazon s3 and introducing modules for refactoring and better structure of our codes.
Code From Darey.io

Top comments (2)
This post is awesome, @royalt1234! Thanks for sharing!
Thanks Patrick :)