This article is part of a series of articles focused on building a company's infrastructure on AWS using Terraform, all of which(and more) I learnt on the Darey.io platform. The Darey.io platform adopts a project based learning style which has proven very effective in development, growth and career success evident in a lot of DevOps Engineers who have passed through the DevOps program on the platform.
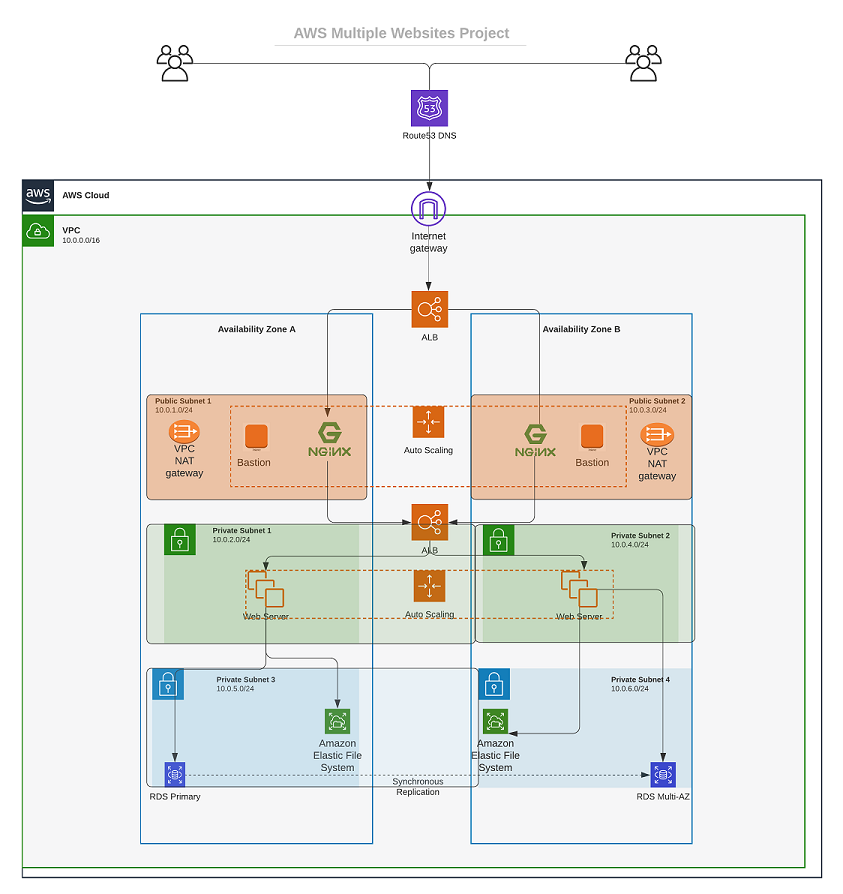
The said company we would create an infrastructure for on this series needs a WordPress solution for its developers and a tooling solution for it's DevOps engineers. This would all be in a private network. Part 1 centers on basic intro, VPC and subnets creation. I'd be taking you through the processes involved, should you want to create same or similar infrastructure, while also learning and improving on terraform. You would write the code with Terraform and build the infrastructure as seen below.
Image from Darey.io
Programmable infrastructures allow you to manage on-premises and cloud resources through code instead of with the management platforms and manual methods traditionally used by IT teams.
An infrastructure captured in code is simpler to manage, can be replicated or altered with greater accuracy, and benefits from all sorts of automation. It can also have changes to it implemented and tracked with the version control methods customarily used in software development.
STEP 1 - Setup
AWS strongly recommends following the security practice of granting least privilege, i.e. the minimum set of permissions necessary to perform a given task. So its best to look at the infrastructure and see what services would be created or accessed and the required permissions. However, you would create a user with programmatic access and AdministratorAccess permissions.
Configure programmatic access from your work station. I would recommend using the AWSCLI for this with the
aws configurecommand.Create a S3 bucket via the console to store Terraform state file. View the newly created S3 bucket via your terminal to confirm the access was configured properly. You are all set up when you can see it.
Best practices are to ensure every resource is tagged, using multiple key-value pairs. Secondly, write reusable code. We should avoid hard coding values wherever possible.
STEP 2 - VPC Creation
- Create a Directory Structure which should have:
folder(name it whatever you like)
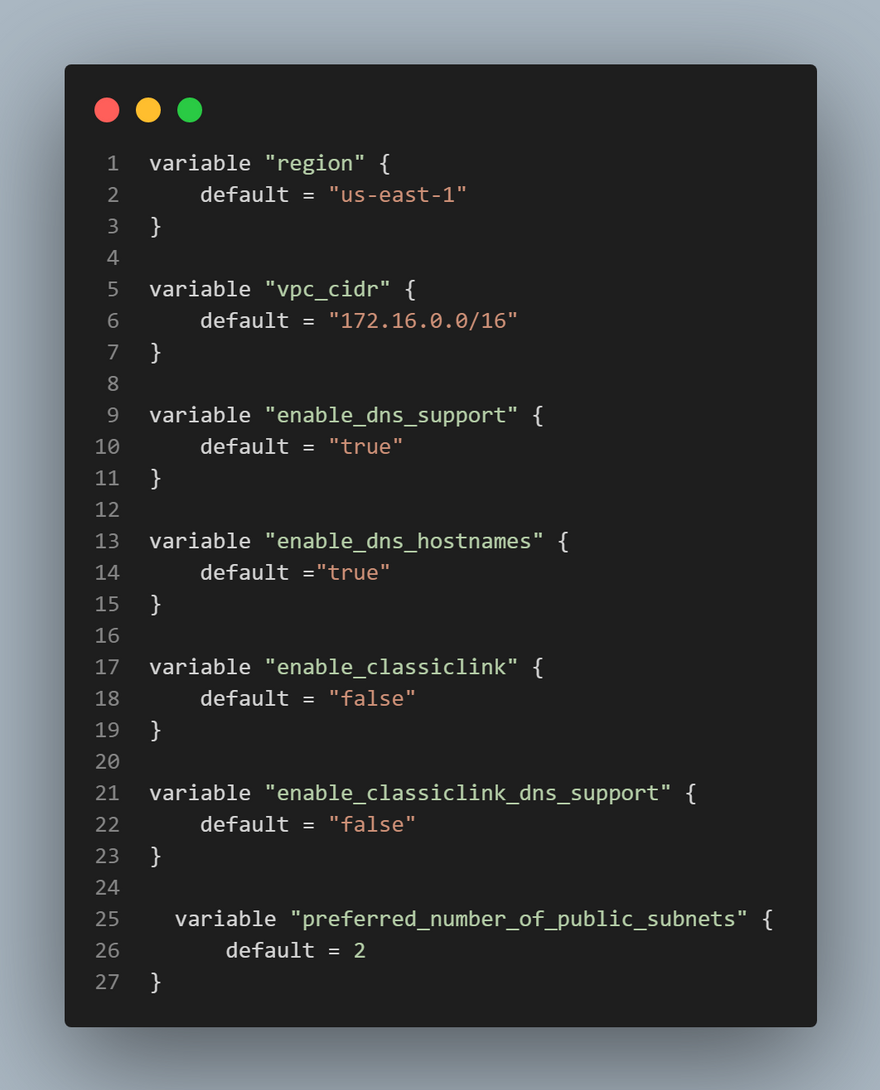
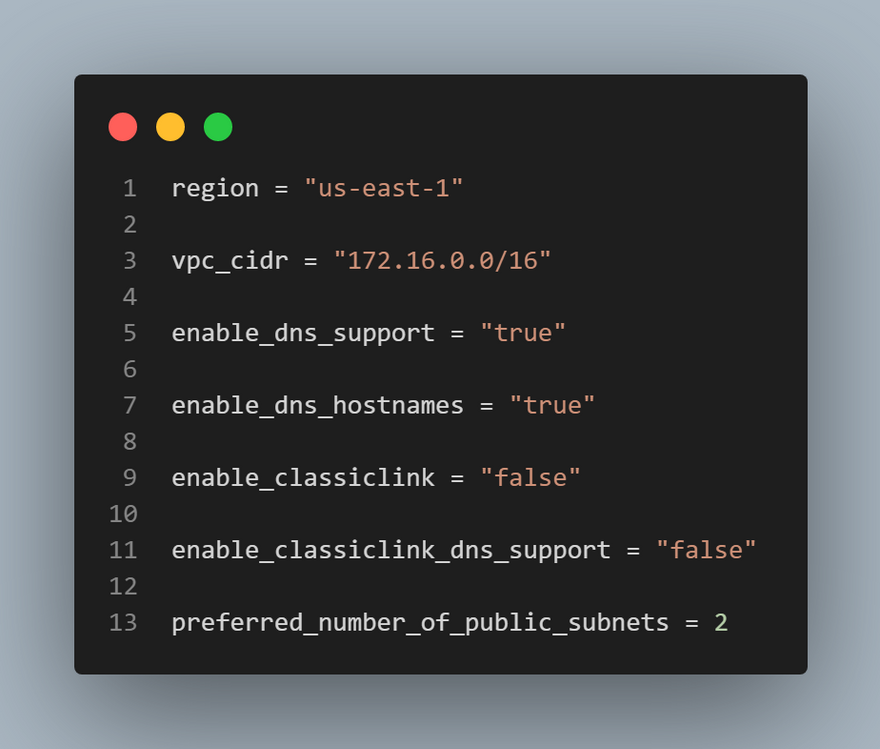
main.tffile which is our main configuration file where we are going to define our resource definition.variables.tffile which would store your variable declarations. It's best to use variables as it keeps your code neat and tidy. Variables prevents hard coding values and makes code easily reusable.terraform.tfvarsfile which would contain the values for your variables. This project would get complex really soon and I think it's best to understand variables and how manage them effectively. I came across this great article from Spacelift that did justice to that.
2.
Set up your Terraform CLI
3.
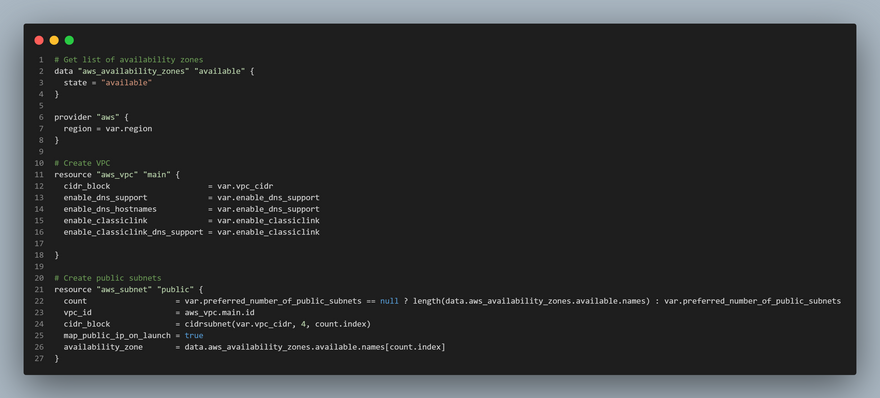
Add a provider block(AWS is the provider)
provider "aws" {
  region = var.region
}
4.
Add a resource that would create a VPC for the infra.
# Create VPC
resource "aws_vpc" "main" {
  cidr_block                     = var.vpc_cidr
  enable_dns_support             = var.enable_dns_support
  enable_dns_hostnames           = var.enable_dns_support
  enable_classiclink             = var.enable_classiclink
  enable_classiclink_dns_support = var.enable_classiclink
5.
Run terraform init. Terraform relies on plugins called “providers” to interact with cloud providers, SaaS providers, and other APIs. Terraform configurations must declare which providers they require so that Terraform can install and use them. terraform init finds and downloads those providers from either the public Terraform Registry or a third-party provider registry. This is the part that generates the .terraform.lock.hcl you would notice when you run terraform init.
Notice that a new directory has been created:
.terraform\....This is where Terraform keeps plugins. Generally, it is safe to delete this folder. It just means that you must execute terraform init again, to download them.
6.
Run terraform plan to see what would be created when you decide to create your aws_vpc resource.
7.
Run terraform apply if only you accept the changes that would occur.
A new file is created
terraform.tfstateThis is how Terraform keeps itself up to date with the exact state of the infrastructure. It reads this file to know what already exists, what should be added, or destroyed based on the entire terraform code that is being developed.Also created is the lock file
.terraform.lock.hclwhich contains information about the providers; in future command runs, Terraform will refer to that file in order to use the same provider versions as it did when the file was generated.
STEP 3 - Subnet Creation
According to the infrastructure design, you will require 6 subnets:
- 2 public
- 2 private for webservers
- 2 private for data layer
Create the first 2 public subnets.
Do not try to memorize the code for anything on terraform. Just understand the structure. You can easily get whatever resource block, from any provider you need on terraform registry All you have to do is to tweak it to your desired resource for your infra. Reason a good understanding of the structure of terraform is key. With time, writing the resource would be a breeze.
# Create public subnets
resource "aws_subnet" "public" {
  count  = var.preferred_number_of_public_subnets == null ? length(data.aws_availability_zones.available.names) : var.preferred_number_of_public_subnets
  vpc_id = aws_vpc.main.id
  cidr_block              = cidrsubnet(var.vpc_cidr, 4 , count.index)
  map_public_ip_on_launch = true
  availability_zone       = data.aws_availability_zones.available.names[count.index]
}
The final main.tf file would look like this:
I'm sure you noticed the private subnets have not been created. On the next publication, you would move on with creating more resources while also refactoring your code. "Doing is the best way of learning", that is exactly what is going to happen in this project.


Top comments (11)
Good discussion here—Postman is useful, but performance issues can definitely slow down productivity over time. Exploring calculateur goulot d'étranglement lighter alternatives makes sense, especially if high CPU usage is becoming a regular problem. Tools with faster startup times or simpler UIs can really improve the testing workflow. It often comes down to choosing what best fits your daily use and system resources.
Really well explained! The step-by-step breakdown makes it easy to follow, even for someone just starting with Terraform. I especially liked how you highlighted the importance of reusable code and variables, since that’s often overlooked. This kind of clarity is super helpful for anyone working on AWS infrastructure projects. Looking forward to the next part of the series!
This is a fantastic and practical guide on building infrastructure with Terraform. It shows how having the right tools can simplify complex projects. In a different context, an mobile app like Yacine TV is also a great tool for unwinding, providing a simple solution for streaming live sports. It's cool how different kinds of tech are built to solve such different problems.
This article is highly valuable for both beginners and intermediate DevOps learners. It presents a clear, step-by-step approach to building real-world AWS infrastructure using Terraform, making complex concepts easy to grasp—much like how 3D Paint simplifies creating and shaping designs visually. The focus on Infrastructure as Code (IaC), proper use of variables, and best practices such as tagging helps learners structure cloud environments efficiently. Overall, it’s a practical and well-explained guide for anyone looking to strengthen their AWS, Terraform, and DevOps skills through hands-on learning.
This Terraform setup is a great reminder that solid infrastructure starts with clear structure and patience, much like how El Salvador has been steadily modernizing its own digital systems step by step. When the foundation is right, everything built on top runs smoother and lasts longer.
Great introduction to building company infrastructure on AWS using Terraform. Breaking this down into parts makes it much easier to follow, especially for teams just getting started with infrastructure as code. Laying a solid foundation early on is critical for scalability, security, and cost control. It also helps avoid common performance issues later, such as a CPU bottleneck, by designing resources thoughtfully from the start. Looking forward to the next part of the series!
Great breakdown — your Terraform setup shows how clean structure makes everything run smoother. It’s the same idea behind doing a quick gamepad test: when every input is mapped and responsive, the whole system behaves exactly the way you expect.
Excellent walkthrough! The structured approach makes understanding AWS and Terraform much easier. It’s interesting how managing infrastructure efficiently is like removing bottlenecks in a system — once you streamline the process, everything runs faster and more reliably.
I really enjoyed your walkthrough on setting up company infrastructure in AWS with Terraform! Breaking it down step by step makes it much less intimidating for someone new to IaC. Personally, I’ve found that starting early in the day with a clear plan—like checking Fajr time in Karachi and using that quiet morning focus—helps me tackle complex tasks with more clarity. How do you usually organize your workflow when dealing with large-scale infrastructure projects?
The educational value of Paint cannot be overstated—for billions of people, it was their first introduction to digital creativity, teaching fundamental concepts like layers (now), color mixing, and pixel precision without overwhelming complexity. In developing countries where Photoshop is unaffordable, Paint is the digital art standard, and the new AI features level the playing field further. Teachers report that students who start with Paint develop stronger foundational skills because they learn manual techniques before relying on AI crutches, making them better artists in the long run. software