Docker has become more and more popular in recent years and has now essentially become the industry-standard for containerisation – be it via docker-compose or Kubernetes. When creating Dockerfiles, there are certain aspects that need to be considered. In this blog post, we’ll show you some strategies with which to create slim Docker images.
In this blog post we will cover
* Reducing the Docker images’ size
* What are the requirements for a Docker image?
* Evolution of a Docker image
* Prerequisites
* Strategies and patterns for Dockerfiles
* Evaluating different Dockerfiles
* Evaluation of the resulting sizes
* Our recommendation: Multi-stage Dockerfiles
Why are we talking about Docker images?
Docker images have become our preferred technology – to develop applications locally on the one hand and to run applications in a testing/staging or production system (‘deployment’) on the other. As python developers, we don’t just face the unfamiliar situation of suddenly having a certain build waiting time again, but we’ve also noticed that some of the resulting Docker images are pretty big.
Reducing the Docker images’ size
When creating our Dockerfiles, reducing the image size plays a particularly important role. Naturally, the Docker image should have everything it needs to be able to run the application – but ideally no more than that. Unnecessary features may be software packages and libraries that are only needed for compiling or running automated tests, for example.
There are a number of reasons why a Docker image should only contain the absolute minimum necessary:
- For one, the security of the image is increased. If I just want to run a simple Django application, I certainly don’t need a whole Debian or Ubuntu image. A simple Python image as a basis will be enough – it practically doesn’t need to be able to do anything more than running the Django application via a Python interpreter or application server. Why does this increase the security? Easy: fewer libraries mean that less can go wrong. Although this article is already a year old, it provides an informative insight into the underlying problems and outlines how to reduce the usual CVEs (Common Vulnerabilities and Exposures) with smaller versions of the base image.
- Another issue is speed. On the surface, it doesn’t really matter whether the Docker image has a size of 2 gigabytes or only 200 megabytes when running the application. The deployment is often automated and it usually doesn’t make much difference if it takes a few minutes longer until the (new) code is deployed. But here, too, the golden rule is of course: whatever unnecessary data usage and data transfer can be avoided should be avoided.
- As a developer, I can primarily benefit from smaller Docker images if I don’t have an automated build pipeline but am instead building them myself and deploying them in a container registry (the central storage for images), for example. If I’ve created a Dockerfile with a size of 2 gigabytes and I’m sitting in my home office due to Corona with a less than optimal internet connection, the upload may well take a while. It’s certainly annoying if the development process is prolonged unnecessarily, even if that’s just by half a minute for each build.
- The next point is the resource consumption. Not only the one on my laptop, where more and more Docker images get dumped over time, but also the one in the container registry. The registry might be hosted by Gitlab, for example. And sure, storage space is usually not a major cost factor, but if every Docker image has a size of 1 to 2 gigabytes each and if the registry gets bombarded with dozens of images week after week, the used storage space can add up to quite a lot. If we manage to reduce the Docker images to a half or a quarter of their original size, we’ve already made a good amount of progress. Last but not least, we mustn’t forget about the environment. First, every Docker image gets pushed into a registry and downloaded again from there – be it on a developer’s laptop or from a production system. If my Docker images are four times larger than they need to be, I am permanently creating four times as much traffic by using my images or I might even become the reason why additional storage systems have to be used.
What are the requirements for a Docker image?
Despite all the minimising of the image size, there are still a few requirements to be considered, of course. I can optimise my Docker images right down to the last megabyte, but if that means I can’t develop properly with them anymore or if the application isn’t running reliably as a result, I haven’t gained much. Ultimately, the things to be considered can be boiled down to three areas: development, testing/staging and production.
As a developer, I want my workflow to be interrupted as little as possible – convenience is definitely the main priority. This means that I need a Docker image which ideally has a short build time and supports the live code reloading, for example. I also might want to use some other tools like the Python debugger or telepresence. I may need further dependencies for this which might not be relevant in a production system, for example.
The requirements for testing/staging and production systems look pretty similar. Security is clearly the top priority here. I want to have as few libraries and packages on the system as possible that aren’t actually needed for the running of the application. As a developer, I shouldn’t even really have any need to interact with the running container which means I don’t need to worry about various concerns regarding convenience.
However, it can still be handy to have certain packages available for debugging purposes, particularly in a testing/staging system. That’s doesn’t necessarily mean that you should already have these packages available in the Docker images, though. Instead, as an example, you can use telepresence to swap a deployment in a Kubernetes environment. This means that I can build a Docker image locally which deploys all my necessary dependencies, and I can run it in my testing/staging cluster. Find out how you can accomplish this by checking out one of our other blog posts – Cloud Native Kubernetes development.
The use case described above can occur particularly often early on in the development phase. For a production system, this shouldn’t really make a difference anymore, though. I might want to look at some logs here, but this can either be done via kubectl or possibly also with a log collector solution. In the end, I want the testing/staging system to be run with the identical Docker image, like the production system. Otherwise, we might risk some malfunction in the production system which wouldn’t have occurred in the testing/staging system due to the different environment.
There might also be some requirements from an operations point of view – a vulnerability check, for instance, to ensure that known vulnerabilities aren’t even present in the image, where possible, or that vulnerabilities that can be corrected will be corrected. Furthermore, a company policy might also have influence on the Dockerfile – either one’s own company policy or that of the client. One possible scenario would be that certain base images are excluded or that the availability of certain packages or libraries is ensured.
Evolution of a Docker image
In the following sections, let’s have a look at the exact steps you can take to optimise your own Dockerfile. We’ll first check out the prerequisites that can influence the resulting Docker image. We’ll then look at the strategies and patterns for Dockerfiles before checking out the optimisation impact in several iterations.
Prerequisites
First off, we’ve got to select the base image. This one also has to first be defined in the Dockerfile. For a Django application, a Python base image will suffice. We could, of course, simply choose an Ubuntu image, but we want to keep the image size as small as possible and not even introduce unnecessary packages to the image in the first place. The Docker Hub provides many prefabricated images. For Python, too, there are different images which can be differentiated by the Python version number or by the terms ‘slim’ and ‘alpine’.
The ‘standard’ Python base image is based on Debian Buster and therefore represents one of the three variants. The slim variant is also based on Debian Buster, though with trimmed-down packages. So naturally, the resulting image will be smaller. The third variant is alpine and is, as you can probably guess from the name, based on Alpine Linux. The corresponding Python base image does have the smallest size, but you might well have to install additional required packages in the Dockerfile.
Some of the things that can have a big influence on the Dockerfile are the system runtime and build dependencies. Especially for the base image, it should be noted that an Alpine-based image has to be distributed with musl libc and not with glibc, as is the case with Debian-based images. The same applies to gcc, the GNU Compiler Collection, which isn’t automatically available on Alpine.
As Django developments, applications naturally have a few pip requirements. Depending on the base image selected, the Dockerfile also has to ensure that all system packages and libraries needed for the pip requirements are installed. However, the pip requirements themselves can also have an impact on the Dockerfile if I have additional packages for the development that aren’t needed in the production environment and shouldn’t really be present there either. An example for this is the pydevd-pycharm package which we only need for the Python remote debugger in PyCharm.
Strategies and patterns for Dockerfiles
Over time, various different strategies and patterns emerged with which to create and optimise Dockerfiles. The challenge of making the image size as small as possible is closely linked to the process of the Dockerfile becoming an image. Every instruction adds another layer, with every layer being stacked on top of the previous one. Once you’re aware of this, you naturally want to try and keep the number of layers and the size of each individual layer to a minimum. For example, you could delete artefacts within a layer which are not needed anymore, or you might combine different instructions within a layer by using various shell tricks and other logics.
A by now outdated pattern is the so-called builder pattern. With this, a Dockerfile is created for the development – the builder Dockerfile. It contains everything needed to build the application. For the testing/staging and production environment, a second, trimmed-down Dockerfile is created. This one contains the application itself and other than that, only whatever’s needed to run the software. While this approach is doable, it has two major drawbacks: for one, having to maintain two different Dockerfiles is anything but ideal, and secondly, it creates a rather complex workflow:
- compile a builder image
- create a container with the builder image
- copy or extract the required artefacts from the container
- remove container
- build production image using the extracted artefacts
This procedure can be automated with scripts, of course, but it’s still not ideal.
So-called multi-stage Dockerfiles are now gaining more and more popularity as the preferred solution. They’re even recommended by Docker themselves. A multi-stage Dockerfile technically follows a pretty simple structure:
The different stages are separated from one another by FROM statements. You can also give the stages different names so that it’s easier to reference an individual stage. As every stage starts with a FROM statement, every stage also uses a new base image. The benefit of having several stages is that you can now select individual artefacts from one stage and copy them into the next one. It’s also possible to stop at a certain stage – to deploy debugging functions, for example, or to support different stages for development/debugging and staging/production.
If you don’t specify a stage at which you want to stop during the build process, the Dockerfile will run in its entirety which should result in the Docker image for the production system. Compared to the build pattern, only one Dockerfile is needed for this and you also don’t need a build script in order to display the workflow.
Evaluating different Dockerfiles
Now that we’ve got all this knowledge, let’s do an evaluation of different Dockerfiles. We have written six different Dockerfiles which we have evaluated according to their size. First, let’s have a look at the individual Dockerfiles with the selected optimisations. There are some common features that all Dockerfiles share: the installation of postgresql-client or postgresql-dev, the copying and installation of pip requirements as well as the copying of the application.
Dockerfile 1 – Naive
FROM python:3.8

RUN apt-get update
RUN apt-get install -y --no-install-recommends postgresql-client

COPY requirements.txt /requirements.txt
RUN pip install -r /requirements.txt

COPY src /app

WORKDIR /app
The first Dockerfile is based on the python:3.8 base image. This means that we’re equipped with all the Debian ‘nuts and bolts’ that we need to work within the container without any real restrictions.
Dockerfile 2 – Naive; Removing the apt lists
FROM python:3.8


RUN apt-get update \
    && apt-get install -y --no-install-recommends postgresql-client \
    && rm -rf /var/lib/apt/lists/*

COPY requirements.txt /requirements.txt
RUN pip install -r /requirements.txt

COPY src /app

WORKDIR /app
This Dockerfile is identical to the previous one with the exception that the content of the directory /var/lib/apt/lists/ is removed after the required additional package has been installed. Package lists which are no longer relevant for our Docker image are saved in this directory after an apt update.
Dockerfile 3 – Alpine naive
FROM python:3.8-alpine

RUN apk update && apk --no-cache add libpq gcc python3-dev musl-dev linux-headers postgresql-dev

COPY requirements.txt /requirements.txt
RUN pip install -r /requirements.txt

COPY src /app

WORKDIR /app
Our third Dockerfile is simply based on Alpine Linux. As there are some packages for the running of the application missing in Alpine, we have to install these first.
Dockerfile 4 – Alpine linux; Removing build dependencies
FROM python:3.8-alpine

COPY requirements.txt /requirements.txt

RUN apk update && apk add --no-cache --virtual .build-deps gcc python3-dev musl-dev linux-headers postgresql-dev && \
 apk --no-cache add libpq && \
 pip install -r /requirements.txt && \
 apk del .build-deps

COPY src /app
WORKDIR /app
The next Dockerfile based on Alpine Linux technically only adds a removal of build dependencies, i.e. additionally installed packages that are only needed for the image building but not for the running of the application. For this to work in only one command, the COPY command for the pip requirements has to be moved upwards – this will allow the pip requirements to be installed between the installation and removal of the build dependencies.
Dockerfile 5 – Alpine linux, multi-stage
FROM python:3.8-alpine as base

FROM base as builder

RUN apk update && apk add gcc python3-dev musl-dev linux-headers postgresql-dev
RUN mkdir /install
WORKDIR /install
COPY requirements.txt /requirements.txt
RUN pip install --prefix=/install -r /requirements.txt

FROM base

COPY --from=builder /install /usr/local
COPY src /app
RUN apk --no-cache add libpq
WORKDIR /app
The last Dockerfile uses the multi-stage pattern. Both stages use the Alpine Linux Python base image. In the first stage, builder, the required build dependencies are installed, the directory /install is used as WORKDIR and subsequently, the pip requirements are copied and installed. The second stage now copies the content from the /install directory of the first stage, it copies the code of the application and installs another package with libpq which is needed for the running of the application.
Evaluation of the resulting sizes
The following table shows the size of the Docker images for our five Dockerfiles:
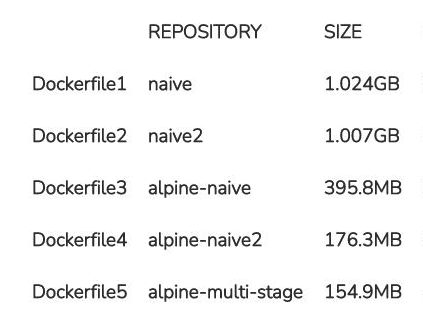
The clearest jump in terms of quantity can be seen in the usage of the Alpine-based base image. If both Debian-based Docker images have a size of at least one gigabyte each, the usage of Alpine Linux will cut this by more than half. The size of the resulting image is therefore just short of 400 megabytes. By some skilfully written commands and thus optimised Dockerfiles, we can even reduce this size further by more than half and ultimately land at 176 megabytes.
The multi-stage Dockerfile has around 155 megabytes. Compared to the previously optimised Dockerfile, we haven’t saved that much. The Dockerfile is a bit more elaborate due to the various stages, but it’s also considerably tidier and, as described above, a lot more flexible thanks to the different stages. With this image, we’ve only reached just about 15% of the first naive Debian-based image. Even compared to the naive Alpine image, we’ve saved more than 60%.
Our recommendation: Multi-stage Dockerfiles
Our recommendation is definitely the use of multi-stage Dockerfiles. As you were able to see quite impressively in the evaluation, Dockerfiles can reduce the resulting image size significantly. So long as the conditions and the application permit it, you should also use an Alpine-based base image if you’re keen on reducing the image size.
We’re not just recommending multi-stage builds because of the resulting image sizes, however – the flexibility thanks to the different stages is another massive advantage in our opinion. We can manage the development process up to the production deployment with only one Dockerfile and don’t have to maintain several Dockerfiles.
Written by Robert Gutschale


Top comments (0)