This article originally published on codehirise, and dev.to
Hi everyone,
In this article, we will walk you through the steps for setting up GitHub Self-hosted Runners in Ubuntu virtual machine as a service for persistence runner installation.
The primary reason organizations to adopt GitHub self-hosted runners is to securely access internal, private networks such as databases, services, or virtual machines without exposing them to the public internet. By keeping workflows within their controlled infrastructure, they eliminate risks like accidental data leaks or compliance violations.
Additionally, self-hosted runners safeguarding sensitive code, credentials, or artifacts since runners are hosted on organization network.
Prerequisites
- A GitHub account.
- An Ubuntu Virtual machine with root access with internet connectivity.
- Basic familiarity with Linux commands and GitHub Actions.
Lets get started
First go to your desired GitHub repository and go to Settings > Actions > Runners > New self-hosted runner.
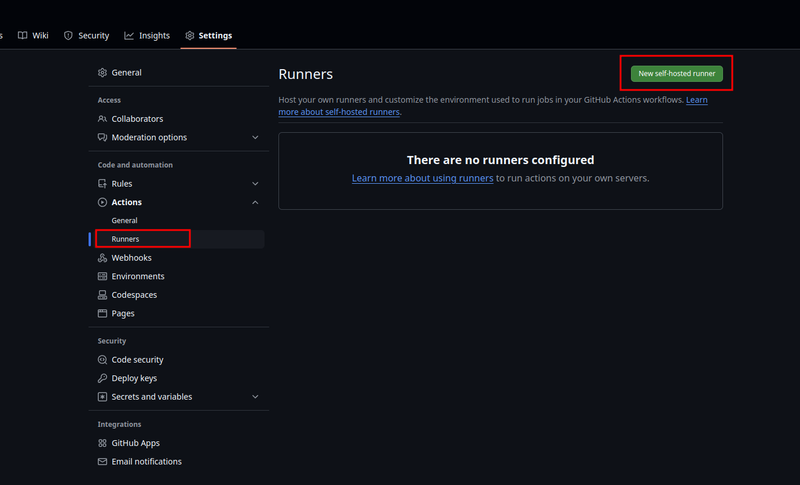
When you click New self hosted runner button you will get below page with all required steps.
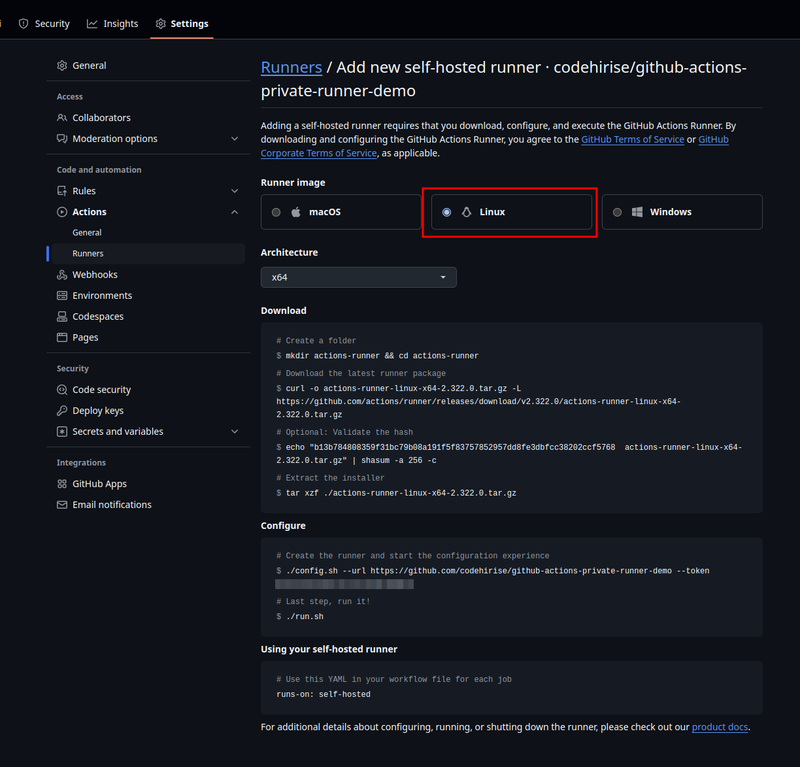
It outlines downloading and setting up action runner but in our case we will take some extra steps to make sure our setup is more secure and configure runner as a systemd service.
Step 1: Create a Dedicated System User for GitHub action runner
we will create new system user user in our ubuntu vm.
Run below commad.
sudo useradd --system --shell /usr/sbin/nologin gh-action-runner-user
-
--system: Creates a non-interactive service account. -
--shell /usr/sbin/nologin: Blocks SSH/login access.
Step 2: Download the GitHub Runner
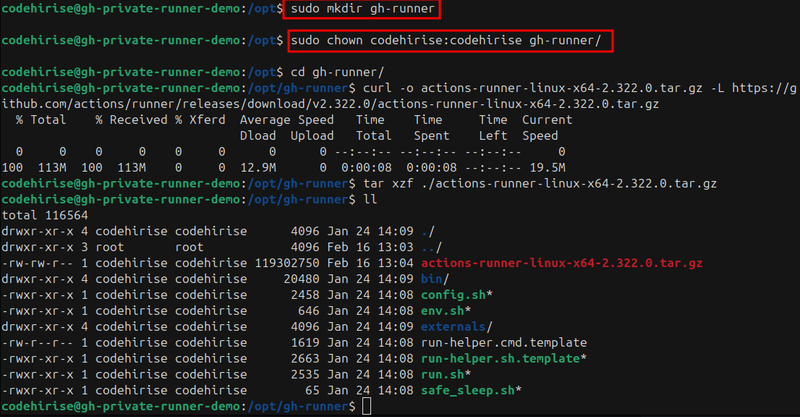
Run below command to create runners installation directory in /opt directory.
sudo mkdir /opt/gh-runner
cd /opt
Use the /opt directory for installation of add-on application software package and avoid using user's home directory
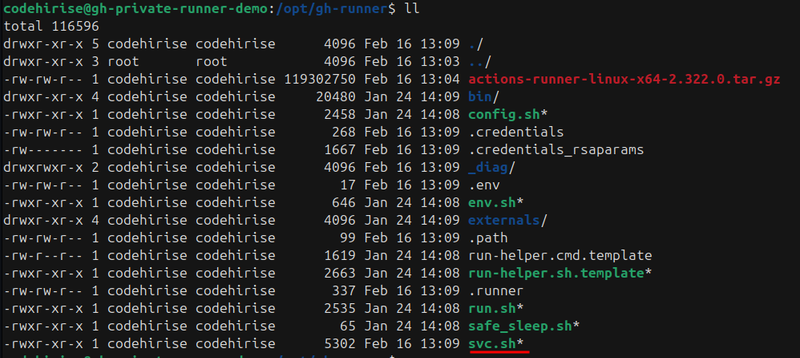
Run below command to change ownership of the directory to our current owner for downloading and extracting files.
sudo chown codehirise:codehirise gh-runner/
cd gh-runner
then run below to extract action runner.
curl -o actions-runner-linux-x64-2.322.0.tar.gz -L https://github.com/actions/runner/releases/download/v2.322.0/actions-runner-linux-x64-2.322.0.tar.gz
optionally run below command to verify downloaded tar file.
echo "b13b784808359f31bc79b08a191f5f83757852957dd8fe3dbfcc38202ccf5768 actions-runner-linux-x64-2.322.0.tar.gz" | shasum -a 256 -c
Next run below command to extact all actions runner tar.gz file.
tar xzf ./actions-runner-linux-x64-2.322.0.tar.gz
Step 3: Configure the Runner
After downloading run below command to configure GitHub action runner.
./config.sh --url https://github.com/codehirise/github-actions-private-runner-demo --token YOUR_TOKEN
Replace YOUR_TOKEN with the token displayed in GitHub add new self hosted action runner page.
Here you will be prompled for some input like runner name and lables. You can enter them as you see fit.

It will create some additional files like svc.sh which we will be using to configure action runner as a systemd service.
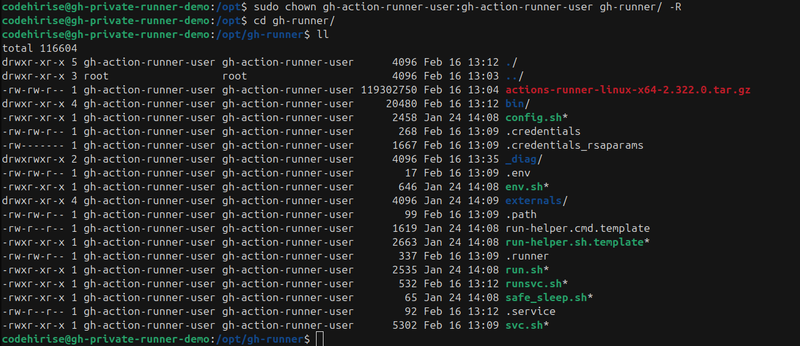
Before that make sure to change the ownership of the directory to our Linux service user which is gh-action-runner-user.
Run below command
sudo chown gh-action-runner-user:gh-action-runner-user /opt/gh-runner/ -R
Step 4: Configure the Runner Systemd Service
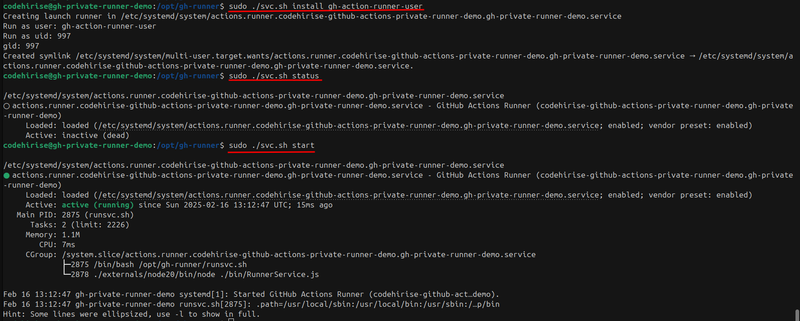
Next run below command to install systemd service for github action runner. This will install action runner as a systemd service and set user as gh-action-runner-user.
sudo ./svc.sh install gh-action-runner-user
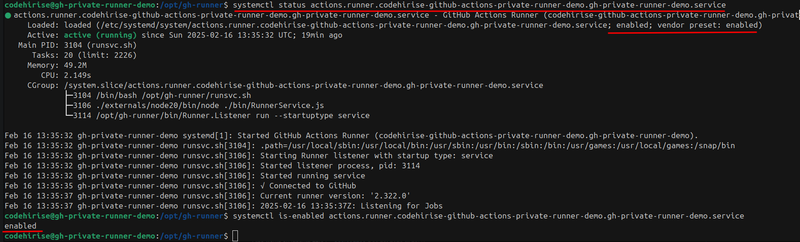
Next you can run status command to check status
sudo ./svc.sh status
and run start command to start github action runner
sudo ./svc.sh start
to check github action run related logs simply run
journalctl -f -u actions.runner.codehirise-github-actions-private-runner-demo.gh-private-runner-demo.service
Note that actions.runner.codehirise-github-actions-private-runner-demo.gh-private-runner-demo.service is the service name which is displayed when running sudo ./svc.sh status command.

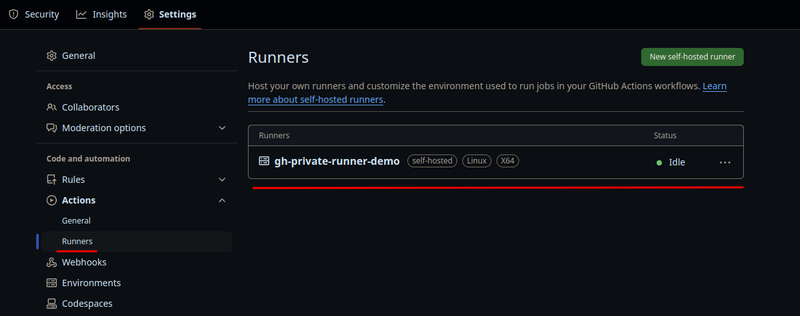
It will show connected to GitHub which indicate that we have successfully setup our GitHub action runner as a service.
if you now visit runners page you can see our brand new github action self hosted runner is ready and waiting to pickup jobs.
Action runner systemd service comes enabled by default so it will automatically start after a system reboot.
Step 5: Using selfhosted runner in Github action workflow
To use this runner in workflow , set runs-on in your github actions workflow file to selfhosted
Example workflow file below.
# This is a basic workflow to help you get started with Actions

name: CI

# Controls when the workflow will run
on:
  # Triggers the workflow on push or pull request events but only for the "main" branch
  push:
    branches: [ "main" ]
  pull_request:
    branches: [ "main" ]

  # Allows you to run this workflow manually from the Actions tab
  workflow_dispatch:

# A workflow run is made up of one or more jobs that can run sequentially or in parallel
jobs:
  # This workflow contains a single job called "build"
  build:
    # The type of runner that the job will run on
    runs-on: self-hosted

    # Steps represent a sequence of tasks that will be executed as part of the job
    steps:
      # Checks-out your repository under $GITHUB_WORKSPACE, so your job can access it
      - uses: actions/checkout@v4

      # Runs a single command using the runners shell
      - name: Run a one-line script
        run: echo Hello, world!

      # Runs a set of commands using the runners shell
      - name: Run a multi-line script
        run: |
          echo Add other actions to build,
          echo test, and deploy your project.
in action workflow we can see job ran on the runner we setup.
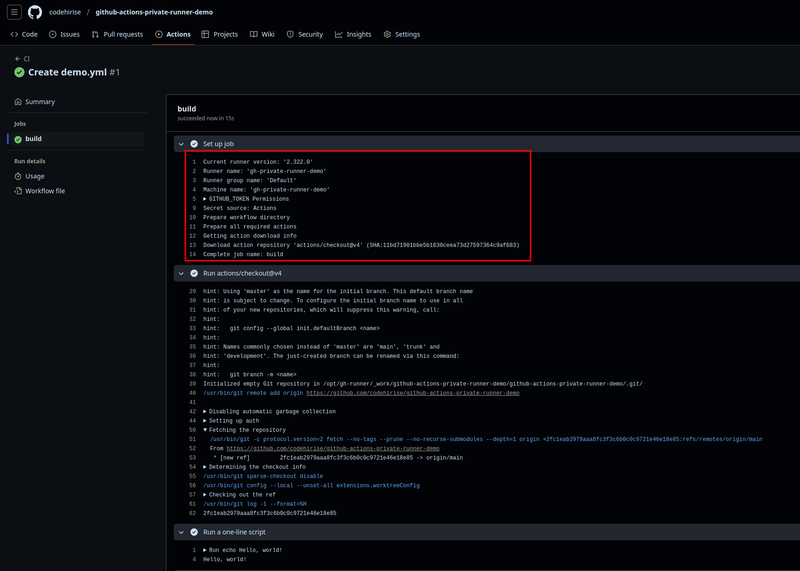
In our runner logs we can see job completed successfully

Self-hosted GitHub runners on Ubuntu VMs put you in control—locking down sensitive workflows and integrating seamlessly with private infrastructure. With this setup, your pipelines stay fast, secure, and entirely within your environment. Will this be your team’s next step toward DevOps adventure? 🚀

Top comments (1)
good work bro plese check my websites vidmateapk.com.pk/