Terraform is anInfrastructure as Code (IaC) tool that can help you define resources within your environment. In this article, I want to take you through deploying your first resource within AWS via Terraform. The resource we are going to deploy is an AWS S3 bucket.
Prerequisites
- AWS subscription: If you don't have an Azure subscription, create afree account before you begin
- Terraform: Installed on your machine, you can follow my guide to do this if you haven’t already
- AWS CLI: Installed on your machine
- Code editor: my preference is Visual Studio Code
Create an IAM AWS user
An IAM user account within AWS can represent a user or a workload that needs to interact with AWS. For this use case, we are going to create an IAM user account that allows our local computer to connect to AWS.
We will use this account to help us deploy our Terraform template.
To create a new IAM AWS log into the AWS console and head to the IAM Management Console.
Click on “Users” down the left-hand side and then select “Add Users”
Specify a name for your IAM user account. Then select “Next”.
The next stage will ask what permissions you want to give this IAM user account. For this example, I am going to give the IAM account full admin access, but it is best practice to scope the permissions accordingly.
Once you have configured the permissions select “Next”. Then “Create User”.
Once the user is created, select it from the list of IAM users. This will give you access to the properties and configuration of the account.
Select the “Security Credentials” option.
Scroll down to “Access Key” and click on “Create access key”
When the creation wizard starts it will ask you what these credentials will be used for. For this account select “Command Line Interface” then select “Next”.
Then select “Create key”.
Take note of the access key and secret access key. We will need it for the next step.
Configure your local machine
In order to deploy the Terraform template to AWS from your machine you need to ensure you have the AWS CLI and Terraform software installed on your machine.
Once installed, you need to configure the AWS CLI to connect to your account. To do this, open up your terminal and type in “aws configure”. It will prompt you for information about your IAM access key and secret. Enter the information you created in the previous step.
Once you have answered all the questions as prompted you are ready to start to build your Terraform template.
Build the Terraform Template
There are different ways of deploying your template but we are going to do it from our local machine.
We are going to build up a Terraform template that will create an S3 bucket within our AWS account. To do this I will open my favourite code editor, Visual Studio Code.
I create a new file called main.tf
The first section I create is:
terraform {
  required_providers {
    aws = {
      source = "hashicorp/aws"
      version = "~> 5.0"
    }
  }

  required_version = ">= 0.13"
}
This is the start of your template, it’s indicating what version of Terraform you wish to use and what providers you need. A provider within Terraform is essentially a plugin that enables interaction with an API.
We need the AWS provider, this provider interacts with the AWS API to help deploy resources to AWS.
The next part of the template I need is:
provider "aws" {
  profile = "default"
  region = "eu-west-2"
}
This section of the template configures my AWS settings, my profile and my default region I wish to use.
The next section I put into the template is:
# Bucket creation
resource "aws_s3_bucket" "my_s3_bucket" {
  bucket = "sarah-terraform-bucket"
}

# Disabling bucket public access
resource "aws_s3_bucket_public_access_block" "my_s3_bucket_access" {
  bucket = aws_s3_bucket.my_s3_bucket.id

  # Block public access
  block_public_acls = true
  block_public_policy = true
  ignore_public_acls = true
  restrict_public_buckets = true
}
This section creates the S3 bucket and then disables public access to the bucket’s contents.
There is a lot more you could write within this template, but this will get you a basic S3 bucket within AWS. As you start to build up your knowledge you can start to explore the other settings you may wish to use.
Deploying the Terraform Template
Now we have the template created, it's time to deploy it. When you deploy a Terraform template there are a few stages that you will go through before the resources are created.
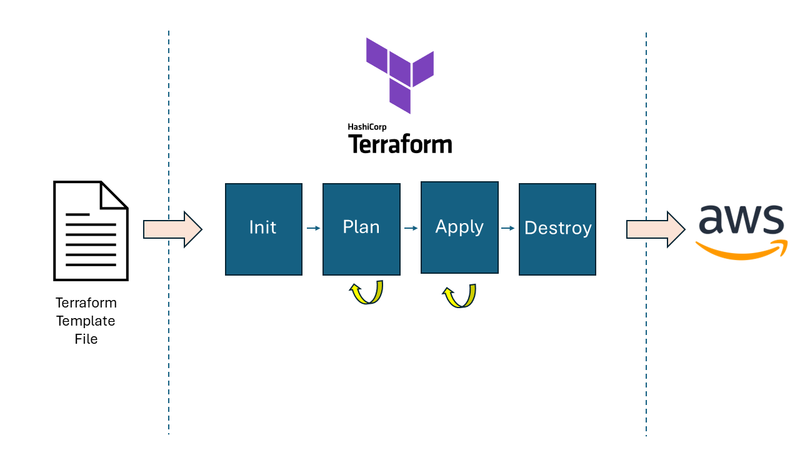
Terraform stages of deployment
Let’s explain the steps:
- Init : The init command prepares the working directory for use with Terraform. It initialises the backend, any child module installation and any plugin installation.
- Plan : The plan command determines the deltas between the current configuration and prior state data. It will propose changes that make the remote infrastructure match the current configuration.
- Apply : Running the apply command will run the plan from the terraform plan command.
- Destroy : The destroy command is used to destroy all remote objects managed by a particular Terraform configuration.
The first step we need to go through is initialising the Terraform file.
Make sure you are in the directory where the Terraform file lives and enter the command:
terraform init
The next step is to plan the resource deploying. To do that type in the command:
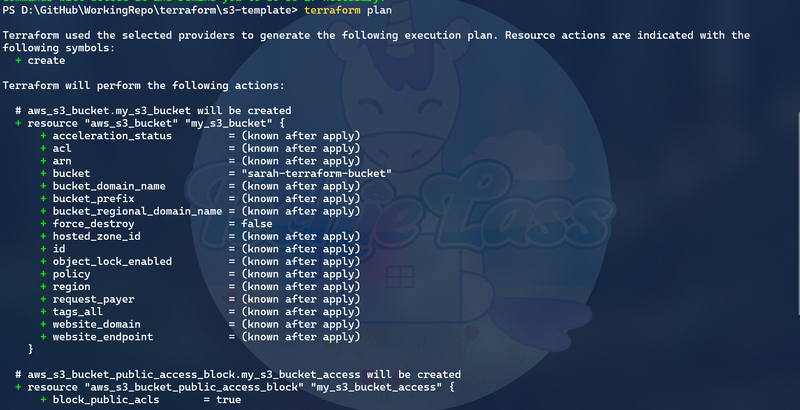
terraform plan
When the command has run it will show you what is going to happen if you were to deploy the Terraform template.
Now we are ready to actually create the research so we type in the command:
terraform apply -auto-approve
This command will now initiate the deploying. The -auto-approve flag helps us skip the step where Terraform will ask if we wish to proceed with the deploying. If you don’t use the -auto-approve flag you will have to confirm you want to deploy the template.
After a few minutes you should get a confirmation that the S3 bucket has been deployed.
Well done!
You’ve deployed your first AWS resource using a Terraform template!
If you’d like to clean up this S3 bucket you can run the command:
terraform -destroy -auto-approve
And it will be destroyed for you.


Top comments (3)
Thanks for the feedback! :)
Just finished my first run of 14daywithyou and I’m still shook—Ren’s “I can see your desktop” moment made me slam my laptop shut. Can’t believe a vn can gaslight ME, not just the mc.
This is a simple and clear example of how to create an AWS S3 bucket with Terraform. It's a great way to learn how Terraform works with cloud services. Try it out for practice!