This article was originally posted on Everything DevOps.
Docker Desktop failed me, and at the time (13th July 2022) of writing this article, Hyperkit, VirtualBox, and other hypervisors specified here don’t work on the Apple M1 chip.
Weeks ago, while using Docker Desktop, it suddenly got stuck in a start-stop loop. I spent hours trying to resolve it, combed through GitHub issues and stackoverflow, and even downloaded older versions of Docker Desktop but to no avail.
I then started searching for an alternative to Docker Desktop. And oh, did I see so many! But though they were alternatives, most didn’t work seamlessly on the M1 chip until I found Colima.
This article will teach you how to run minikube on an Apple M1 chip without Docker Desktop using Colima.
Prerequisite
To follow along with this article, you should have:
- minikube installed on your machine. Learn how to here.
- Docker Desktop uninstalled. It’s important to note that Colima from v0.3.0 upwards can run alongside Docker Desktop. # How to run Minikube without Docker Desktop
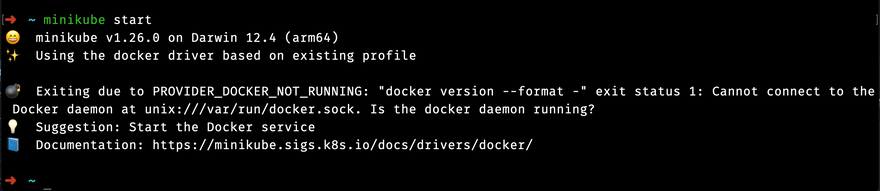
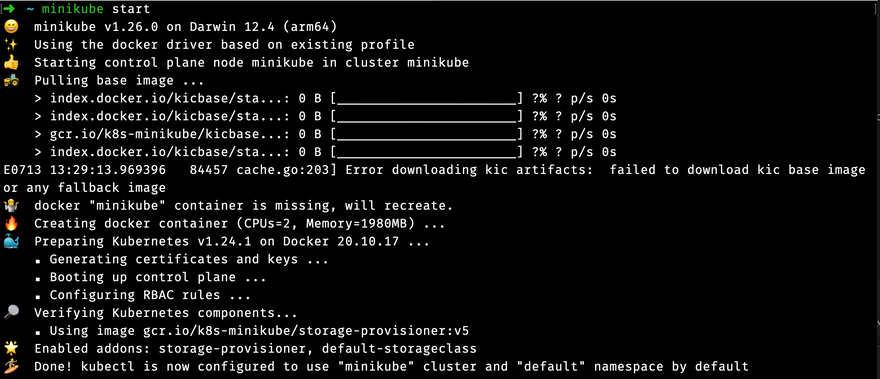
With your current M1 minikube installation, if you run just $ minikube start, it will fail (see image below). And this is because minikube needs a container or virtual machine manager to run, which ideally, Docker desktop (VM + container), hyperKit, etc., would provide.
But since you are having issues or don’t want to use Docker Desktop and can’t use other hypervisors on the M1 chip. You can replace Docker Desktop with Colima reducing the process to run minikube to $ colima start and then $ minikube start.
What is Colima?
Colima is an open-source project that provides container runtimes on macOS with minimal setup. The name Colima means containers in Lima — Linux virtual machines on macOS.
Aside from the minimal setup, Colima offers the following:
- Simple CLI interface
- Docker and Containerd support
- Port Forwarding
- Volume mounts
- Kubernetes
As this article is to run minikube, you will use Colima with Docker runtime without enabling its Kubernetes feature.
Installing Colima to run Docker containers on macOS
As minikube (with Docker driver) will create a docker container, you must install Docker’s CLI alongside Colima.
Installing Colima
The fastest way to install Colima is through Homebrew. There are other installation options; check here to see them.
$ brew install colima
To check your installation, run:
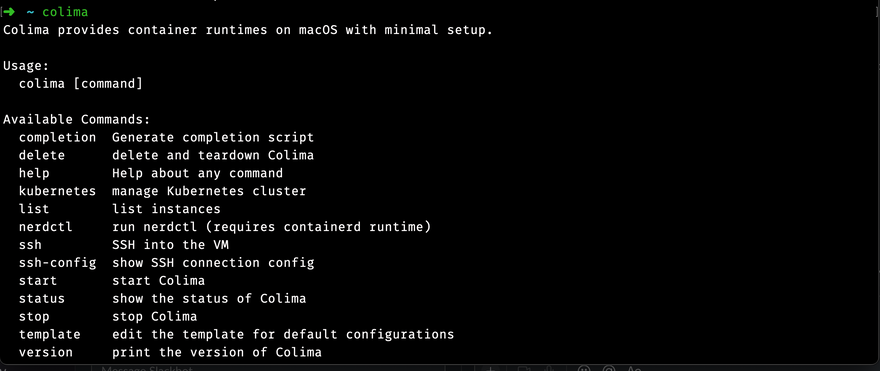
$ colima
And ensure you get a help message similar to the image below:
Installing Docker’s CLI
After Colima installs, install Docker and Docker Compose.
$ brew install docker docker-compose
After the above installation, configure docker-compose as a Docker plugin so you can use the docker compose command instead of the legacy docker-compose script. To do that, first create a folder in your home directory to hold Docker CLI plugins:
$ mkdir -p ~/.docker/cli-plugins
Then symlink docker-compose into that folder with:
$ ln -sfn $(brew --prefix)/opt/docker-compose/bin/docker-compose ~/.docker/cli-plugins/docker-compose
And to test, run:
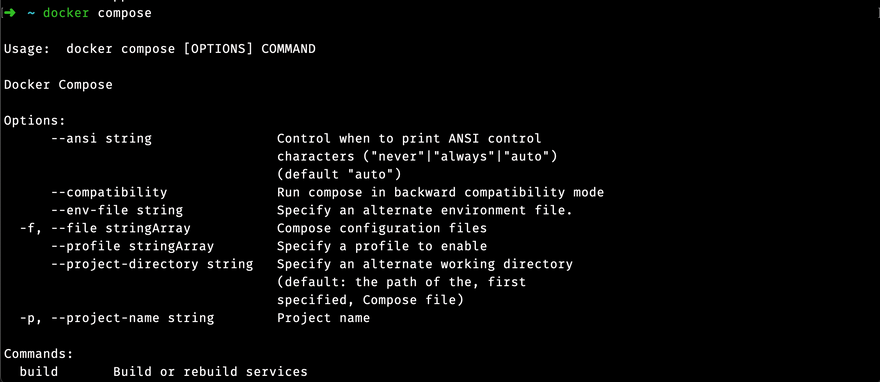
$ docker compose
Then ensure you get an output similar to the image below.
Now that you have Colima installed on your machine, you will create a virtual machine instance with Colima. minikube will use the VM instance, which provides the Docker runtime to start.
Creating a virtual machine instance with Colima
To create a virtual machine with Colima, run:
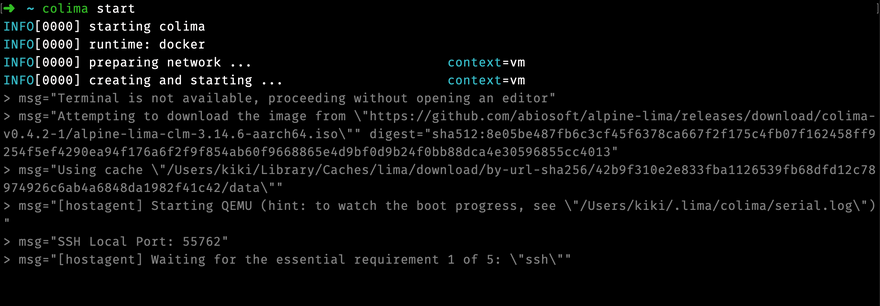
$ colima start
The above command will create a VM with the default configuration of 2 CPUs, 2GiB memory, and 60GiB storage which should be enough for moderate use. But if you’d like, you can customize your VM by passing additional flags such as --cpu, --memory, --disk, etc., to colima start. Or by editing the config file with colima start --edit. To learn more, check here.
After you run the start command, you will see the following output as Colima downloads the image required the create the VM and then boots the VM:
Once the download and boot process finishes, you will see an output showing that Colima is ready for use.

To confirm, you can run $ colima list or $ colima status to see the Colima running and with the default Docker runtime which minikube will use to start.

Now with Colima running, you can efficiently run minikube without specifying any driver.
Starting minikube
With Colima running, run the $ minikube start command to create your minikube cluster.
Now, run $ docker ps. You will see the minikube container running on your machine with the image created on the first $ minikube start.

Conclusion
This article taught you how to run minikube on an Apple silicon without Docker Desktop and other hypervisors using Colima. Colima is a great tool and has made my life easier since I started using the Apple M1 chip. To learn more about Colima, see answers to some frequently asked questions.

Top comments (0)