Background
Imagine building a house without carefully reviewing the blueprints or measuring the materials.
You might have misaligned walls, incorrectly sized windows, or structural issues. Similarly, while developing an application, neglecting tests can lead to:
- Unexpected errors: Bugs and errors can go unnoticed until users face your application, potentially causing significant problems to users. Of course, That you will never want!
- Poor user experience: A buggy application can frustrate users and damage your reputation.
- Increased maintenance costs: Fixing bugs after they’ve been discovered can be time-consuming and expensive.
By investing time in testing your code, you’re essentially building a solid foundation for your application, ensuring its reliability, quality, and maintainability.
Why E2E tests?
E2E tests validate that the entire user journey functions correctly, from login to checkout or any other complex process. They ensure that the application provides a seamless and intuitive user experience.
We can easily detect any broken link, invalid user input, or any UI/UX problem that is laughing in the corner!
You might say, the tests take up much of my time 😨. Trust me, it will be worth it!!
Multiple tools are available for testing, such as Jest, Cypress, Playwright, etc. Each has advantages and drawbacks.
As we are going to perform End-to-End tests, Playwright is the testing tool that has more advantages over any other tools, specifically Cypress.
Hence, we will go with the playwright in this blog.
Without further ado, let’s go ahead!!
Prerequisites
Consider installing Node.js as a first step, if you don’t have one already.
Before we start, let’s first create a Next.js application. We will use it throughout the blog.
Execute the below command to create the Next.js app.
npx create-next-app@latest
It will ask questions for configuring the app, respond to them, and we’re ready with the app.
Setup steps
Installation
Execute the command to install the playwright.
npm init playwright@latest
It will ask you certain questions for configuring the playwright tool in your project.
Configuration
After completing the configuration, you will find some of the files created inside the project folder, but we will only need the playwright.config.ts file and the tests directory from them.
playwright.config.ts
import { defineConfig, devices } from '@playwright/test';

/**
 * Read environment variables from file.
 * https://github.com/motdotla/dotenv
 */
// import dotenv from 'dotenv';
// import path from 'path';
// dotenv.config({ path: path.resolve(__dirname, '.env') });

/**
 * See https://playwright.dev/docs/test-configuration.
 */
export default defineConfig({
  testDir: './tests',
  /* Run tests in files in parallel */
  fullyParallel: true,
  /* Fail the build on CI if you accidentally left test.only in the source code. */
  forbidOnly: !!process.env.CI,
  /* Retry on CI only */
  retries: process.env.CI ? 2 : 0,
  /* Opt out of parallel tests on CI. */
  workers: process.env.CI ? 1 : undefined,
  /* Reporter to use. See https://playwright.dev/docs/test-reporters */
  reporter: 'html',
  /* Shared settings for all the projects below. See https://playwright.dev/docs/api/class-testoptions. */
  use: {
    /* Base URL to use in actions like `await page.goto('/')`. */
    // baseURL: 'http://127.0.0.1:3000',

    /* Collect trace when retrying the failed test. See https://playwright.dev/docs/trace-viewer */
    trace: 'on-first-retry',
  },

  /* Configure projects for major browsers */
  projects: [
    {
      name: 'chromium',
      use: { ...devices['Desktop Chrome'] },
    },

    {
      name: 'firefox',
      use: { ...devices['Desktop Firefox'] },
    },

    // {
    //   name: 'webkit',
    //   use: { ...devices['Desktop Safari'] },
    // },

    /* Test against mobile viewports. */
    // {
    //   name: 'Mobile Chrome',
    //   use: { ...devices['Pixel 5'] },
    // },
    // {
    //   name: 'Mobile Safari',
    //   use: { ...devices['iPhone 12'] },
    // },

    /* Test against branded browsers. */
    // {
    //   name: 'Microsoft Edge',
    //   use: { ...devices['Desktop Edge'], channel: 'msedge' },
    // },
    // {
    //   name: 'Google Chrome',
    //   use: { ...devices['Desktop Chrome'], channel: 'chrome' },
    // },
  ],

  /* Run your local dev server before starting the tests */
  // webServer: {
  //   command: 'npm run start',
  //   url: 'http://127.0.0.1:3000',
  //   reuseExistingServer: !process.env.CI,
  // },
});
testDir — Path where our test files live
projects — Defines the browsers, in which we want to run the tests. It will run all the provided tests in all browsers.
i.e. total test executions will be no. of test cases * no. of browserswebServer — This block presents our server url, for lcoal environment it will be http://127.0.0.1:3000
modify the webServer block as below, if the url doesn’t load local server:
webServer: {
command: ‘npm run start’,
port: 3000,
reuseExistingServer: true,
}
Notes:
- It also provides an option to mention a specific device or a browser on which we want to execute tests. P.S. /* Test against mobile viewports. */ section.
- Before running the tests, ensure the application is already running on the url provided in the webserver config. If it is running on a different port, consider updating it accordingly.
Implement user login flow
To test user login flow, let’s first create it.
Please note that I have used an App router in Next.js that’s why I added the login page at /src/app.
If you use a Page router then add the /login/page.tsx into /src/pages directory.
src/app/login/page.tsx
"use client";

import { useState } from 'react';
import { FormEvent } from 'react'

export default function LoginForm() {
  const [email, setEmail] = useState('');
  const [password, setPassword] = useState('');
  const [errorMessage, setErrorMessage] = useState("");

  const handleLogin = async (e: FormEvent<HTMLFormElement>) => {
    e.preventDefault();

    // Validate the form
    if (!email || !password) {
      setErrorMessage('Please fill in all fields');
      return;
    }

    // Simulate a login request
    if (email === "johndoe@gmail.com" && password === "pass1234") {
      window.location.href = "/";
    }
  };

  return (
    <div className='flex justify-center items-center h-screen'>
      <form onSubmit={handleLogin} className='flex flex-col gap-3 w-[300px] text-black'>
      <input
        type="email"
        placeholder="Email"
        value={email}
        onChange={(e) => setEmail(e.target.value)}
        className='p-3'
      />
      <input
        type="password"
        placeholder="Password"
        value={password}
        onChange={(e) => setPassword(e.target.value)}
        className='p-3'
      />
      <button type="submit" className='bg-blue-500 p-3 w-fit mx-auto'>Login</button>
      {errorMessage && <p>{errorMessage}</p>}
    </form>
    </div>
  );
}
In this simple component, we’re expecting users to input their email and password to log in to the application.
For simplicity purposes, I have simulated the login request by just matching the email and password to static values(Don’t take it seriously though😃).
There are two scenarios,
If the login succeeds — Redirect the user to the home screen(“/”)
In case login fails — Stay on the login page and show the error message
Let’s test both scenarios now.
P.S. Make sure the app is running while executing the tests, as we will need to test redirection using a real URL.
End-to-End testing
As we have configured /tests directory in the playwright.config.ts, we asked the playwright to look into this directory and execute tests from there. Consider modifying it, if you want to use some other directory.
Let’s create login.spec.ts in the tests directory, you can name it whatever you want (There’s no convention for it).
For simplicity purposes, I have named it as the feature name.
Let’s first collect the steps, we are going to test for successful login.
- Navigate to the login page
- Fill in the email and password fields
- Click on the Login button
- Next steps will be executed according to the login success/failure scenario
- For a successful login case — We will verify whether the current page is the home page
- For failure case — We will check the current page is login and the error message is set.
Let’s write our first test case for successful login.
test('Login form successfully redirects on valid credentials', async ({ page }) => {
  // Navigate to the login page
  await page.goto('/login'); // Replace with your development URL

  // Fill in the email and password fields
  await page.fill('input[type="email"]', 'johndoe@gmail.com');
  await page.fill('input[type="password"]', 'pass1234');

  // Click the login button
  await page.click('button[type="submit"]');

  // Wait for the page to redirect
  await page.waitForURL("/");

  // Assert that the user is redirected to the homepage
  await expect(page).toHaveURL('/'); // Replace with your homepage URL
});
Here, we have provided the valid credentials and thus the login check passed and redirected to the home page.
Let’s check by running the test command inside the project directory.
npx playwright test
Hurray! Our first test is passed successfully🎉🎊.
We have written only one test case, but it shows two tests while executing the tests as below.
Why is it like that?
It’s because we opted for two simulated browsers using playwright.config.ts file. All the tests will be executed in each browser we have mentioned.
Let’s write the failure test cases now. We will consider two cases:
- Requesting login with empty email and password
test('Login form displays error message on empty credentials', async ({ page }) => {
  await page.goto('/login');

  // Click the login button
  await page.click('button[type="submit"]');

  // Check if the error message is displayed
  const errorMessage = await page.textContent('p');
  await expect(errorMessage).toContain('Please fill in all fields');
});
Requesting login with wrong credentials
test('Login form displays error message on invalid credentials', async ({ page }) => {
  await page.goto('/login');

  // Fill in the email field only
  await page.fill('input[type="email"]', 'test@gmail.com');
  await page.fill('input[type="password"]', 'pass1234');

  // Click the login button
  await page.click('button[type="submit"]');

  const errorMessage = await page.textContent('p');
  await expect(errorMessage).toContain('Invalid credentials');
});
Let’s rerun the tests to check whether all of our test cases pass or not. And yay! it all passed🎉
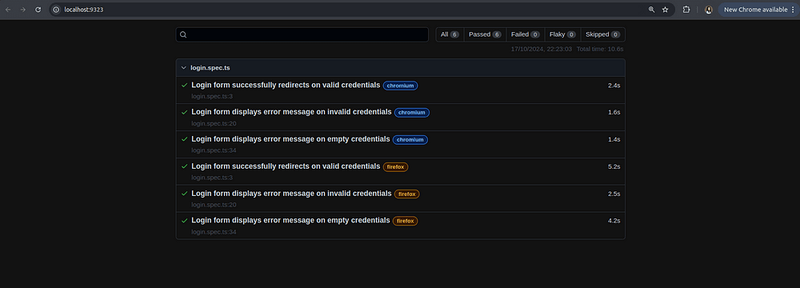
The playwright tool also provides a test report. Run the below command to see the report. It will open a browser page as below.
npx playwright show-report
Bottom Line
A playwright is a powerful tool for writing E2E tests.
E2E tests ensure your application feature works as expected from start to finish.
For performing E2E tests in Next.js, the essential steps are:
- Setup Playwright
- Create test files
- Write test cases
- Execute the tests
- Show the test report for a visual representation of the test results
To read the Full blog on our platform, please visit Canopas blog.
If you like what you read, be sure to hit 💖 button! — as a writer it means the world!
I encourage you to share your thoughts in the comments section below. Your input not only enriches our content but also fuels our motivation to create more valuable and informative articles for you.
Happy coding! 👋


Top comments (1)
Thanks for sharing