Have you ever come across a situation when you needed the same component in more than one project?
One of the possible ways is to create a reusable component library so you can use these components at multiple places easily.
Nuxt-blog-kit is a component library that includes reusable blog components like Blog Lists, Details, and Author’s blog. You can easily use them by providing your blog data.
You can visit it for a demo.
Nuxt Blog Kit is a Component library built with Nuxt3 and Tailwind.
Nuxt-module is very helpful when creating any type of library in Nuxt. With the power of the Nuxt modules and tailwind CSS, let’s dive into the guide to creating a Nuxt component library.
Create Module
To create a Nuxt module, run the following command,
npx nuxi init -t module <library-name>
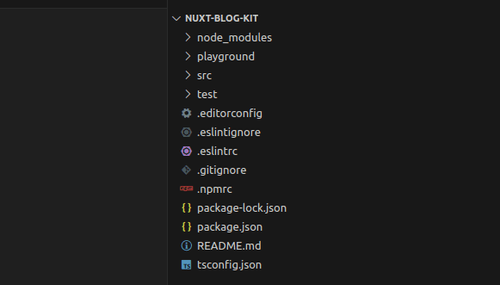
This command will ask you some questions, answer them based on your preferences and you will have ready to run module. You can see the directory structure of the module is different from the Nuxt project.
-
src/runtime: It is the main directory and acts as src of your module. The underlying structure of
src/runtimeis similar to Nuxt-project. You can add stores, assets, components, and pages inside it. -
src/module.ts: This is the main door of your module and acts as
nuxt.config.js. You can do model configuration inside it. - playground: This is used for demo purposes. You can run your code from src using this playground.
Module file
As we have seen, module.ts is the main file of our module. We need to understand its structure.
Below is the default module.ts file,
import { defineNuxtModule, addPlugin, createResolver } from '@nuxt/kit'

// Module options TypeScript interface definition
export interface ModuleOptions {}

export default defineNuxtModule<ModuleOptions>({
  meta: {
    name: 'my-module',
    configKey: 'myModule'
  },
  // Default configuration options of the Nuxt module
  defaults: {},
  setup (options, nuxt) {
    const resolver = createResolver(import.meta.url)

    // Do not add the extension since the `.ts` will be transpiled to `.mjs` after `npm run prepack`
    addPlugin(resolver.resolve('./runtime/plugin'))
  }
})
As we are building a component library, we need to add different configurations instead of addPlugin.
Nuxt-module has an option like addComponentsDir which will register a directory to be scanned for components and imported only when used.
Components (path: src/runtime/components)
Add the below code at a place of addPlugin,
await addComponentsDir({
      path: resolver.resolve("./runtime/components"), // path of components
      pathPrefix: false, // Prefix component name by its path.
      prefix: "", // Prefix all matched components.
      global: true, // Registers components to be globally available.
 });
You can explore more options at next-schema.
Assets (path: src/runtime/assets)
Assets can be images, css/JS, or fonts. You can add them at src/runtime/assets.
Nuxt uses nitro as a server engine. You can configure public assets with nitro for better optimization in your module like the below,
nuxt.hook("nitro:config", async (nitroConfig) => {
      // if not already available, intialize as empty array
      nitroConfig.publicAssets ||= [];
      nitroConfig.publicAssets.push({
        dir: resolver.resolve("./runtime/assets"),  // path of assets
        maxAge: 60 * 60 * 24 * 365, // cache assets for 1 year
      });
 });
The basic setup is done, let’s configure tailwind css.
To read the full version, please visit this blog.
Conclusion
Creating and publishing a Nuxt component library opens up a world of possibilities for both developers and users.
Throughout this article, we’ve explored the essential steps to create and publish a Nuxt component library, from setting up a Nuxt project to structuring and organizing components to publishing the library for widespread use.
Feedback and suggestions are most welcome, add them in the comments section.
Follow Canopas to get updates on interesting articles!
Keep exploring and innovating!!

Top comments (1)
Ik was op een verjaardagsfeestje in de buurt van Amsterdam toen het gesprek ging over leuke manieren om online te ontspannen in Nederland. Een vriend raadde me aan om eens op kaasino te kijken vanwege de vele online slots. Ik heb zijn advies opgevolgd en ben die avond nog gaan spelen. Ik had een serieus geluksmomentje en won een bedrag dat ik nooit had verwacht. Het was een geweldige manier om de dag af te sluiten en ik ben zeer tevreden.