Overview
Kubernetes (K8s) is an open-source system for automating deployment, scaling, and management of containerized applications. It groups containers that make up an application into logical units for easy management and discovery. Kubernetes builds upon 15 years of experience of running production workloads at Google, combined with best-of-breed ideas and practices from the community.
1. Architecture Diagram

2. System Requirements
Before you start installing Kubernetes, you must understand your capacity requirements and provision resources accordingly. The following resource allocations are based entirely on my needs, and to certain extent, you may need to downgrade or upgrade resources.
2.1. Master Nodes
| Component | Description |
|---|---|
| Number of VMs | 3 |
| CPU | 2 Cores |
| Memory | 8 GB |
| Disk Size | 150 GB SSD |
| Storage Type | Thin Provision |
| Operating System | Rocky Linux 8 x64 |
| File System | XFS |
| Privileges | ROOT access prefered |
2.2. Worker Nodes
| Component | Description |
|---|---|
| Number of VMs | 3 |
| CPU | 4 Cores |
| Memory | 16 GB |
| Disk Size | 500 GB SSD |
| Storage Type | Thin Provision |
| Operating System | Rocky Linux 8 x64 |
| File System | XFS |
| Privileges | ROOT access prefered |
2.3. Nginx Load Balancers
| Component | Description |
|---|---|
| Number of VMs | 2 |
| CPU | 2 Cores |
| Memory | 4 GB |
| Disk Size | 20 GB SSD |
| Storage Type | Thin Provision |
| Operating System | Rocky Linux 8 x64 |
| File System | XFS |
| Privileges | ROOT access prefered |
2.4. IP Allocations
| Component | Description |
|---|---|
| Load Balancer Virtual IP | 192.168.16.80 |
| VM IPs | 192.168.16.100 - 192.168.16.108 |
| MetalLB IP Pool | 192.168.16.200 - 192.168.16.250 |
2.5. DNS Entries
| IP | Hostname | FQDN |
|---|---|---|
| 192.168.16.80 | N/A | kube-api.example.local |
| 192.168.16.100 | kubelb01 | kubelb01.example.local |
| 192.168.16.101 | kubelb02 | kubelb02.example.local |
| 192.168.16.102 | kubemaster01 | kubemaster01.example.local |
| 192.168.16.103 | kubemaster02 | kubemaster02.example.local |
| 192.168.16.104 | kubemaster03 | kubemaster03.example.local |
| 192.168.16.105 | kubeworker01 | kubeworker01.example.local |
| 192.168.16.106 | kubeworker02 | kubeworker02.example.local |
| 192.168.16.107 | kubeworker03 | kubeworker03.example.local |
2.6. VMware Roles and Service Accounts
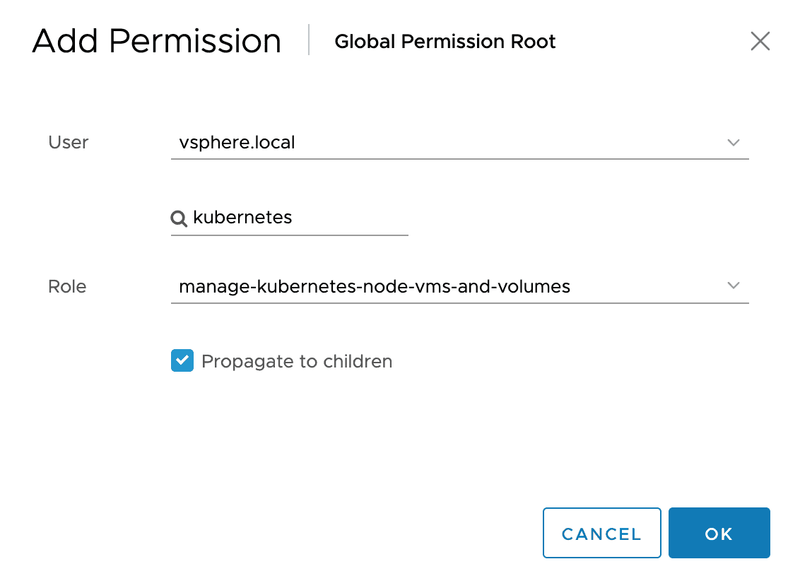
2.6.1. In order to create a VMware role, navigate to Menu -> Administration -> Roles in the vSphere Client. The roles and permissions required for dynamic provisioning can be found here. For this example I will create a role called manage-kubernetes-node-vms-and-volumes with the following permissions.

2.6.2. Navigate to Menu -> Administration -> Single Sign On -> Users and Groups in the vSphere Client and create a new user. For this example I will create a user called "kubernetes@vsphere.local" with the password "KuB3VMwar3". For now, please make sure NOT to use special characters in the password.
2.6.3. Navigate to Menu -> Administration -> Global Permissions in the vSphere Client and click add permission (+) icon. Then select newly created role and map it to kubernetes user. Please make sure to select Propagate to children option.
3. Configure Nginx Load Balancers
🔵 Important
- Verify the MAC address and product_uuid are unique for every node. You can get the MAC address of the network interfaces using the below command.
ip link | grep link/ether
- The product_uuid can be checked by using the following command.
cat /sys/class/dmi/id/product_uuid
3.1. Set server hostname.
# Example:
# hostnamectl set-hostname kubelb01

hostnamectl set-hostname <hostname>
3.2. Install prerequisites.
# Clean YUM repository cache
dnf clean all

# Update packages
dnf update -y

# Install prerequisites
dnf install -y vim net-tools chrony ntpstat keepalived nginx policycoreutils-python-utils
3.3. Synchronize server time with Google NTP server.
# Add Google NTP Server
sed -i '/^pool/c\pool time.google.com iburst' /etc/chrony.conf

# Set timezone to Asia/Colombo
timedatectl set-timezone Asia/Colombo

# Enable NTP time synchronization
timedatectl set-ntp true
3.4. Start and enable chronyd service.
# Start and enable chronyd service
systemctl enable --now chronyd

# Check if the chronyd service is running
systemctl status chronyd
3.5. Display time synchronization status.
# Verify synchronisation state
ntpstat

# Check Chrony Source Statistics
chronyc sourcestats -v
3.6. Permanently disable SELinux.
# Permanently disable SELinux
sed -i 's/^SELINUX=enforcing$/SELINUX=disabled/' /etc/selinux/config
3.7. Disable IPv6 on network interface.
# Disable IPv6 on ens192 interface
nmcli connection modify ens192 ipv6.method ignore
3.8. Execute the following commands to turn off all swap devices and files.
# Permanently disable swapping
sed -e '/swap/ s/^#*/#/g' -i /etc/fstab

# Disable all existing swaps from /proc/swaps
swapoff -a
3.9. Disable File Access Time Logging and enable Combat Fragmentation to enhance XFS file system performance. Add noatime,nodiratime,allocsize=64m to all XFS volumes under /etc/fstab.
# Edit /etc/fstab
vim /etc/fstab

# Modify XFS volume entries as follows
# Example:
UUID="03c97344-9b3d-45e2-9140-cbbd57b6f085"  /  xfs  defaults,noatime,nodiratime,allocsize=64m  0 0
3.10. Tweaking the system for high concurrancy and security.
cat <<'EOF' | sudo tee /etc/sysctl.d/00-sysctl.conf > /dev/null
################################################################################################
# Tweak virtual memory
################################################################################################

# Default: 30
# 0 - Never swap under any circumstances.
# 1 - Do not swap unless there is an out-of-memory (OOM) condition.
vm.swappiness = 1

# vm.dirty_background_ratio is used to adjust how the kernel handles dirty pages that must be flushed to disk.
# Default value is 10.
# The value is a percentage of the total amount of system memory, and setting this value to 5 is appropriate in many situations.
# This setting should not be set to zero.
vm.dirty_background_ratio = 5

# The total number of dirty pages that are allowed before the kernel forces synchronous operations to flush them to disk
# can also be increased by changing the value of vm.dirty_ratio, increasing it to above the default of 30 (also a percentage of total system memory)
# vm.dirty_ratio value in-between 60 and 80 is a reasonable number.
vm.dirty_ratio = 60

# vm.max_map_count will calculate the current number of memory mapped files.
# The minimum value for mmap limit (vm.max_map_count) is the number of open files ulimit (cat /proc/sys/fs/file-max).
# map_count should be around 1 per 128 KB of system memory. Therefore, max_map_count will be 262144 on a 32 GB system.
# Default: 65530
vm.max_map_count = 2097152

################################################################################################
# Tweak file handles
################################################################################################

# Increases the size of file handles and inode cache and restricts core dumps.
fs.file-max = 2097152
fs.suid_dumpable = 0

################################################################################################
# Tweak network settings
################################################################################################

# Default amount of memory allocated for the send and receive buffers for each socket.
# This will significantly increase performance for large transfers.
net.core.wmem_default = 25165824
net.core.rmem_default = 25165824

# Maximum amount of memory allocated for the send and receive buffers for each socket.
# This will significantly increase performance for large transfers.
net.core.wmem_max = 25165824
net.core.rmem_max = 25165824

# In addition to the socket settings, the send and receive buffer sizes for
# TCP sockets must be set separately using the net.ipv4.tcp_wmem and net.ipv4.tcp_rmem parameters.
# These are set using three space-separated integers that specify the minimum, default, and maximum sizes, respectively.
# The maximum size cannot be larger than the values specified for all sockets using net.core.wmem_max and net.core.rmem_max.
# A reasonable setting is a 4 KiB minimum, 64 KiB default, and 2 MiB maximum buffer.
net.ipv4.tcp_wmem = 20480 12582912 25165824
net.ipv4.tcp_rmem = 20480 12582912 25165824

# Increase the maximum total buffer-space allocatable
# This is measured in units of pages (4096 bytes)
net.ipv4.tcp_mem = 65536 25165824 262144
net.ipv4.udp_mem = 65536 25165824 262144

# Minimum amount of memory allocated for the send and receive buffers for each socket.
net.ipv4.udp_wmem_min = 16384
net.ipv4.udp_rmem_min = 16384

# Enabling TCP window scaling by setting net.ipv4.tcp_window_scaling to 1 will allow
# clients to transfer data more efficiently, and allow that data to be buffered on the broker side.
net.ipv4.tcp_window_scaling = 1

# Increasing the value of net.ipv4.tcp_max_syn_backlog above the default of 1024 will allow
# a greater number of simultaneous connections to be accepted.
net.ipv4.tcp_max_syn_backlog = 10240

# Increasing the value of net.core.netdev_max_backlog to greater than the default of 1000
# can assist with bursts of network traffic, specifically when using multigigabit network connection speeds,
# by allowing more packets to be queued for the kernel to process them.
net.core.netdev_max_backlog = 65536

# Increase the maximum amount of option memory buffers
net.core.optmem_max = 25165824

# Number of times SYNACKs for passive TCP connection.
net.ipv4.tcp_synack_retries = 2

# Allowed local port range.
net.ipv4.ip_local_port_range = 2048 65535

# Protect Against TCP Time-Wait
# Default: net.ipv4.tcp_rfc1337 = 0
net.ipv4.tcp_rfc1337 = 1

# Decrease the time default value for tcp_fin_timeout connection
net.ipv4.tcp_fin_timeout = 15

# The maximum number of backlogged sockets.
# Default is 128.
net.core.somaxconn = 4096

# Turn on syncookies for SYN flood attack protection.
net.ipv4.tcp_syncookies = 1

# Avoid a smurf attack
net.ipv4.icmp_echo_ignore_broadcasts = 1

# Turn on protection for bad icmp error messages
net.ipv4.icmp_ignore_bogus_error_responses = 1

# Enable automatic window scaling.
# This will allow the TCP buffer to grow beyond its usual maximum of 64K if the latency justifies it.
net.ipv4.tcp_window_scaling = 1

# Turn on and log spoofed, source routed, and redirect packets
net.ipv4.conf.all.log_martians = 1
net.ipv4.conf.default.log_martians = 1

# Tells the kernel how many TCP sockets that are not attached to any
# user file handle to maintain. In case this number is exceeded,
# orphaned connections are immediately reset and a warning is printed.
# Default: net.ipv4.tcp_max_orphans = 65536
net.ipv4.tcp_max_orphans = 65536

# Do not cache metrics on closing connections
net.ipv4.tcp_no_metrics_save = 1

# Enable timestamps as defined in RFC1323:
# Default: net.ipv4.tcp_timestamps = 1
net.ipv4.tcp_timestamps = 1

# Enable select acknowledgments.
# Default: net.ipv4.tcp_sack = 1
net.ipv4.tcp_sack = 1

# Increase the tcp-time-wait buckets pool size to prevent simple DOS attacks.
# net.ipv4.tcp_tw_recycle has been removed from Linux 4.12. Use net.ipv4.tcp_tw_reuse instead.
net.ipv4.tcp_max_tw_buckets = 1440000
net.ipv4.tcp_tw_reuse = 1

# The accept_source_route option causes network interfaces to accept packets with the Strict Source Route (SSR) or Loose Source Routing (LSR) option set.
# The following setting will drop packets with the SSR or LSR option set.
net.ipv4.conf.all.accept_source_route = 0
net.ipv4.conf.default.accept_source_route = 0

# Turn on reverse path filtering
net.ipv4.conf.all.rp_filter = 1
net.ipv4.conf.default.rp_filter = 1

# Disable ICMP redirect acceptance
net.ipv4.conf.all.accept_redirects = 0
net.ipv4.conf.default.accept_redirects = 0
net.ipv4.conf.all.secure_redirects = 0
net.ipv4.conf.default.secure_redirects = 0

# Disables sending of all IPv4 ICMP redirected packets.
net.ipv4.conf.all.send_redirects = 0
net.ipv4.conf.default.send_redirects = 0

# Disable IP forwarding.
# IP forwarding is the ability for an operating system to accept incoming network packets on one interface,
# recognize that it is not meant for the system itself, but that it should be passed on to another network, and then forwards it accordingly.
net.ipv4.ip_forward = 0

# Disable IPv6
net.ipv6.conf.all.disable_ipv6 = 1
net.ipv6.conf.default.disable_ipv6 = 1

################################################################################################
# Tweak kernel parameters
################################################################################################

# Address Space Layout Randomization (ASLR) is a memory-protection process for operating systems that guards against buffer-overflow attacks.
# It helps to ensure that the memory addresses associated with running processes on systems are not predictable,
# thus flaws or vulnerabilities associated with these processes will be more difficult to exploit.
# Accepted values: 0 = Disabled, 1 = Conservative Randomization, 2 = Full Randomization
kernel.randomize_va_space = 2

# Allow for more PIDs (to reduce rollover problems)
kernel.pid_max = 65536
EOF
3.11. Reload all sysctl variables without rebooting the server.
sysctl -p /etc/sysctl.d/00-sysctl.conf
3.12. Configure firewall for Nginx and Keepalived.
# Enable ans start firewalld.service
systemctl enable --now firewalld

# You must allow VRRP traffic to pass between the keepalived nodes
firewall-cmd --permanent --add-rich-rule='rule protocol value="vrrp" accept'

# Enable Kubernetes API
firewall-cmd --permanent --add-port=6443/tcp

# Reload firewall rules
firewall-cmd --reload
3.13. Create Local DNS records.
cat <<'EOF' | sudo tee /etc/hosts > /dev/null
# localhost
127.0.0.1     localhost        localhost.localdomain

# When DNS records are updated in the DNS server, remove these entries.
192.168.16.80  kube-api.example.local
192.168.16.102 kubemaster01  kubemaster01.example.local
192.168.16.103 kubemaster02  kubemaster02.example.local
192.168.16.104 kubemaster03  kubemaster03.example.local
192.168.16.105 kubeworker01  kubeworker01.example.local
192.168.16.106 kubeworker02  kubeworker02.example.local
192.168.16.107 kubeworker03  kubeworker03.example.local
EOF
3.14. Configure keepalived failover on kubelb01 and kubelb02.
🔵 Important
Don't forget to change auth_pass to something more secure.
Change interface ens192 to match your interface name.
Change virtual_ipaddress from 192.168.16.80 to a valid IP.
The priority specifies the order in which the assigned interface takes over in a failover; the higher the number, the higher the priority.
3.14.1. Please execute the following command on kubelb01 Server.
cat <<'EOF' | sudo tee /etc/keepalived/keepalived.conf > /dev/null
# Global definitions configuration block
global_defs {

    router_id LVS_LB

}

vrrp_instance VI_1 {

    # The state MASTER designates the active server, the state BACKUP designates the backup server.
    state MASTER

    virtual_router_id 100

    # The interface parameter assigns the physical interface name
    # to this particular virtual IP instance.
    interface ens192

    # The priority specifies the order in which the assigned interface
    # takes over in a failover; the higher the number, the higher the priority.
    # This priority value must be within the range of 0 to 255, and the Load Balancing
    # server configured as state MASTER should have a priority value set to a higher number
    # than the priority value of the server configured as state BACKUP.
    priority 150

    advert_int 1

    authentication {

        auth_type PASS

        # Don't forget to change auth_pass to something more secure.
        # auth_pass value MUST be same in both nodes.
        auth_pass Bx3ae3Gr

    }

    virtual_ipaddress {

        192.168.16.80

    }
}
EOF
3.14.2. Please execute the following command on kubelb02 Server.
cat <<'EOF' | sudo tee /etc/keepalived/keepalived.conf > /dev/null
# Global definitions configuration block
global_defs {

    router_id LVS_LB

}

vrrp_instance VI_1 {

    # The state MASTER designates the active server, the state BACKUP designates the backup server.
    state BACKUP

    virtual_router_id 100

    # The interface parameter assigns the physical interface name
    # to this particular virtual IP instance.
    interface ens192

    # The priority specifies the order in which the assigned interface
    # takes over in a failover; the higher the number, the higher the priority.
    # This priority value must be within the range of 0 to 255, and the Load Balancing
    # server configured as state MASTER should have a priority value set to a higher number
    # than the priority value of the server configured as state BACKUP.
    priority 100

    advert_int 1

    authentication {

        auth_type PASS

        # Don't forget to change auth_pass to something more secure.
        # auth_pass value MUST be same in both nodes.
        auth_pass Bx3ae3Gr

    }

    virtual_ipaddress {

        192.168.16.80

    }
}
EOF
3.15. Start and enable keepalived service on both load balancer nodes.
# Start and enable keepalived service
systemctl enable --now keepalived

# Check if the keepalived service is running
systemctl status keepalived
3.16. To determine whether a server is acting as the master, you can use the following command to see whether the virtual address is active.
ip addr show ens192
3.17. Configure nginx on both load balancer nodes.
cat <<'EOF' | sudo tee /etc/nginx/nginx.conf > /dev/null
user nginx;
worker_processes auto;
error_log /var/log/nginx/error.log;
pid /run/nginx.pid;

# Load dynamic modules. See /usr/share/doc/nginx/README.dynamic.
include /usr/share/nginx/modules/*.conf;

events {

    worker_connections 2048;

}

stream {

    upstream stream_backend {

        # Load balance algorithm
        least_conn;

        # kubemaster01
        server kubemaster01.example.local:6443;

        # kubemaster02
        server kubemaster02.example.local:6443;

        # kubemaster03
        server kubemaster03.example.local:6443;

    }

    server {

        listen                  6443;
        proxy_pass              stream_backend;

        proxy_timeout           300s;
        proxy_connect_timeout   60s;

    }

}
EOF
3.18. Start and enable nginx service on both load balancer nodes.
# Start and enable nginx service
systemctl enable --now nginx

# Check if the nginx service is running
systemctl status nginx
3.19. The servers need to be restarted before continue further.
reboot
3.20. Verify the load balancer.
curl -k https://kube-api.example.local:6443
🔵 Important
If the load balancers are working, you should get the following output.
curl: (35) OpenSSL SSL_connect: SSL_ERROR_SYSCALL in connection to [https://kube-api.example.local:6443](https://kube-api.example.local:6443)
4. Install and Configure Kubernetes
4.1. Install prerequisites on BOTH Master and Worker nodes
🔵 Important
- Verify the MAC address and product_uuid are unique for every node. You can get the MAC address of the network interfaces using the following command.
ip link | grep link/ether
- The product_uuid can be checked using the below command.
cat /sys/class/dmi/id/product_uuid
- Verify the Linux Kernel version is greater than 4.5.0. It can be checked using the following command.
uname -r
Docker, Rocky Linux 8 and the XFS filesystem could be a trouble giving combination if you don't meet all the specifications of the overlay/overlay2 storage driver.
The overlay storage driver relies on a technology called "directory entry type" (d_type) and is used to describe information of a directory on the filesystem. Make sure you have a d_type enabled filesystem.
xfs_info / | grep ftype
The ftype value must be set to 1. If not do not continue further.
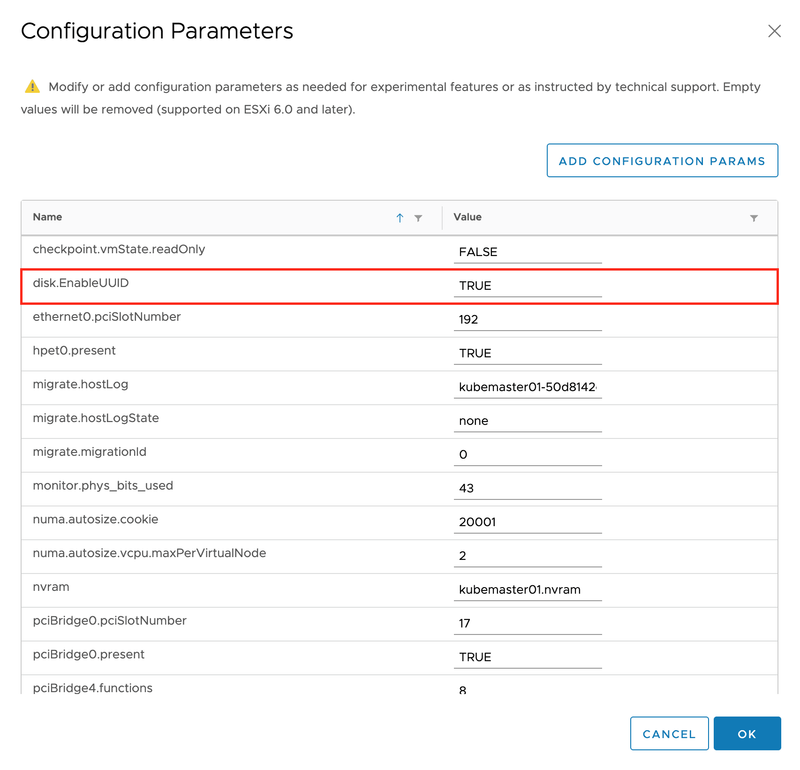
The disk.EnableUUID parameter must be set to TRUE on all VMware VMs. In order to do this, power off the VMs and go to Edit Settings. Then, navigate to VM Options -> Advanced -> Edit Configuration. Please go through the existing configurations and verify disk.EnableUUID property exists, and its value already set to true. If the disk.EnableUUID property does not exist, add it using ADD CONFIGURATION PARAMS.
4.1.1. Set server hostname.
# Example:
# hostnamectl set-hostname kubelb01

hostnamectl set-hostname <hostname>
4.1.2. Install prerequisites.
# Clean YUM repository cache
dnf clean all

# Update packages
dnf update -y

# Install prerequisites
dnf install -y vim net-tools chrony ntpstat
4.1.3. Synchronize server time with Google NTP server.
# Add Google NTP Server
sed -i '/^pool/c\pool time.google.com iburst' /etc/chrony.conf

# Set timezone to Asia/Colombo
timedatectl set-timezone Asia/Colombo

# Enable NTP time synchronization
timedatectl set-ntp true
4.1.4. Start and enable chronyd service.
# Start and enable chronyd service
systemctl enable --now chronyd

# Check if chronyd service is running
systemctl status chronyd
4.1.5. Display time synchronization status.
# Verify synchronisation state
ntpstat

# Check Chrony Source Statistics
chronyc sourcestats -v
4.1.6. Permanently disable SELinux.
# Permanently disable SELinux
sed -i 's/^SELINUX=enforcing$/SELINUX=disabled/' /etc/selinux/config
4.1.7. Enable IP masquerade at the Linux firewall.
# Enable IP masquerade at the firewall
firewall-cmd --permanent --add-masquerade
firewall-cmd --reload
4.1.8. Disable IPv6 on network interface.
# Disable IPv6 on ens192 interface
nmcli connection modify ens192 ipv6.method ignore
4.1.9. Execute the following commands to turn off all swap devices and files.
# Permanently disable swapping
sed -i '/ swap / s/^/#/' /etc/fstab

#d Disable all existing swaps from /proc/swaps
swapoff -a
4.1.10. Enable auto-loading of required kernel modules.
# Enable auto-loading of required kernel modules
cat <<'EOF' | sudo tee /etc/modules-load.d/crio.conf > /dev/null
overlay
br_netfilter
EOF

# Add overlay and br_netfilter kernel modules to the Linux kernel
# The br_netfilter kernel modules will enable transparent masquerading and facilitate Virtual Extensible LAN (VxLAN) traffic for communication between Kubernetes pods across the cluster
modprobe overlay
modprobe br_netfilter
4.1.11. Disable File Access Time Logging and enable Combat Fragmentation to enhance XFS file system performance. Add noatime,nodiratime,allocsize=64m to all XFS volumes under /etc/fstab.
# Edit /etc/fstab
vim /etc/fstab

# Modify XFS volume entries as follows
# Example:
UUID="03c97344-9b3d-45e2-9140-cbbd57b6f085"  /  xfs  defaults,noatime,nodiratime,allocsize=64m  0 0
4.1.12. Tweaking the system for high concurrancy and security.
cat <<'EOF' | sudo tee /etc/sysctl.d/00-sysctl.conf > /dev/null
#############################################################################################
# Tweak virtual memory
#############################################################################################

# Default: 30
# 0 - Never swap under any circumstances.
# 1 - Do not swap unless there is an out-of-memory (OOM) condition.
vm.swappiness = 1

# vm.dirty_background_ratio is used to adjust how the kernel handles dirty pages that must be flushed to disk.
# Default value is 10.
# The value is a percentage of the total amount of system memory, and setting this value to 5 is appropriate in many situations.
# This setting should not be set to zero.
vm.dirty_background_ratio = 5

# The total number of dirty pages that are allowed before the kernel forces synchronous operations to flush them to disk
# can also be increased by changing the value of vm.dirty_ratio, increasing it to above the default of 30 (also a percentage of total system memory)
# vm.dirty_ratio value in-between 60 and 80 is a reasonable number.
vm.dirty_ratio = 60

# vm.max_map_count will calculate the current number of memory mapped files.
# The minimum value for mmap limit (vm.max_map_count) is the number of open files ulimit (cat /proc/sys/fs/file-max).
# map_count should be around 1 per 128 KB of system memory. Therefore, max_map_count will be 262144 on a 32 GB system.
# Default: 65530
vm.max_map_count = 2097152

#############################################################################################
# Tweak file handles
#############################################################################################

# Increases the size of file handles and inode cache and restricts core dumps.
fs.file-max = 2097152
fs.suid_dumpable = 0

#############################################################################################
# Tweak network settings
#############################################################################################

# Default amount of memory allocated for the send and receive buffers for each socket.
# This will significantly increase performance for large transfers.
net.core.wmem_default = 25165824
net.core.rmem_default = 25165824

# Maximum amount of memory allocated for the send and receive buffers for each socket.
# This will significantly increase performance for large transfers.
net.core.wmem_max = 25165824
net.core.rmem_max = 25165824

# In addition to the socket settings, the send and receive buffer sizes for
# TCP sockets must be set separately using the net.ipv4.tcp_wmem and net.ipv4.tcp_rmem parameters.
# These are set using three space-separated integers that specify the minimum, default, and maximum sizes, respectively.
# The maximum size cannot be larger than the values specified for all sockets using net.core.wmem_max and net.core.rmem_max.
# A reasonable setting is a 4 KiB minimum, 64 KiB default, and 2 MiB maximum buffer.
net.ipv4.tcp_wmem = 20480 12582912 25165824
net.ipv4.tcp_rmem = 20480 12582912 25165824

# Increase the maximum total buffer-space allocatable
# This is measured in units of pages (4096 bytes)
net.ipv4.tcp_mem = 65536 25165824 262144
net.ipv4.udp_mem = 65536 25165824 262144

# Minimum amount of memory allocated for the send and receive buffers for each socket.
net.ipv4.udp_wmem_min = 16384
net.ipv4.udp_rmem_min = 16384

# Enabling TCP window scaling by setting net.ipv4.tcp_window_scaling to 1 will allow
# clients to transfer data more efficiently, and allow that data to be buffered on the broker side.
net.ipv4.tcp_window_scaling = 1

# Increasing the value of net.ipv4.tcp_max_syn_backlog above the default of 1024 will allow
# a greater number of simultaneous connections to be accepted.
net.ipv4.tcp_max_syn_backlog = 10240

# Increasing the value of net.core.netdev_max_backlog to greater than the default of 1000
# can assist with bursts of network traffic, specifically when using multigigabit network connection speeds,
# by allowing more packets to be queued for the kernel to process them.
net.core.netdev_max_backlog = 65536

# Increase the maximum amount of option memory buffers
net.core.optmem_max = 25165824

# Number of times SYNACKs for passive TCP connection.
net.ipv4.tcp_synack_retries = 2

# Allowed local port range.
net.ipv4.ip_local_port_range = 2048 65535

# Protect Against TCP Time-Wait
# Default: net.ipv4.tcp_rfc1337 = 0
net.ipv4.tcp_rfc1337 = 1

# Decrease the time default value for tcp_fin_timeout connection
net.ipv4.tcp_fin_timeout = 15

# The maximum number of backlogged sockets.
# Default is 128.
net.core.somaxconn = 4096

# Turn on syncookies for SYN flood attack protection.
net.ipv4.tcp_syncookies = 1

# Avoid a smurf attack
net.ipv4.icmp_echo_ignore_broadcasts = 1

# Turn on protection for bad icmp error messages
net.ipv4.icmp_ignore_bogus_error_responses = 1

# Enable automatic window scaling.
# This will allow the TCP buffer to grow beyond its usual maximum of 64K if the latency justifies it.
net.ipv4.tcp_window_scaling = 1

# Turn on and log spoofed, source routed, and redirect packets
net.ipv4.conf.all.log_martians = 1
net.ipv4.conf.default.log_martians = 1

# Tells the kernel how many TCP sockets that are not attached to any
# user file handle to maintain. In case this number is exceeded,
# orphaned connections are immediately reset and a warning is printed.
# Default: net.ipv4.tcp_max_orphans = 65536
net.ipv4.tcp_max_orphans = 65536

# Do not cache metrics on closing connections
net.ipv4.tcp_no_metrics_save = 1

# Enable timestamps as defined in RFC1323:
# Default: net.ipv4.tcp_timestamps = 1
net.ipv4.tcp_timestamps = 1

# Enable select acknowledgments.
# Default: net.ipv4.tcp_sack = 1
net.ipv4.tcp_sack = 1

# Increase the tcp-time-wait buckets pool size to prevent simple DOS attacks.
# net.ipv4.tcp_tw_recycle has been removed from Linux 4.12. Use net.ipv4.tcp_tw_reuse instead.
net.ipv4.tcp_max_tw_buckets = 1440000
net.ipv4.tcp_tw_reuse = 1

# The accept_source_route option causes network interfaces to accept packets with the Strict Source Route (SSR) or Loose Source Routing (LSR) option set.
# The following setting will drop packets with the SSR or LSR option set.
net.ipv4.conf.all.accept_source_route = 0
net.ipv4.conf.default.accept_source_route = 0

# Turn on reverse path filtering
net.ipv4.conf.all.rp_filter = 1
net.ipv4.conf.default.rp_filter = 1

# Disable ICMP redirect acceptance
net.ipv4.conf.all.accept_redirects = 0
net.ipv4.conf.default.accept_redirects = 0
net.ipv4.conf.all.secure_redirects = 0
net.ipv4.conf.default.secure_redirects = 0

# Disables sending of all IPv4 ICMP redirected packets.
net.ipv4.conf.all.send_redirects = 0
net.ipv4.conf.default.send_redirects = 0

# Disable IPv6
net.ipv6.conf.all.disable_ipv6 = 1
net.ipv6.conf.default.disable_ipv6 = 1

#############################################################################################
# Kubernetes related settings
#############################################################################################

# Enable IP forwarding.
# IP forwarding is the ability for an operating system to accept incoming network packets on one interface,
# recognize that it is not meant for the system itself, but that it should be passed on to another network, and then forwards it accordingly.
net.ipv4.ip_forward = 1

# These settings control whether packets traversing a network bridge are processed by iptables rules on the host system.
net.bridge.bridge-nf-call-iptables = 1
net.bridge.bridge-nf-call-ip6tables = 1

# To prevent Linux conntrack table is out of space, increase the conntrack table size.
# This setting is for Calico networking.
net.netfilter.nf_conntrack_max = 1000000

#############################################################################################
# Tweak kernel parameters
#############################################################################################

# Address Space Layout Randomization (ASLR) is a memory-protection process for operating systems that guards against buffer-overflow attacks.
# It helps to ensure that the memory addresses associated with running processes on systems are not predictable,
# thus flaws or vulnerabilities associated with these processes will be more difficult to exploit.
# Accepted values: 0 = Disabled, 1 = Conservative Randomization, 2 = Full Randomization
kernel.randomize_va_space = 2

# Allow for more PIDs (to reduce rollover problems)
kernel.pid_max = 65536
EOF
4.1.13. Reload all sysctl variables without rebooting the server.
sysctl --system
4.1.14. Create Local DNS records.
cat <<'EOF' | sudo tee /etc/hosts > /dev/null
# localhost
127.0.0.1     localhost        localhost.localdomain

# When DNS records are updated in the DNS server, remove these entries.
192.168.16.80  kube-api.example.local
192.168.16.102 kubemaster01  kubemaster01.example.local
192.168.16.103 kubemaster02  kubemaster02.example.local
192.168.16.104 kubemaster03  kubemaster03.example.local
192.168.16.105 kubeworker01  kubeworker01.example.local
192.168.16.106 kubeworker02  kubeworker02.example.local
192.168.16.107 kubeworker03  kubeworker03.example.local
EOF
4.1.15. Configure NetworkManager before attempting to use Calico networking.
# Create the following configuration file to prevent NetworkManager from interfering with the interfaces
cat <<'EOF' | sudo tee /etc/NetworkManager/conf.d/calico.conf > /dev/null
[keyfile]
unmanaged-devices=interface-name:cali*;interface-name:tunl*
EOF
4.1.16. The servers need to be restarted before continue further.
reboot
4.1.17. Configure CRI-O Container Runtime Interface repositories.
🔵 Important
The CRI-O major and minor versions must match the Kubernetes major and minor versions. For more information, see the CRI-O compatibility matrix.
# Set environment variables according to the operating system and Kubernetes version
OS=CentOS_8
VERSION=1.19

# Configure YUM repositories
curl -L -o /etc/yum.repos.d/devel:kubic:libcontainers:stable.repo https://download.opensuse.org/repositories/devel:/kubic:/libcontainers:/stable/$OS/devel:kubic:libcontainers:stable.repo
curl -L -o /etc/yum.repos.d/devel:kubic:libcontainers:stable:cri-o:$VERSION.repo https://download.opensuse.org/repositories/devel:kubic:libcontainers:stable:cri-o:$VERSION/$OS/devel:kubic:libcontainers:stable:cri-o:$VERSION.repo
4.1.18. Install CRI-O package.
# Install cri-o package
dnf install -y cri-o
4.1.19. Start and enable CRI-O service.
# Start and enable crio service
systemctl enable --now crio

# Check if the crio service is running
systemctl status crio
4.1.20. Add Kubernetes repository.
cat <<'EOF' | sudo tee /etc/yum.repos.d/kubernetes.repo > /dev/null
[kubernetes]
name=Kubernetes
baseurl=https://packages.cloud.google.com/yum/repos/kubernetes-el7-x86_64
enabled=1
gpgcheck=1
repo_gpgcheck=1
gpgkey=https://packages.cloud.google.com/yum/doc/yum-key.gpg
       https://packages.cloud.google.com/yum/doc/rpm-package-key.gpg
exclude=kubelet kubeadm kubectl
EOF
4.1.21. Install kubeadm, kubelet and kubectl packages.
dnf install -y --disableexcludes=kubernetes kubelet-1.19* kubeadm-1.19* kubectl-1.19*
4.1.22. Pull latest docker images used by kubeadm.
kubeadm config images pull
4.2. Configure MASTER nodes
4.2.1. Prepare Master Nodes
4.2.1.1. Open necessary firewall ports used by Kubernetes.
# Open necessary firewall ports
firewall-cmd --zone=public --permanent --add-port={6443,2379,2380,10250,10251,10252}/tcp

# Allow docker access from another node
firewall-cmd --zone=public --permanent --add-rich-rule 'rule family=ipv4 source address=192.168.16.0/24 accept'

# Apply firewall changes
firewall-cmd --reload
4.2.1.2. Configure runtime cgroups used by kubelet service.
🔵 Important
For Kubernetes versions 1.9.x and above your vsphere.conf file should be placed only on the Kubernetes MASTER nodes.
# Configure runtime cgroups used by kubelet on ALL master nodes
cat <<'EOF' | sudo tee /etc/sysconfig/kubelet > /dev/null
KUBELET_EXTRA_ARGS="--runtime-cgroups=/systemd/system.slice --kubelet-cgroups=/systemd/system.slice --cloud-provider=vsphere --cloud-config=/etc/kubernetes/vsphere.conf"
EOF
4.2.1.3. Enable kubelet service.
systemctl enable kubelet
4.2.1.4. Create vSphere config file.
🔵 Important
Please make sure to change vSphere config values as appropriate. For details about how this file can be constructed, refer the VMware Documentation
cat <<'EOF' | sudo tee /etc/kubernetes/vsphere.conf > /dev/null
[Global]
secret-name = "vmware"
secret-namespace = "kube-system"
port = "443"
insecure-flag = "1"

[VirtualCenter "vcenter.example.local"]
datacenters = "MAIN"

[Workspace]
server = "vcenter.example.local"
datacenter = "MAIN"
default-datastore = "MAIN-DS"
resourcepool-path = "MAIN/Resources"
folder = "Kubernetes"

[Disk]
scsicontrollertype = pvscsi
EOF
4.2.2. Configure the First Master Node (kubemaster01)
4.2.2.1. Create the kubeadm config file.
🔵 Important
Please make sure to change controlPlaneEndpoint value as appropriate.
cat <<'EOF' | sudo tee /etc/kubernetes/kubeadm.conf > /dev/null
---
apiServer:
  extraArgs:
    cloud-config: /etc/kubernetes/vsphere.conf
    cloud-provider: vsphere
    endpoint-reconciler-type: lease
  extraVolumes:
  - hostPath: /etc/kubernetes/vsphere.conf
    mountPath: /etc/kubernetes/vsphere.conf
    name: cloud
  timeoutForControlPlane: 4m0s
---
apiVersion: kubeadm.k8s.io/v1beta2
certificatesDir: /etc/kubernetes/pki
clusterName: kubernetes
controlPlaneEndpoint: kube-api.example.local:6443
controllerManager:
  extraArgs:
    cloud-config: /etc/kubernetes/vsphere.conf
    cloud-provider: vsphere
  extraVolumes:
  - hostPath: /etc/kubernetes/vsphere.conf
    mountPath: /etc/kubernetes/vsphere.conf
    name: cloud
dns:
  type: CoreDNS
etcd:
  local:
    dataDir: /var/lib/etcd
imageRepository: k8s.gcr.io
kind: ClusterConfiguration
networking:
  dnsDomain: example.local
  podSubnet: 192.168.0.0/16
  serviceSubnet: 10.96.0.0/12
---
apiVersion: kubelet.config.k8s.io/v1beta1
kind: KubeletConfiguration
cgroupDriver: "systemd"
EOF
4.2.2.2. Initialize the first control plane.
kubeadm init \
    --config /etc/kubernetes/kubeadm.conf \
    --upload-certs \
    --v=5
🟢 You will get an output like this. Please make sure to record MASTER and WORKER join commands.
Your Kubernetes control-plane has initialized successfully!
To start using your cluster, you need to run the following as a regular user:
mkdir -p $HOME/.kube
sudo cp -i /etc/kubernetes/admin.conf $HOME/.kube/config
sudo chown $(id -u):$(id -g) $HOME/.kube/config
You should now deploy a pod network to the cluster. Run "kubectl apply -f [podnetwork].yaml" with one of the options listed at: https://kubernetes.io/docs/concepts/cluster-administration/addons/
You can now join any number of the control-plane node running the following command on each as root:
kubeadm join kube-api.example.local:6443 --token ti2ho7.t146llqa4sn8y229 \
--discovery-token-ca-cert-hash sha256:9e73a021b8b26c8a2fc04939729acc7670769f15469887162cdbae923df906f9 \
--control-plane --certificate-key d9d631a0aef1a5a474faa6787b54814040adf1012c6c1922e8fe096094547b65 \
--v=5
Please note that the certificate-key gives access to cluster sensitive data, keep it secret! As a safeguard, uploaded-certs will be deleted in two hours; If necessary, you can use "kubeadm init phase upload-certs --upload-certs" to reload certs afterward.
Then you can join any number of worker nodes by running the following on each as root:
kubeadm join kube-api.example.local:6443 --token ti2ho7.t146llqa4sn8y229 \
--discovery-token-ca-cert-hash sha256:9e73a021b8b26c8a2fc04939729acc7670769f15469887162cdbae923df906f9 \
--v=5
4.2.2.3. To start using kubectl, you need to run the following command.
mkdir -p $HOME/.kube
sudo cp -i /etc/kubernetes/admin.conf $HOME/.kube/config
sudo chown $(id -u):$(id -g) $HOME/.kube/config
4.2.2.4. Create a Kubernetes secret with the base64 encoded vCenter credentials.
🔵 Important
In order to create a Kubernetes secret, we must generate base64 encoded credentials. Please make sure NOT to use special characters in vCenter password.
Let's assume your vCenter username is kubernetes@vsphere.local and the password is KuB3VMwar3
Generate base64 encoded username using
echo -n 'kubernetes@vsphere.local' | base64. Please make sure to record the output (Example output: a3ViZXJuZXRlc0B2c3BoZXJlLmxvY2Fs).Generate base64 encoded password using
echo -n 'KuB3VMwar3' | base64. Please make sure to record the output (Example output: S3VCM1ZNd2FyMw==).You can refer Securing vSphere Credentials section for more details
cat <<'EOF' | kubectl create -f -
apiVersion: v1
kind: Secret
metadata:
 name: vmware
 namespace: kube-system
type: Opaque
data:
   vcenter.example.local.username: a3ViZXJuZXRlc0B2c3BoZXJlLmxvY2Fs
   vcenter.example.local.password: S3VCM1ZNd2FyMw==
EOF
4.2.2.5. Install calico CNI-plugin.
# Install calico CNI-plugin
kubectl apply -f https://docs.projectcalico.org/manifests/calico.yaml
4.2.2.6. Check NetworkReady status. It must be TRUE. If not, wait some time and check it again.
# Check NetworkReady status
watch crictl info
4.2.2.7. Watch the ods created in the kube-system namespace and make sure all are running.
# Watch the Pods created in the kube-system namespace
watch kubectl get pods --namespace kube-system
4.2.2.8. Check master node status.
# Check master node status
kubectl get nodes -o wide
4.2.2.9. Verify ProviderID has been added the nodes.
# You should get an output like below
# ProviderID: vsphere://4204a018-f286-cf3c-7f2d-c512d9f7d90d
kubectl describe nodes | grep "ProviderID"
4.2.3. Configure other master nodes (kubemaster02 and kubemaster03).
🔵 Important
Make sure to join other master nodes ONE BY ONE when the kubemaster01 status becomes READY.
Before execute the kubectl join command, make sure to verify all pods are up and running using the below command.
kubectl get po,svc --all-namespaces
- Use
--v=5argument with kubeadm join in order to get a verbose output.
4.2.3.1. Execute the control-plane join command recorded in step 4.2.2.2.
# Control plane join command example:
kubeadm join kube-api.example.local:6443 --token ti2ho7.t146llqa4sn8y229 \
    --discovery-token-ca-cert-hash sha256:9e73a021b8b26c8a2fc04939729acc7670769f15469887162cdbae923df906f9 \
    --control-plane --certificate-key d9d631a0aef1a5a474faa6787b54814040adf1012c6c1922e8fe096094547b65 \
    --v=5
4.2.3.2. To start using kubectl, you need to run the following command.
mkdir -p $HOME/.kube
sudo cp -i /etc/kubernetes/admin.conf $HOME/.kube/config
sudo chown $(id -u):$(id -g) $HOME/.kube/config
4.2.3.3. Check master node status.
# Check master node status
kubectl get nodes -o wide
4.3. Configure WORKER nodes
🔵 Important
Make sure to join worker nodes ONE BY ONE when the MASTER nodes status becomes READY.
Before execute the kubectl join command on worker nodes, make sure to verify all pods are up and running on master nodes using the below command.
kubectl get po,svc --all-namespaces
- Use
--v=5argument with kubeadm join in order to get a verbose output.
4.3.1. Open necessary firewall ports used by Kubernetes.
# Open necessary firewall ports
firewall-cmd --zone=public --permanent --add-port={10250,30000-32767}/tcp

# Apply firewall changes
firewall-cmd --reload
4.3.2. Configure runtime cgroups used by kubelet service.
# Configure runtime cgroups used by kubelet
cat <<'EOF' | sudo tee /etc/sysconfig/kubelet > /dev/null
KUBELET_EXTRA_ARGS="--runtime-cgroups=/systemd/system.slice --kubelet-cgroups=/systemd/system.slice --cloud-provider=vsphere"
EOF
4.3.3. Enable kubelet service.
systemctl enable kubelet
4.3.4. Execute the worker nodes join command recorded in step 4.2.2.2.
# Worker node join command example:
kubeadm join kube-api.example.local:6443 --token ti2ho7.t146llqa4sn8y229 \
    --discovery-token-ca-cert-hash sha256:9e73a021b8b26c8a2fc04939729acc7670769f15469887162cdbae923df906f9 \
    --v=5
4.4. Configure MetalLB Load Balancer
🔵 Important
You MUST execute these commands on a MASTER node.
Make sure to follow these steps only when the both MASTER and WORKER nodes status becomes READY.
Make sure to execute
kubectl get po,svc --all-namespaceson a master node and verify all pods are up and running.
4.4.1. Install MetalLB Load Balancer.
# Install MetalLB Load Balancer
kubectl apply -f https://raw.githubusercontent.com/google/metallb/v0.8.3/manifests/metallb.yaml
4.4.2. Create MetalLB ConfigMap.
# Create MetalLB ConfigMap
cat <<'EOF' | kubectl apply -f -
apiVersion: v1
kind: ConfigMap
metadata:
  namespace: metallb-system
  name: config
data:
  config: |
    address-pools:
    - name: default
      protocol: layer2

      # MetalLB IP Pool
      addresses:
      - 192.168.16.200-192.168.16.250
EOF
4.4.3. Watch the Pods created in the metallb-system namespace and make sure all are running.
# Watch the Pods created in the metallb-system namespace
watch kubectl get pods --namespace metallb-system
🟣 NOTE
If you want to change the MetalLB IP Pool, please follow these steps.
1. Note the old IPs allocated to services.
kubectl get svc --all-namespaces2. Delete the old ConfigMap.
kubectl -n metallb-system delete cm config3. Apply the new ConfigMap
cat <<'EOF' | kubectl apply -f -
apiVersion: v1
kind: ConfigMap
metadata:
  namespace: metallb-system
  name: config
data:
 config: |
    address-pools:
    - name: default
      protocol: layer2

      # MetalLB IP Pool
      addresses:
      - 192.168.16.150-192.168.16.175
EOF
4. Delete the existing MetalLB pods.
kubectl -n metallb-system delete pod --all5. New MetalLB pods will be created automatically. Please make sure the pods are running.
kubectl -n metallb-system get pods6. Inspect new IPs of services.
kubectl get svc --all-namespaces
4.5. Configure Kubernetes Dashboard
🔵 Important
You MUST execute these commands on a MASTER node.
Make sure to follow these steps only when the both MASTER and WORKER nodes status becomes READY.
Make sure to execute
kubectl get po,svc --all-namespaceson a master node and verify all pods are up and running.
4.5.1. Install Kubernetes Dashboard.
# Install Kubernetes Dashboard
kubectl apply -f https://raw.githubusercontent.com/kubernetes/dashboard/v2.0.0-rc6/aio/deploy/recommended.yaml
4.5.2. Create the Dashboard service account.
# Create the Dashboard service account
# This will create a service account named dashboard-admin in the default namespace
kubectl create serviceaccount dashboard-admin --namespace kubernetes-dashboard
4.5.3. Bind the dashboard-admin service account to the cluster-admin role.
# Bind the dashboard-admin service account to the cluster-admin role
kubectl create clusterrolebinding dashboard-admin --clusterrole=cluster-admin \
    --serviceaccount=kubernetes-dashboard:dashboard-admin
4.5.4. When we created the dashboard-admin service account, Kubernetes also created a secret for it. List secrets using the following command.
# When we created the dashboard-admin service account Kubernetes also created a secret for it.
# List secrets using:
kubectl get secrets --namespace kubernetes-dashboard
4.5.5. Get Dashboard Access Token.
# We can see the dashboard-admin-sa service account secret in the above command output.
# Use kubectl describe to get the access token:
kubectl describe --namespace kubernetes-dashboard secret dashboard-admin-token
4.5.6. Watch Pods and Service accounts under kubernetes-dashboard namespace.
# Watch Pods and Service accounts under kubernetes-dashboard
watch kubectl get po,svc --namespace kubernetes-dashboard
4.5.7. Get logs of kubernetes-dashboard.
# Get logs of kubernetes-dashboard
kubectl logs --follow --namespace kubernetes-dashboard deployment/kubernetes-dashboard
4.5.8. Create kubernetes-dashboard load balancer.
# Create kubernetes-dashboard load balancer
cat <<'EOF' | kubectl apply -f -
apiVersion: v1
kind: Service
metadata:
  labels:
    app.kubernetes.io/name: load-balancer-dashboard
  name: dashboard-load-balancer
  namespace: kubernetes-dashboard
spec:
  ports:
    - port: 443
      protocol: TCP
      targetPort: 8443
  selector:
    k8s-app: kubernetes-dashboard
  type: LoadBalancer
EOF
4.5.9. Get logs of kubernetes-dashboard.
# Get logs of kubernetes-dashboard
kubectl logs --follow --namespace kubernetes-dashboard deployment/kubernetes-dashboard
4.5.10. Get kubernetes-dashboard External IP.
# Get kubernetes-dashboard external IP
kubectl get po,svc --namespace kubernetes-dashboard | grep -i service/dashboard-load-balancer
4.6. Create vSphere Storage Class
# Create vSphere storage class
cat <<'EOF' | kubectl create -f -
kind: StorageClass
apiVersion: storage.k8s.io/v1
metadata:
  name: vsphere
  annotations:
    storageclass.kubernetes.io/is-default-class: "true"
provisioner: kubernetes.io/vsphere-volume
parameters:
    datastore: KUBE-DS
    diskformat: thin
    fstype: xfs
EOF
4.7. Deploy a Sample WordPress Blog
🔵 Important
You MUST execute these commands on a MASTER node.
Make sure to follow these steps only when the both MASTER and WORKER nodes status becomes READY.
Make sure to execute
kubectl get po,svc --all-namespaceson a master node and verify all pods are up and running.
4.7.1. Deploy a sample WordPress application using rook persistent volume claim.
# Create a MySQL container
kubectl create -f https://notebook.yasithab.com/gist/vsphere-mysql.yaml

# Create an Apache WordPress container
kubectl create -f https://notebook.yasithab.com/gist/vsphere-wordpress.yaml
4.7.2. Get detailed information about the Persistent Volumes (PV) used by the application.
# Describe PersistentVolume
kubectl describe pv
4.7.3. Describe Persistant Volume Claims (PVC) used by the application.
# Describe mysql persistance volume claim
kubectl describe pvc mysql-pv-claim

# Describe wordpress persistance volume claim
kubectl describe pvc wp-pv-claim
4.8. Clean up Kubernates
🔴 Caution
- The following commands are used to RESET your nodes and WIPE OUT all components installed.
- You MUST run this on ALL MASTER and WORKER nodes.
4.8.1. Remove Kubernetes Components from Nodes
# The reset process does not clean CNI configuration. To do so, you must remove /etc/cni/net.d
# The reset process does not reset or clean up iptables rules or IPVS tables.
# If you wish to reset iptables, you must do so manually by using the "iptables" command.
# If your cluster was setup to utilize IPVS, run ipvsadm --clear (or similar) to reset your system's IPVS tables.

# Remove Kubernetes Components from Nodes
kubeadm reset --force

# The reset process does not clean your kubeconfig files and you must remove them manually
rm -rf $HOME/.kube/config
If you liked the post, then you may purchase my first cup of coffee ever, thanks in advance :)

5. References
- Install and configure a multi-master Kubernetes cluster with kubeadm
- How to Deploy a HA Kubernetes Cluster with kubeadm on CentOS7
- Demystifying High Availability in Kubernetes Using Kubeadm
- Highly Available Control Plane with kubeadm
- Install and configure a multi-master Kubernetes cluster with kubeadm
- HA Cluster vs. Backup/Restore
- Kubernetes HA Cluster installation guide
- Creating Highly Available clusters with kubeadm
- Deploy Kubernetes on vSphere
- vSphere Cloud Provider Configuration
- Rook on Kubernetes
- Lab Guide - Kubernetes and Storage With the Vsphere Cloud Provider - Step by Step
- Use vSphere Storage as Kubernetes persistent volumes
- Dynamic Provisioning and StorageClass API
- ROOK - Teardown Cluster
- What You Need to Know About MetalLB
- MetalLB Layer 2 Configuration
- Bare-metal considerations
- Kubernetes Ingress 101: NodePort, Load Balancers, and Ingress Controllers
- Ingress Controllers
- Kubernetes Storage on vSphere 101 – Failure Scenarios
- Moving a Stateful App from VCP to CSI based Kubernetes cluster using Velero
- Verifying that DNS is working correctly within your Kubernetes platform
- Debugging DNS Resolution
- CRI-O
- Container Runtimes
- CRI-O as a replacement for Docker
- How to install Kubernetes cluster on CentOS 8

Top comments (0)