
Today is a great time to be a developer:
- there are plenty of languages and frameworks to choose from to build an application
- there are very powerful IDEs and tools to help us write, analyze, refactor, test and debug code
- there are many nice CI/CD platforms that allow us to package and deploy our applications anywhere
- thanks to cloud platforms and infrastructure as code we can provision infrastructure on-demand in an automated way
Yet, sometimes it seems quite complex and time-consuming to deploy an application in the cloud.
As a .NET developer, do I really need to master YAML, and Domain Specific Languages like HCL to deploy a simple ASP.NET Core API in Azure? Should I forget about local debugging when developing CI/CD pipelines? Do I have to learn everything from scratch each time I use another CI/CD platform?
Thanks to Nuke and Pulumi, I don't think so and that is what we are going to talk about in this article.
The scenario
They are already lots of great articles about Pulumi or Nuke, so I won't spend time explaining what they are and why you should use them. Instead, I will show you how you can use them together with an example.
My scenario is the following: I have a very basic ASP.NET Core API that I want to deploy to Azure App Service using a CI/CD pipeline.
To do that, I want to use my existing .NET skills and code everything with the language and tools I know and love.
Steps of the CI/CD pipeline
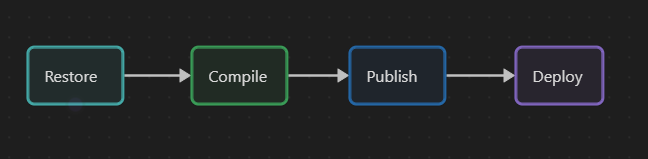
There are often two main steps (or stages or whatever you call them) in a CI / CD pipeline: the packaging and the deployment.

To package a .NET application, we have to first restore the dependencies, then compile the application and publish it. So my Package step is composed of 3 steps.
💬 A
dotnet publishdoes an implicit restore and build the application so only one step could be used but I like separating these steps for clarity. Moreover it is sometimes needed, for instance when you are restoring packages from private Nuget feeds.
I said the application needed to be deployed to Azure App Service but I don't have an existing Azure App Service resource, and I don't want to manually create one. So I also need a step to deploy the infrastructure
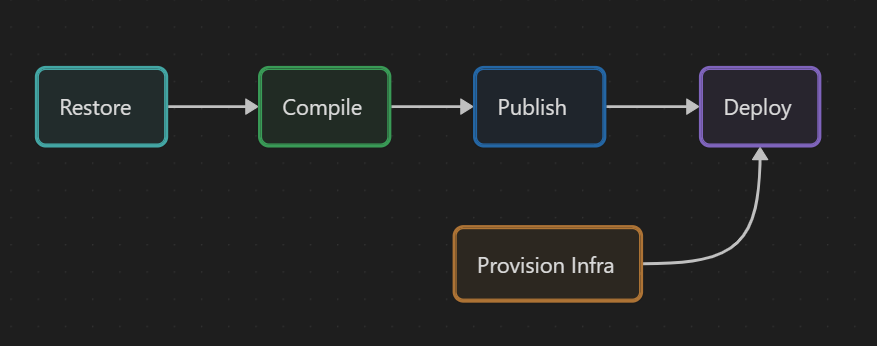
It seems fine. I will just add another optional step at the beginning to clean the temporary files I could have created on previous builds.
If your pipeline runs on a hosted agent/runner (managed by the CI/CD platform you use), the Clean step might not be very useful but I intend to also run this pipeline locally.

Now, that we know the different steps of our pipeline, let's get to the code.
Getting started with the code
Code organization
I put all the code in the same Git repository because:
- it makes sense as everything is linked
- it's easier to maintain (all the code in one place)
- it's easier to version (one tag on one commit in one repository)
I chose to organize my repository with the following folders:
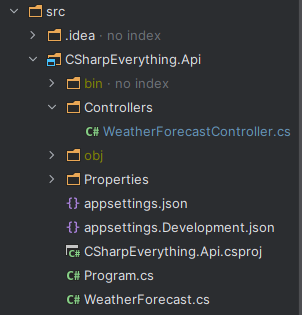
- 📁 src ➡️ for the application code of the API
- 📁 infrastructure ➡️ for the infrastructure code that provisions the App Service
- 📁 build ➡️ for pipeline code that builds and deploys the application
- 📁 artifacts ➡️ for the package created by the pipeline
Create the C# projects
To create the API project, we just use the default ASP.NET Core API template in .NET 7 that creates a simple Weather API.
I can initialize the infrastructure project using the Pulumi CLI new command with the azure C# template:
pulumi new azure-csharp
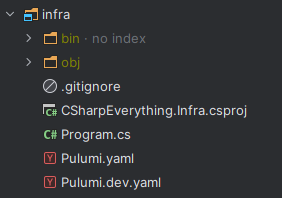
I will show later how to modify the code of the template to provision an App Service.
You can check Pulumi Getting Started with Azure tutorial to see how to set up your environment and start creating Azure resources in C# (or in another language).
To initialize the build project, we can use Nuke's .NET global tool as explained in the documentation:
nuke :setup
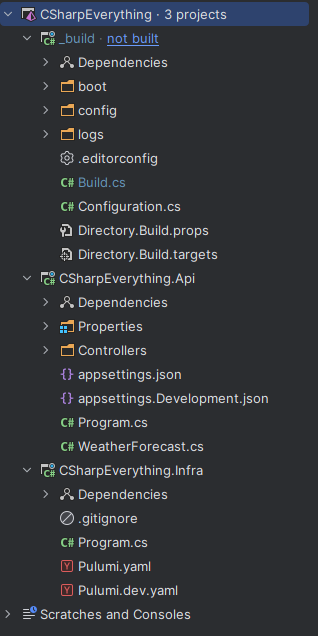
Everything in .NET
What I like about using Pulumi (in .NET) and Nuke is that all the code is just C# code. My infrastructure project and my build project are standard .NET console applications. And I can open the 3 projects (API, infrastructure, and build) in the same solution in my preferred IDE.
Why does it matter? Because any .NET developer in a team would be able to understand and maintain this code. How many times have you seen a project slow down because the person responsible for the infrastructure code written in YAML, JSON, Bicep, or HCL was on vacation or ill? How often have you been stuck because the only few people in the team that knew how to modify the YAML pipelines were not available?
But it's not a question of knowledge only. It's also because the developer experience of writing build or infrastructure code in .NET is much better than writing code in YAML or other declarative "languages".
I talk a lot about the benefits of using programming languages for infrastructure code in my article "Why will I choose Pulumi over Terraform for my next project?" if you have not read it yet.
Implementing the pipeline steps from Clean to Publish
The Nuke pipeline
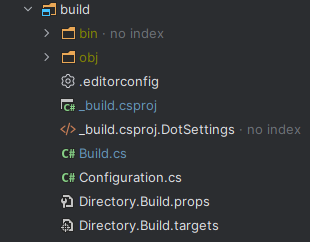
Here is what looks like the default build project after its creation:
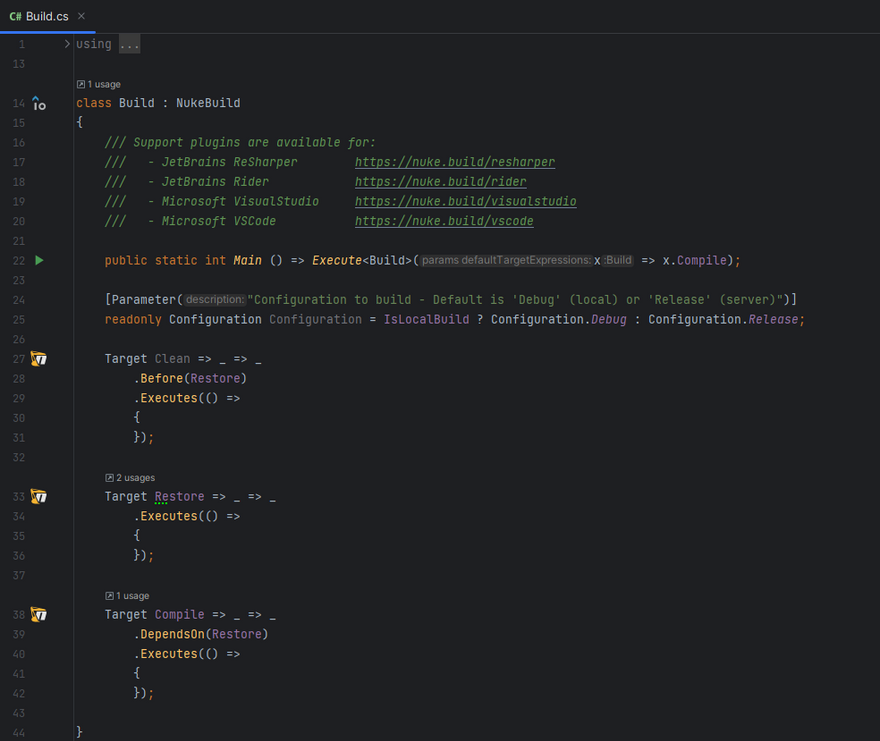
The main method is contained in a Build.cs file. This file contains the steps of the pipeline that are called Target in Nuke. We can set the dependencies between targets.
💡The build project is a .NET console application so it works out of the box in any .NET IDE or from the command line. But to be more productive you can install a plugin for your IDE that will add snippets and a way to easily debug each target individually.
As you see we can define properties with the attribute Parameter if we need to pass parameters to our pipeline, like the Configuration parameter.
The Clean target
We can define the Clean target like that:
Target Clean => _ => _
    .Before(Restore)
    .Executes(() =>
    {
        SourceDirectory.GlobDirectories("*/bin", "*/obj").ForEach(DeleteDirectory);
        EnsureCleanDirectory(ArtifactsDirectory);
    });
This code deletes all the bin and obj directories of the source directory. It also deletes the content in the artifacts directory. Nuke overloads the division operator to allow us to easily define paths in the project.
AbsolutePath SourceDirectory => RootDirectory / "src";

AbsolutePath InfrastructureDirectory => RootDirectory / "infra";

AbsolutePath ArtifactsDirectory => RootDirectory / "artifacts";
The Restore target
To restore .NET dependencies, we can use the dotnet restore command. Nuke supports executing CLI tools and has even auto-generated CLI wrappers for some common tools like dotnet CLI to use a Fluent API instead of string interpolation to pass parameters.
Target Restore => _ => _
    .Executes(() =>
    {
        DotNetRestore(_ => _.SetProjectFile(Solution));
    });
The Compile target
The compile target uses the dotnet build command. We can start to see the benefits of using this Fluent API that provides us with autocompletion and documentation. For instance, as we already restored the dependencies in the previous step, we can set the --no-restore option using the EnableNoRestore auto-generated method.
Target Compile => _ => _
    .DependsOn(Restore)
    .Executes(() =>
    {
        DotNetBuild(_ => _
            .SetProjectFile(Solution)
            .SetConfiguration(Configuration)
            .EnableNoRestore());
    });
The Publish target
The publish target uses the dotnet publish command and then creates a zip api.zip of the resulting package in the artifacts directory.
Target Publish => _ => _
    .DependsOn(Compile)
    .Executes(() =>
    {
        DotNetPublish(_ => _
            .SetProject(Solution.CSharpEverything_Api)
            .SetConfiguration(Configuration)
            .EnableNoBuild()
            .SetOutput(ApiPackageDirectory));

        ZipFile.CreateFromDirectory(ApiPackageDirectory, ArtifactsDirectory / "api.zip");
    });
💡If you need more compressing archives options, you can check Nuke documentation, they have some utilities to do more complex scenarios.
You may have noted on the line where I set the project that I have strong-typed access to the projects in my solutions. This is possible by adding this field with the Solution attribute and its GenerateProjects property set to true.
[Solution(GenerateProjects = true)]
readonly Solution Solution;
🪄 It looks like magic but it's not! Nuke uses a source generator to do that behind the scenes.
Provisioning the App Service with Pulumi
The Pulumi project
By default, the infrastructure code is contained in the Program.cs file of our project. The resources to provision are declared in the lambda in parameter of the Deployment.RunAsync method.
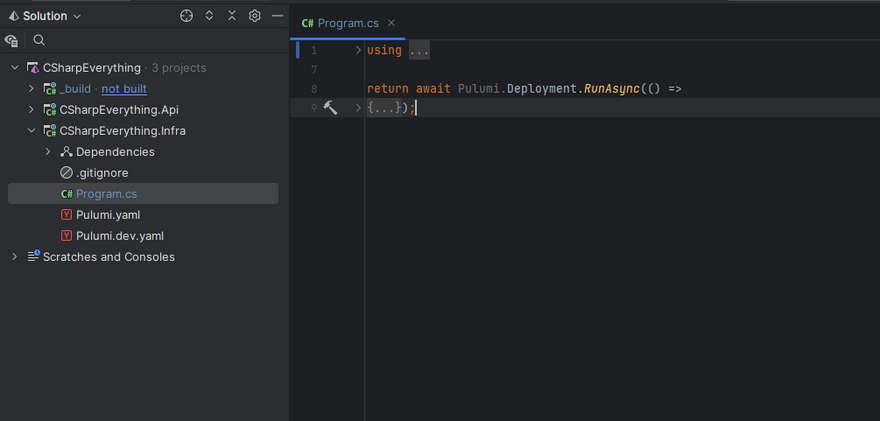
💬The project uses the top-level statement feature of C#.
As we don't have many resources to declare for our scenario we will keep all the code in the Program.cs file but that is not what you would do in a more complex project.
Azure resources to provision
There are 3 Azure resources we need to create in our stack (instance of a Pulumi program):
- a resource group to contain the different Azure resources
- an App Service Plan which defines the set of compute resources for a web app to run
- a Web App / App Service which is where the API will be deployed
var resourceGroup = new ResourceGroup($"rg-{Deployment.Instance.ProjectName}-{Deployment.Instance.StackName}");

var appServicePlan = new AppServicePlan($"plan-{Deployment.Instance.ProjectName}-{Deployment.Instance.StackName}", new AppServicePlanArgs
{
    ResourceGroupName = resourceGroup.Name,
    Kind = "App",
    Sku = new SkuDescriptionArgs
    {
        Tier = "Basic",
        Name = "B1",
    },
});

var appService = new WebApp($"app-{Deployment.Instance.ProjectName}-{Deployment.Instance.StackName}", new WebAppArgs
{
    ResourceGroupName = resourceGroup.Name,
    ServerFarmId = appServicePlan.Id
});
The code is quite simple, and because we are writing C# in our IDE, we have autocompletion and everything we need to make writing the infrastructure code easier.
💡If you are used to Azure Bicep or ARM templates, the names of the classes or properties will look familiar to you. It's because we are using Azure Native, which is a Pulumi native provider that is generated from Azure APIs.
Stack outputs
Provisioning the cloud resources we need is great we have to think about the next step which is to deploy our API on these resources. So what will we need for that?
First, we will need to have the name of the provisioned App Service. That's easy it's the property Name of the appService variable.
Second, because we are going to use the Kudu API to zip deploy our application to the App Service, we will need the site credentials (aka the Publishing Profile Credentials). These can be retrieved in the Pulumi program using the following code:
var publishingCredentials = ListWebAppPublishingCredentials.Invoke(new()
{
    ResourceGroupName = resourceGroup.Name,
    Name = appService.Name
});
💬 Using the Kudu API is just one of the many ways to deploy a zip package to an App Service. I could have chosen another way like using the Azure CLI, in that case retrieving the site credentials would not have been needed.
Pulumi, like Terraform, has this concept of stack output where outputs are information about your stack/infrastructure that you want to expose. That is exactly what we need to export our App Service name and our site credentials so that they can be retrieved later by the Nuke code that will take care of the application deployment. To export these values we can return them in a Dictionary like that:
return new Dictionary<string, object?>
{
    ["publishingUsername"] = Output.CreateSecret(publishingCredentials.Apply(c => c.PublishingUserName)),
    ["publishingUserPassword"] = Output.CreateSecret(publishingCredentials.Apply(c => c.PublishingPassword)),
    ["appServiceName"] = appService.Name
};
You might notice that we use the Output.CreateSecret method to create outputs for our publishing credentials. The aim is to tell Pulumi to treat these values as secrets what it will do by encrypting them in the state file for extra protection (that is not something Terraform does by the way).
Implementing the Provision Infrastructure step
To deploy the infrastructure, we can use the pulumi up command. We will write the code in a fluent way as we did with the dotnet CLI:
AbsolutePath InfrastructureDirectory => RootDirectory / "infra";

Target ProvisionInfra => _ => _
    .Description("Provision the infrastructure on Azure")
    .Executes(() =>
    {
        PulumiTasks.PulumiUp(_ => _
            .SetCwd(InfrastructureDirectory)
            .SetStack("dev")
            .EnableSkipPreview());
    });
Deploying the ASP.NET Core API to Azure App Service
I previously said we were going to use the Kudu API to deploy our application. You can check the documentation about that but concretely we will do a POST request to the zipdeploy endpoint using Basic authentication.
To retrieve a stack output, we can use the pulumi stack output command. To avoid duplicating the code I wrote a short method:
string GetPulumiOutput(string outputName)
{
    return PulumiTasks.PulumiStackOutput(_ => _
            .SetCwd(InfrastructureDirectory)
            .SetPropertyName(outputName)
            .EnableShowSecrets()
            .DisableProcessLogOutput())
        .StdToText();
}
The step itself is not very complicated, just standard C# code using an HttpClient to send a POST request (with our application package as the content) to the Kudu API.
Target Deploy => _ => _
    .DependsOn(Publish)
    .After(ProvisionInfra)
    .Executes(async () =>
    {
        var publishingUsername = GetPulumiOutput("publishingUsername");
        var publishingUserPassword = GetPulumiOutput("publishingUserPassword");
        var base64Auth = Convert.ToBase64String(Encoding.Default.GetBytes($"{publishingUsername}:{publishingUserPassword}"));

        await using var package = File.OpenRead(ArtifactsDirectory / "api.zip");
        using var httpClient = new HttpClient();
        httpClient.DefaultRequestHeaders.Authorization = new AuthenticationHeaderValue("Basic", base64Auth);
        await httpClient.PostAsync($"https://{GetPulumiOutput("appServiceName")}.scm.azurewebsites.net/api/zipdeploy",
            new StreamContent(package));
    });
💡 George Dangl already wrote a nice article about using Nuke to deploy an application to Azure App Service using the Kudu API, so you can have a look at it. The code in the article is similar to the one we have here except that the credentials don't come from Pulumi outputs but from an Azure Key Vault.
What I like about this approach is that you know exactly what you are doing, and the deployment logic is not hidden from you in an obscure YAML task whose code you will never read (yes I am talking to you Azure Pipelines and GitHub Actions 😃).
But the awesome part in Nuke is that you can put a breakpoint in the code and debug it locally. If you need to modify your pipeline, you don't need to write YAML code modifications without knowing if it would work or not 🤞, commit and push your modifications, wait for an agent to run the changed pipeline in the cloud, wait for it to fail, browse the logs to try to understand the problem, and try again until it works.
Final pipeline
If I fold everything, the pipeline code we created looks like that:
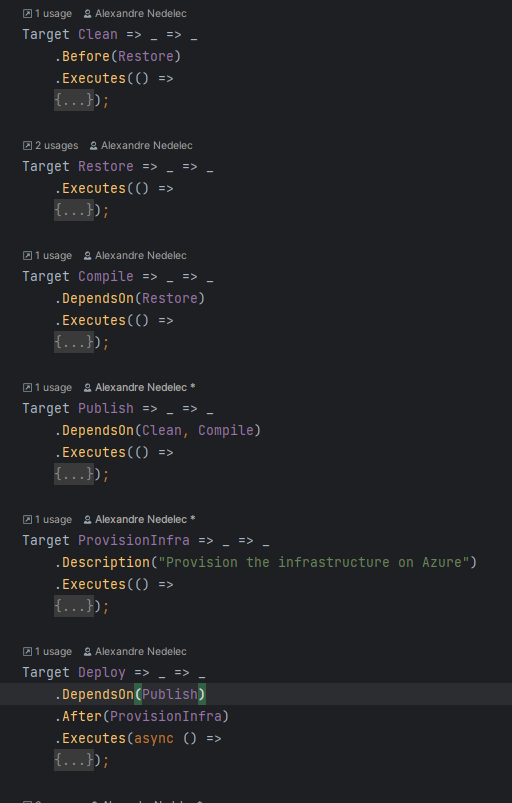
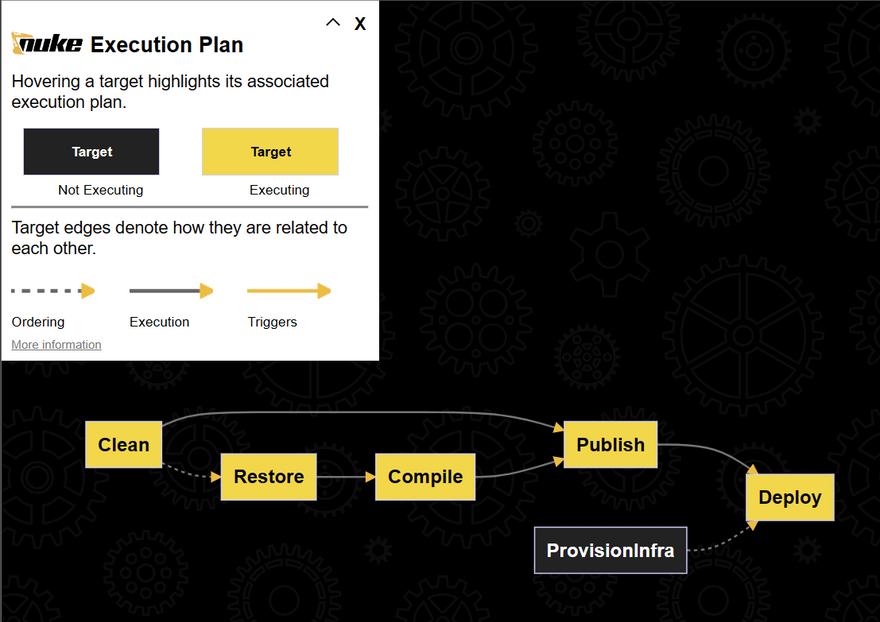
I think it is quite clear with the different steps/targets defined with their dependencies/order. Yet if this is not clear enough for you, you can use the nuke --plan command to display a visual representation of the pipeline (how cool is that !?)
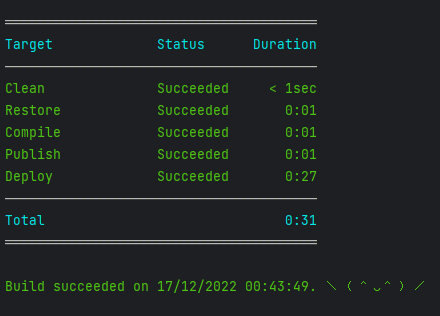
Let's execute the complete pipeline:
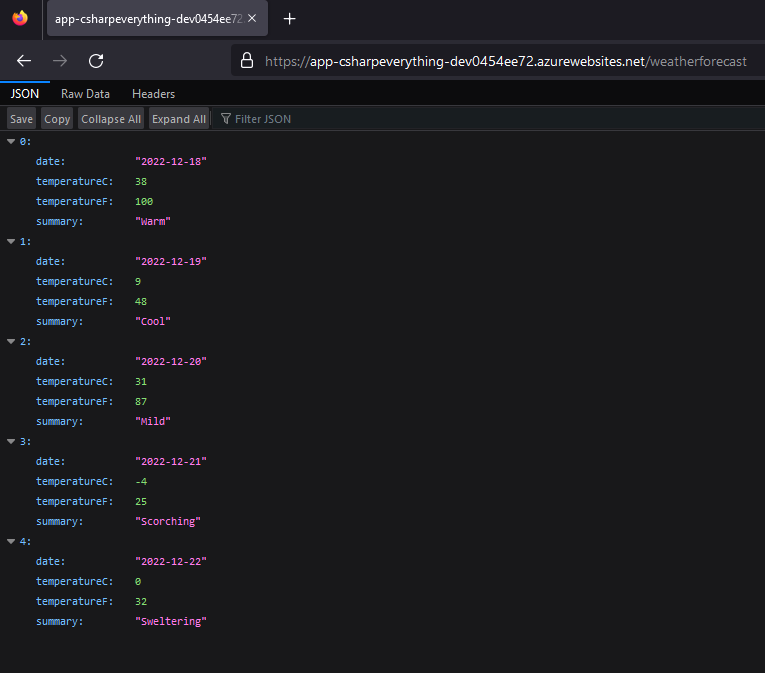
If I go to my Azure portal I can see the new Azure resources, among them an App Service where my Weather API is deployed.
Conclusion
Improvements to the example pipeline
The pipeline I have shown in this article is just a simple sample. They are lots of things that could be done to improve it. Beyond obvious ones like adding a Test target or using GitVersion to version the package, I want to talk about some choices I made in the pipeline implementation that may not be the best ones.
As I said there are many ways to deploy a package to an App Service. While using the Kudu API is fine and allowed me to show you how we can use Pulumi stack outputs to retrieve publishing credentials, it might be a bit limited in some cases and involves a bit of manual code to make the HTTP request. A good alternative would be to use the Azure CLI that has a command for that. But my preferred option would be to use the Azure Resource Manager libraries for .NET. Unfortunately this SDK is quite new and miss samples on how to do that.
Speaking of SDK, Pulumi has an API called the Automation API to use the Pulumi engine as an SDK. I think it would be a better option than using the Pulumi CLI. Generally speaking, I think using SDK instead of CLIs to write the targets of a pipeline brings more power, more flexibility, and a better developer experience.
About Nuke and CI/CD
Nuke has many features I did not show in this small example. If we add some attributes to the pipeline code, Nuke can generate YAML workflow files to execute the Nuke pipeline. When executing the pipeline locally everything works fine because I am logged in to Pulumi CLI and Azure CLI in my terminal but I have to add secret parameters to my Nuke pipeline (a Pulumi token and an Azure Service Principal identifier/password) to make the authentication works when the pipeline is run from a CI/CD platform runner/agent.
Moreover, there are many things I don't know yet about Nuke because I am just starting to use it. That is why I advise you to have a look at its documentation, at some resources and start playing with it by yourself.
In the future, I see myself using Nuke for most of my CI pipelines, and not only for .NET projects (because I can run any CLI tools from Nuke, it also works for front projects where I would use the pnpm CLI for instance). I am not saying that because I am afraid of YAML or because I'm not familiar with ready-made tasks like Azure Pipelines tasks or GitHub Actions. I have been using Azure Pipelines for several years now and I have also played a bit with GitHub Actions. They are good platforms but lack local debugging and the great developer experience provided by a tool like Nuke. So I will continue using them but to run my Nuke pipelines 😉.


Top comments (1)
This is such a great first post! If you haven't already set up an import from your blog via RSS, head over to your Extension Settings and navigate to the section titled Publishing to The Ops Community ⚙️ from RSS to update your settings.
If you've already done that, just forget I said anything 😅