By using Terraform within an Azure DevOps pipeline, IT professionals can deploy resources consistently and reliably across Azure environments.
This guide will walk you through setting up Terraform in Azure DevOps, from creating the necessary service connections and permissions to writing configuration files and running automated deployments.
Whether you're new to CI/CD practices or looking to integrate Terraform into your Azure workflows, this step-by-step tutorial will equip you with the tools and techniques to get started.
Prerequisites
Before we get started, make sure you have the following in place:
- Azure Subscription: To host the resources provided by Terraform. If you don’t have one, you can sign up for a free trial.
- Azure DevOps Account: To create CI/CD pipelines. If you don’t have one, you can sign up here.
How to run Terraform in an Azure DevOps pipeline
Create the Service Principal
A Service Principal (SPN) is required to allow Terraform on the Azure DevOps (ADO) build agent to authenticate against the Azure subscription and create Azure resources.
- Within the Azure portal open Microsoft Entra ID.
- Click on Add and select App registration.
Microsoft Entra ID app registration
- Give the application a name accept all the default settings and click on Register.
- Make a note of the Application (client) ID and Directory (tenant) ID as we need them later.
- When the App registration is created click on *Manage > Certificates & Secrets. *
- Click on Client Secrets and click on New client secret.
- Give the secret a description and expiry date and click on Add. ** **
- Make a note of the value , as you’ll need it later on. ** **
Create the Terraform State storage account
In Terraform, the "state account" typically refers to the storage location that maintains the "state file," which is crucial for tracking the current infrastructure status.
This state file records information about your deployed resources, ensuring that Terraform knows which resources to create, update, or delete when changes are made to the configuration.
By centralising the state, multiple team members can collaborate without conflicting updates, and remote storage provides enhanced security, versioning, and backup capabilities.
We’re going to create an Azure storage account so we can store our state file.
Open https://shell.azure.com in a browser and copy the following PowerShell to create the resource group, storage account, and relevant blob container. Change the variable information to suit your requirements.
# Define variables
$resourceGroupName = "tfstate-demo-rg"
$location = "Sweden Central"
$storageAccountName = "tfstatesademo"
$containerName = "tfstate"

# Create a new resource group
New-AzResourceGroup -Name $resourceGroupName -Location $location

# Create a new storage account within the resource group
New-AzStorageAccount -ResourceGroupName $resourceGroupName -Name $storageAccountName -Location $location -SkuName Standard_LRS -Kind StorageV2

# Retrieve the storage account context
 $storageAccount = Get-AzStorageAccount -ResourceGroupName $resourceGroupName -Name $storageAccountName
$context = $storageAccount.Context

# Create a blob container within the storage account
New-AzStorageContainer -Name $containerName -Context $context
Navigate to the storage account within https://portal.azure.com and under Access Control (IAM) grant the Storage Blob Data Contributor role to the Service Principal (SPN) that you just created.
This allows the SPN to write the tfstate file to the storage account.
Set Azure subscription permissions
The SPN also needs permission to deploy the Azure resource in the wider subscription.
Now setting the appropriate SPN permission is a whole topic in itself, but for this example we’re going to grant the SPN Contributor permissions on the entire subscription.
- Within the Azure portal browse to Subscriptions then select the subscription you want to deploy the resources to.
- Select Access control (IAM)
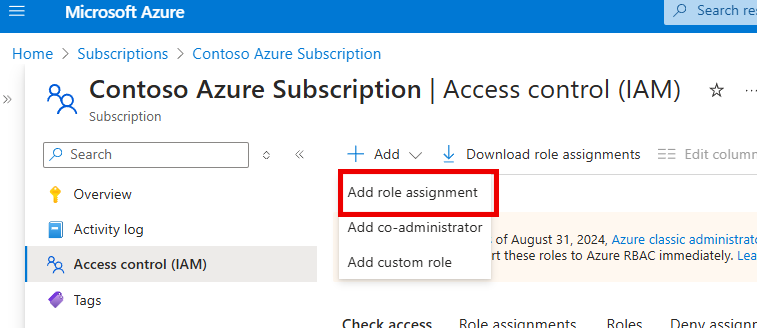
- Click on Add and then Add role assignment
Azure subscription permissions
- Select Privileged administrator roles then Contributor
- Select the SPN you created earlier and assign the permissions.
Set up An Azure DevOps Project
With your account set up, you next need to sign into Azure DevOps and create a project where you’ll be setting up your CI/CD pipelines.
- Go to the Azure DevOps website and sign in with your Microsoft account or organizational account.
- Navigate to Organization : If you’re part of multiple organizations, select the organization where you want to create the project from the top right corner of the page.
- Click on the New Project button.
- In the Create a new project form, fill in the Project Name and visibility and optionally, provide a description for your project, then click on the Create button.
- Once the project is created, you’ll be redirected to the project’s dashboard. Depending on your needs, you may want to add team members, permissions, or integrate other services to this project.
Create service connection
An Azure DevOps service connection in Azure is a secure, managed connection that links Azure DevOps to Azure.
This connection allows DevOps pipelines to securely access and deploy resources, configure infrastructure, or execute commands on these services without requiring manual credential input each time.
Let’s create one we can use in this example.
- Click on Projects Settings in the bottom left-hand corner.
- Click on Service Connection, then New Service Connection.
- Select Azure Resource Manager.
- Then select Service Principal (manual).
- Fill in the information from your subscription and the Service Principal (SPN) that you created earlier.
Ensure you Grant access permissions for all pipelines before creation.
Create Terraform configuration files
In a previous blog post Deploying an Azure Log Analytics Workspace with Terraform, I designed a Terraform template using Azure Verified Modules to deploy an Azure Log Analytics workspace.
We’re going to use the base of that template in this example. I have added a section to the template called backend.
The backend block in this Terraform template defines where and how the state file for your Terraform deployment is stored.
We’re specifying the storage account and resource group we created in an earlier step.
terraform {
  required_version = ">= 1.3.0"
  required_providers {
    azurerm = {
      source  = "hashicorp/azurerm"
      version = ">= 3.71, < 5.0.0"
    }
    random = {
      source  = "hashicorp/random"
      version = ">= 3.5.0, < 4.0.0"
    }
  }
  backend "azurerm" {
    resource_group_name  = "tfstate-demo-rg"
    storage_account_name = "tfstatesademo"
    container_name       = "tfstate"
    key                  = "tfdemo.env0.tfstate"
  }
}
provider "azurerm" {
  features {}
  subscription_id = "xxx-xxxx-xxx"
}
# This ensures we have unique CAF compliant names for our resources.
module "naming" {
  source  = "Azure/naming/azurerm"
  version = "0.3.0"
}
locals {
  azure_regions = [
    "ukwest",
    "westeurope",
    "francecentral",
    "swedencentral"
    # Add other regions as needed
  ]
}
variable "enable_telemetry" {
  description = "Enable or disable telemetry for the log analytics workspace"
  type        = bool
  default     = true # Set a default value if desired
}
# This picks a random region from the list of regions.
resource "random_integer" "region_index" {
  max = length(local.azure_regions) - 1
  min = 0
}
# Add a new random_pet resource to generate a unique, human-readable name
resource "random_pet" "log_analytics_workspace_name" {
  length    = 2
  separator = "-"
}
# This is required for resource modules
resource "azurerm_resource_group" "rg" {
  location = local.azure_regions[random_integer.region_index.result]
  name     = module.naming.resource_group.name_unique
}
# This is the module call
module "log_analytics_workspace" {
  source = "Azure/avm-res-operationalinsights-workspace/azurerm"
  # source             = "Azure/avm-res-operationalinsights-workspace/azurerm"
  enable_telemetry                          = var.enable_telemetry
  location                                  = azurerm_resource_group.rg.location
  resource_group_name                       = azurerm_resource_group.rg.name
  name                                      = "law-${random_pet.log_analytics_workspace_name.id}"
  log_analytics_workspace_retention_in_days = 60
  log_analytics_workspace_sku               = "PerGB2018"
  log_analytics_workspace_daily_quota_gb    = 200
  log_analytics_workspace_identity = {
    type = "SystemAssigned"
  }
}
In order to create the Azure resource we need to create the Terraform file within a repository for storage. You can create the file in a repository within Azure DevOps or somewhere else, like GitHub.
We’re going to use the Azure DevOps repository.
Click on Repos on the left-hand menu and then select *Files. *
The repository will be empty so we need to initialize it with a readme file and a .gitignore file. Ensure the box is ticked for Add a README and select Terraform within the Add a .gitignore box then click on *Initalize. *
Initalize the Azure DevOps repo
We can now create a file with our Terraform. To do this, click on the three ellipses button in the left-hand corner near your project name and select New > File.
Give the file an appropriate name like main.tf and click on *Create. *
Paste the Terraform code into the file and then click on *Commit. *
Configure the Azure DevOps Pipeline
We need to set up our pipeline, we’re going to do this by writing the code needed in the YAML file.
Follow these instructions:
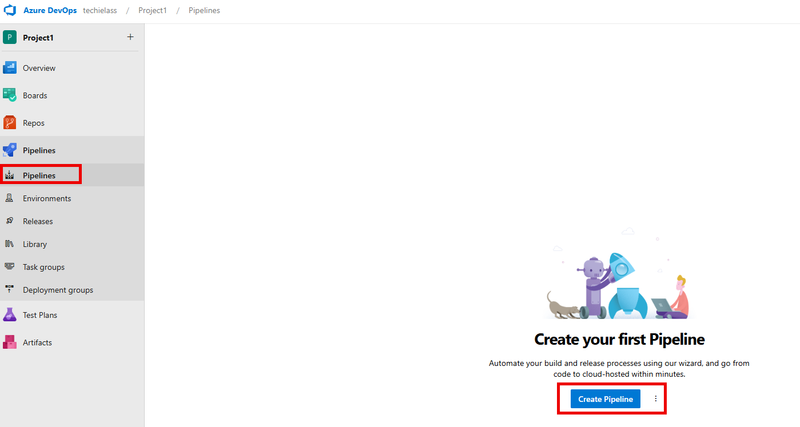
- Click on pipelines in the left-hand side then click on Create pipeline.
- Select Azure Repos Git as the place to store the YAML file.
- Select your project repository.
- Then select Starter pipeline.
- Copy the following code into the editor:
name: Terraform deploy Log Analytics

trigger:
  - main

pool:
  vmImage: 'ubuntu-latest'

variables:
  azureServiceConnection: 'replacewith your service connectionname'

stages:
  - stage: Plan
    displayName: 'Terraform Plan'
    jobs:
      - job: TerraformPlan
        displayName: 'Terraform Plan'
        steps:
          # Step 1: Initialize and Plan Terraform
          - task: AzureCLI@2
            inputs:
              azureSubscription: $(azureServiceConnection) # The service connection defined in your pipeline
              scriptType: bash
              scriptLocation: inlineScript
              inlineScript: |
                echo "Setting up Azure authentication using the service principal credentials from the service connection"
                echo "Terraform init..."
                terraform init
                echo "Terrform plan..."
                terraform plan
            displayName: 'Terraform init and plan'

          # Step 2: Deploy
          - task: AzureCLI@2
            inputs:
              azureSubscription: $(azureServiceConnection) # The service connection defined in your pipeline
              scriptType: bash
              scriptLocation: inlineScript
              inlineScript: |
                echo "Terraform apply"
                terraform apply -auto-approve
            displayName: 'Terraform apply'
Once you’ve inputted the code, click the save button to commit the code to your repository.
Run the pipeline
Within the YAML code that we wrote in the stage above is the trigger to run the pipeline whenever codes changes within the repository.
To check the pipeline run follow these instructions:
- Click on Pipelines in the left-hand menu then Pipelines.
- If the pipeline is running you can check on it’s progress, if not you can click on Run pipeline.
Conclusion
By following this guide, you've set up a CI/CD pipeline that integrates Terraform with Azure DevOps, allowing you to automate infrastructure deployments and streamline workflows.
Using Terraform within Azure DevOps provides consistency, version control, and enhanced collaboration for infrastructure management, all while minimising manual effort and reducing the risk of configuration drift.
What will you use Azure DevOps and Terraform to deploy?


Top comments (1)
Working with Terraform and Azure DevOps CI/CD Pipeline is all about efficiency and clean automation. Similarly, using a tool like penghapus latar belakang gratis from PhotoCat helps you quickly streamline and polish visuals without extra hassle. Both save time and deliver sharper, more professional results in their own fields.