AWS Cloud Development Kit (CDK) is a powerful framework that allows developers to define cloud infrastructure as code using familiar programming languages. With CDK, you can easily provision and manage AWS resources in a consistent and automated manner. In this blog post, we'll walk you through the process of creating a StackSet using AWS CDK.
Before we dive into the details, let's take a quick look at what a StackSet is and how it can help you manage your AWS infrastructure.
StackSets are containers for CloudFormation stacks that enable simultaneous creation, update, and deletion across multiple AWS accounts and regions. With StacksSets, you can ensure that all environments are consistent and compliant with the policies you have in place.
The native support for StackSet in CDK is somewhat rudimentary, due to the fact that it is more common in CDK to use CDK pipelines to roll out stacks to multiple accounts and regions.
Therefore, in order to use StackSet in CDK, a few things need to be considered. In this blogpost, we will show steps on how to deploy StackSets via CDK.
Let’s see how this works.
Prerequisites
To follow this tutorial, make sure you have the following prerequisites
An AWS account with appropriate permissions to create StackSets and associated resources.
Basic knowledge of TypeScript
Bootstrap AWS Account
Bootstrapping is the process of providing resources for the AWS CDK before you can deploy AWS CDK applications in an AWS environment. Normally you could use the default
cdk bootstrap aws://ACCOUNT-NUMBER-1/REGION-1 command. However, we need to customise the template to make the assets available to the entire AWS Organization, as we want to use this CDK environment to deploy StackSets. To get the latest version of the CDK bootstrap template, do the following:
cdk bootstrap --show-template > bootstrap-template.yaml
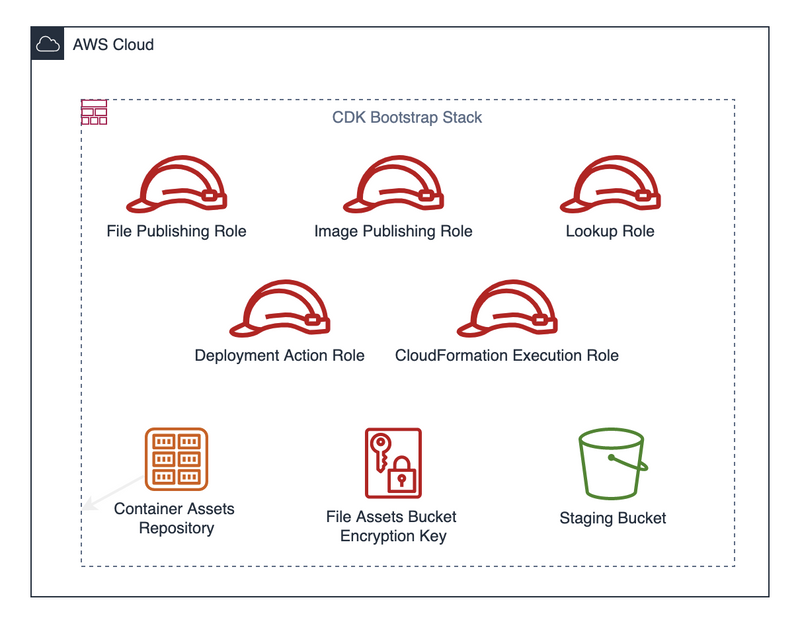
ℹ️ The CDK boostrap template contains an S3 bucket for files and an ECR repository for container images. It also creates few IAM roles.
After that, we need to modify two resources in this template. The s3 bucket for Assets and the KMS Key that will be used to encrypt the assets.
Add the following Part to the Parameters Section of the template:
PrincipalOrgID:

        Description: >-

          The identifier of your AWS organization. Used in the KMS key policy and S3 bucket to

          share the key with all accounts under your organization

        Type: String
We will reference this Parameter in the Resource section.
Add this CodeSnippet to the FileAssetsBucketEncryptionKey Resource in to the Key Policy Section. This will
KeyPolicy:

            Statement:

              - Action:

              ....

              - Action:

                  - kms:Decrypt

                  - kms:DescribeKey

                Effect: Allow

                Principal:

                  AWS: "*"

                Resource: "*"

                Condition:

                  StringEquals:

                    kms:ViaService:

                      - Fn::Sub: s3.${AWS::Region}.amazonaws.com

                  ForAnyValue:StringLike:

                    aws:PrincipalOrgID:

                    - !Ref PrincipalOrgID
Extend the PolicyDocument of the StagingBucketPolicy with the following CodeSnippet. This will ensure that all Accounts of the Organization get access to the objects in the Asset Bucket.
` PolicyDocument:
Id: AccessControl
Version: "2012-10-17"
Statement:
...
- Sid: ''
Effect: Allow
Principal: ''
Action:
- s3:Get
            Resource: !Sub '${StagingBucket.Arn}/*'
            Condition:
              ForAnyValue:StringLike:
                aws:PrincipalOrgID:
                - !Ref PrincipalOrgID
          - Sid: ''
            Effect: Allow
            Principal: '*'
            Action: s3:ListBucket
            Resource: !Sub '${StagingBucket.Arn}'
            Condition:
              ForAnyValue:StringLike:
                aws:PrincipalOrgID:
                - !Ref PrincipalOrgID`
After all the adjustments we need to deploy the template.
aws cloudformation create-stack \

      --stack-name CDKToolkit \

      --template-body file://bootstrap-template.yaml
Set Up Your CDK Project
After bootstrapping our Account we are ready to Initialize a new CDK project. We will do that in a new directory. The initialisation creates a new CDK project structure with a sample lib/stackset-cdk-demo-stack.ts file, which we will modify to create our StackSet.
` #Create new directory
mkdir stackset-cdk-demo
cd stackset-cdk-demo
#Init new CDK Project
cdk init app --language typescript`
Define the StackSet
Open lib/stackset-cdk-demo-stack.ts and remove the example stack definition. We'll define our stackset instead:
` import * as cdk from 'aws-cdk-lib';
import * as servicecatalog from 'aws-cdk-lib/aws-servicecatalog';
import { StackSetTemplate } from "./stackSetTemplate";
import * as s3 from "aws-cdk-lib/aws-s3";
export class StackSetCdkDemoStack extends cdk.Stack {
  constructor(scope: cdk.Construct, id: string, props?: cdk.StackProps) {
    super(scope, id, props);


    const stackSetTemplateSandbox = new StackSetTemplate(this, "stacksettemplate", {
      Config: props.stacksetProps,
      assetBucket: s3.Bucket.fromBucketName(this, "assetbucket", "myCDKAssetBucket")
    });

    new cdk.CfnStackSet(this, "TESTSTACKSET", {
      permissionModel: "SELF_MANAGED",
      stackSetName: "TEST-STACKSET",
      description:
        "example of StackSet with CDK",
      capabilities: ["CAPABILITY_NAMED_IAM"],
      templateUrl: servicecatalog.CloudFormationTemplate.fromProductStack(stackSetTemplateSandbox).bind(this).httpUrl,
      operationPreferences: {
        failureToleranceCount: 30,
        maxConcurrentCount: 30,
      }
    });
  }
}`
⚠️ Ensure to adjust the myCDKAssetBucket to your AWS Account Assets Bucket.
🚨 Using the servicecatalog ProductStack construct we get rid of the PseudoParameter for the assets bucket in lambdas in the template.
❌ Without using the servicatalog ProductStack:

!sub cdk-hnb659fds-assets-${AWS::AccountId}-${AWS::Region}

✅ Using the servicatalog ProductStack:

cdk-hnb659fds-assets-123456789012-eu-central-1
Undefined
This workaround will ensure that all AWS accounts can access the assets in our CDK app.
Create StackSet template
In the lib directory create a new file called stackSetTemplate.ts and add the following code to the file:
`
import * as cdk from "aws-cdk-lib";
import { Construct } from "constructs";
import * as servicecatalog from "aws-cdk-lib/aws-servicecatalog";
import { NodejsFunction } from "aws-cdk-lib/aws-lambda-nodejs";
import * as lambda from "aws-cdk-lib/aws-lambda";
//Standardstackdefinition
export class StackSetTemplate extends servicecatalog.ProductStack {
// export class CdkStack extends cdk.Stack {
  constructor(scope: Construct, id: string, props: cdk.StackProps) {
    super(scope, id, props);

    /**
     * Dummy Node JS Lambda Function
     */
      const lambdaFunction = new NodejsFunction(this, "testFunction", {
        memorySize: 128,
        timeout: cdk.Duration.seconds(60),
        runtime: lambda.Runtime.NODEJS_18_X,
        handler: "handler",
        entry: path.join(__dirname, "lambda/index.ts"),
        bundling: {
          minify: true,
          externalModules: ["aws-sdk"]
        }
      });
      lambdaFunction.applyRemovalPolicy(cdk.RemovalPolicy.RETAIN);
    }
  }
}`
Example Lambda Code
Create a new directory lambda in the lib directory. In the new lambda directory create a new file called index.ts and add the following code:
` import { Handler } from 'aws-lambda';
export const handler: Handler = async (event, context) => {
    console.log('EVENT: \n' + JSON.stringify(event, null, 2));
    return context.logStreamName;
};
`
Deploy the StackSet
Run cdk deploy
in a terminal to deploy the StackSet and associated CloudFormation stacks.
ℹ️ CDK will ask you to confirm that you want to deploy the changes. Type y and press Enter to continue.
Conclusion
In this blog post, we've explored how to create a StackSet using AWS CDK. We also learned how to share the CDK Assets to the whole AWS Organization. StackSets are an essential tool for managing infrastructure at scale across multiple AWS accounts and regions. Using CDK, you can easily define and deploy complex cloud infrastructure as code, and leverage the full power of AWS CloudFormation to ensure consistency, compliance, and efficiency across your organisation's cloud resources.


Top comments (2)
When every jump in Geometry Dash Subzreo is perfectly timed to its upbeat EDM music, the game is less about reacting and more about having a good time. You'll crash a lot, but when you get back up, you'll be even more focused.
Just like mastering the timing and precision in Geometry Dash Lite, deploying complex AWS infrastructure with CDK requires precise configurations and practice. Both demand patience and attention to detail to smoothly progress through each level — whether it’s a tricky jump in the game or setting up your cloud environment!