If your Windows Server 2012 servers that are Arc-enabled to receive their Extended Security Updates (ESU) aren’t receiving the updates or if you are receiving updates and they aren't being installed, here are some troubleshooting steps to work through to try and help resolve the issue.
This blog post will explore the steps needed to troubleshoot the issue.
Step 1 - Check the Azure Arc version installed
The troubleshooting step to check is what version of the Azure Arc agent is installed.
The ESU capability was enabled on version 1.34 of the Azure Arc agent. My recommendation is you have version 1.40 at the least installed on your machine. But you should really be running the latest version.
You can find the latest version of the agent listed on the official website: https://learn.microsoft.com/azure/azure-arc/servers/agent-release-notes
To check the version of the Arc agent log onto the affected server.
Launch a PowerShell command terminal and type in the following command:
azcmagent version
Step 2 - Check pre-requisite patches
There are several pre-requisite patches that need installs on the server to ensure they can receive the relevant ESU updates. If you’ve been keeping your servers up to these should already be there. However if you have are signing up for ESU updates for Windows Server 2012 and haven't been receiving patches for several months, are there are some patches you might have to manually install first.
There are three patches required. The patch numbers are different depending on whether you are using Windows Server 2012 or the R2 version.
Windows Server 2012
- Servicing Stack Update (SSU) KB5029369
- Extended Security Update (ESU) Licensing Preparation Package KB5017221
- Servicing Stack Update (SSU) KB5037022
Windows Server 2012 R2
- Servicing Stack Update (SSU) KB5029368
- Extended Security Update (ESU) Licensing Preparation Package KB5017220
- Servicing Stack Update (SSU) KB5037021
💡
It's worth noting KB5037022 & KB5037021 were released in April 2024. You might have to manually install them on servers to ensure they can be patched with new ESU updates.
Step 3 - Check the ESU license within Azure
The first step is to check the Azure portal to understand if the server has been assigned an ESU licence.
Head to https://portal.azure.com
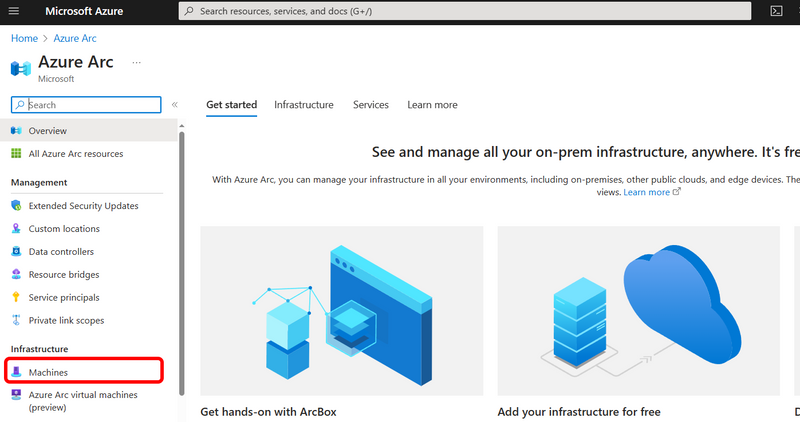
Launch the Azure Arc blade.
Click on Machines down the left-hand side.
Azure Arc blade in the Azure portal
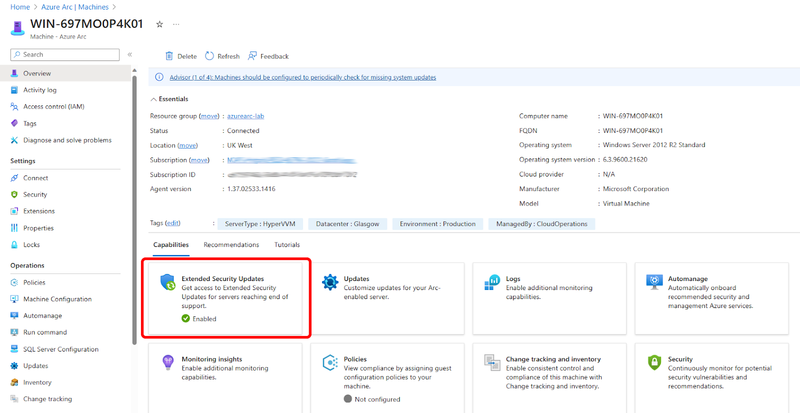
Find the server that isn’t receiving updates.
Click on the server name.
When the server information loads, check under capabilities to ensure ESU is Enabled.
If the server states that the ESU capability is Not Enabled , assign the correct ESU license to the server to enable it to receive updates.
Step 4 - Check the ESU license locally
The next step is to ensure the Azure Arc agent is connected and the license is being picked up locally.
Launch a PowerShell command terminal and type in the following command:
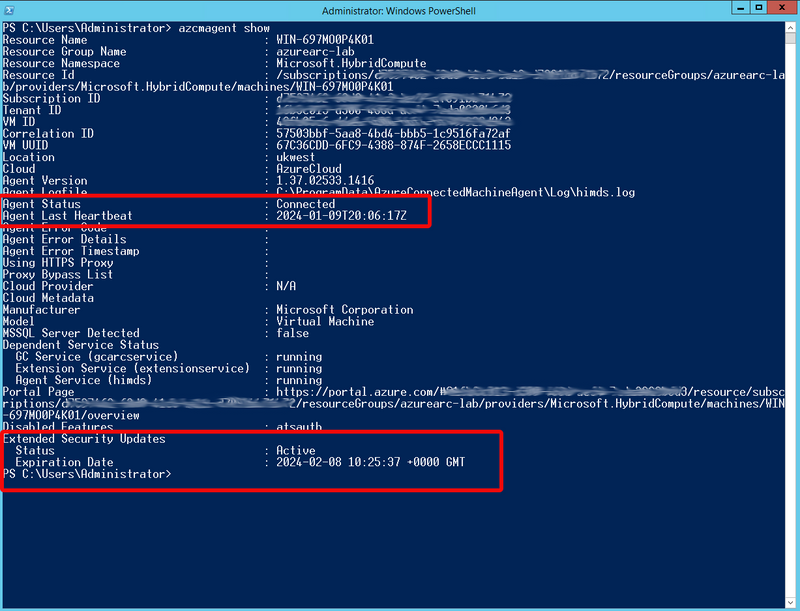
azcmagent show
You are looking for two key pieces of information. The first one is the Agent status and Agent Last Heartbeat. They should state Connected and list a time or date close to your current time and date.
The second piece of information you are looking for is the Extended Security Updates Status. That should read as active.
Step 5 - Recreate the signed license file
If you have patches being downloaded but are failing to install then try this. Open a command line prompt and stop the Azure Hybrid Instance Metadata Service (himds) by issuing this command:
Stop-Service himds
We want to rename the existing file and generate a new one, so still within your command prompt issue the command:
Rename-Item C:\ProgramData\AzureConnectedMachineAgent\Certs\license.json C:\ProgramData\AzureConnectedMachineAgent\Certs\license.bak
Step 6 - Log a Support Ticket
If none of the steps above work, then it's time to log a support ticket via the Azure portal. The team there can help support you through the issue and escalate to the relevant Windows support team if needed.


Top comments (0)
Some comments may only be visible to logged-in visitors. Sign in to view all comments.