
Webpack is great for building Javascript applications, but did you know it can optimize static HTML assets too? In this article, we use Webpack to process HTML files while automatically optimizing their images too.
Hey! Don’t want to read all the in’s and outs of bending Webpack into shape? Jump to the final webpack configuration.
Sometimes Static Html Is Best
Webpack works great for building Javascript heavy sites. But even in a complex Javascript application, some pages are simpler to create and serve as static HTML. However, Webpack entirely ignores HTML files out of the box. With a little work, Webpack can process HTML files just like it does Javascript files. We can even optimize images referenced in the HTML!
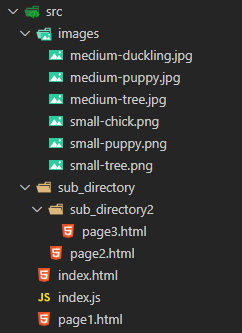
A Simple Static Site
We’ve built a small set of static HTML files and images to demonstrate how Webpack handles HTML and the images it references:
The index.js Javascript file is empty and simply there to make Webpack happy. Our HTML files look like this:
<html>
    <head>
        <title>Static HTML With Inline Images</title>
    </head>
    <h2>Static HTML With Inline Images</h2>
    <p>
        <h3>Links:</h3>
        <a href="page1.html">
            <img src="images/small-puppy.png"> Page 1
        </a><br>
        <a href="sub_directory/page2.html">
            <img src="images/small-chick.png"> Page 2
        </a><br>
        <a href="sub_directory/sub_directory2/page3.html">
            <img src="images/small-tree.png"> Page 3
        </a>
    </p>
</html>
<html>
    <head>
        <title>Page 2: Html In A Sub-Directory</title>
    </head>
    <h2><img src="../images/small-chick.png">Page 2: Html In A Sub-Directory</h2>
    <p>
        <h3><a href="../index.html">Back</a></h3>
    </p>
    <p>
        A larger image:<br>
        <img src="../images/medium-duckling.jpg">
    </p>
</html>
Processing Static HTML With Webpack
Webpack doesn’t know how to handle HTML files, but adding the html-webpack-plugin lets Webpack parse HTML files and place them into the output directory. First we need to install dependencies with NPM:
npm install --save-dev webpack webpack-cli html-webpack-plugin

# We'll use these two loaders later to load and optimize images:
npm install --save-dev html-loader image-webpack-loader
With dependencies installed, we can configure the plugin in webpack.config.js to include index.html in Webpack’s output.
var path = require('path');
var HtmlWebpackPlugin = require('html-webpack-plugin');

module.exports = {
    mode: 'development',
    entry: './src/index.js',
    output: {
        path: path.resolve('dist/'),
        clean: true
    },
    module: { },
    plugins: [
        new HtmlWebpackPlugin({
            template: 'src/index.html',
            filename: 'index.html',
            inject: false
        })
    ],
};
After this change, Webpack has dutifully included a single html file in the output directory along with an empty JS file:

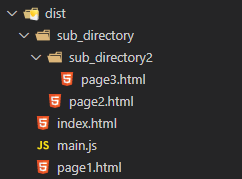
Automatically Processing Many HTML Files
There is one HTML file in the output directory, but there are three more files missing. It would be tedious and error prone to update Webpack’s config every time files are added or removed. Instead of manually adding the other files, let’s modify the configuration to automatically include all HTML files it finds. It’s not immediately obvious how to accomplish this because a HtmlWebpackPlugin instance only handles a single HTML file (It doesn’t support globbing).
Luckily, Webpack’s config is not just a bag of JSON, but a full-fledged javascript file run by Node.js. Using this fact, we can add logic that crawls our source directory looking for HTML files. Some of the files are in subdirectories so we look through those as well:
var path = require('path');
var fs = require('fs');
var HtmlWebpackPlugin = require('html-webpack-plugin');

// Look for .html files
var htmlFiles = [];
var directories = ['src'];
while (directories.length > 0) {
    var directory = directories.pop();
    var dirContents = fs.readdirSync(directory)
        .map(file => path.join(directory, file));

    htmlFiles.push(...dirContents.filter(file => file.endsWith('.html')));
    directories.push(...dirContents.filter(file => fs.statSync(file).isDirectory()));
}

module.exports = {
    mode: 'development',
    entry: './src/index.js',
    output: {
        path: path.resolve('dist/'),
        clean: true
    },
    module: { },
    plugins: [
        // Build a new plugin instance for each .html file found
        ...htmlFiles.map(htmlFile =>
            new HtmlWebpackPlugin({
                template: htmlFile,
                filename: htmlFile.replace(path.normalize("src/"), ""),
                inject: false
            })
        )
    ],
};
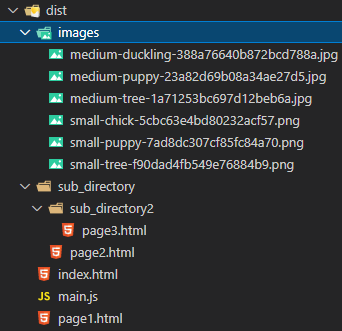
Webpack now automatically finds all static html files and outputs them to the dist/ directory:
Processing Images With Webpack
Webpack is automatically processing our HTML, but doesn’t do anything with the images referenced in img tags:

The Webpack config needs two additional module rules to get images working. The first rule parses HTML files using html-loader which allows Webpack to look for image references. The second uses a Webpack 5 Asset Module to copy those images to the output directory:
module.exports = {
    // ...snip...
    module: {
        rules: [
            {
                test: /\.html$/i,
                use: 'html-loader'
            },
            {
                test: /\.(png|jpg)$/i,
                type: 'asset/resource',
                generator: {
                    filename: 'images/[name]-[hash][ext]'
                }
            }
        ]
    },
    // ...snip...
};
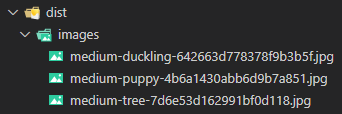
Now all images referenced in the HTML are output to their own directory:
Images now display correctly and we can navigate between pages:

Optimizing Image File Size
Because Webpack is running images through its pipeline, we can do more than just copy them. Adding image-webpack-loader to the existing image rule will reduce image file size on the fly. By default, image-webpack-loader optimizes JPEG, PNG, SVG and GIF images. We’ve overridden the PNG options to get smaller files at the cost of a small reduction in quality:
module.exports = {
    // ...snip...
    module: {
        rules: [
            // ...snip...
            {
                test: /\.(png|jpg)$/i,
                type: 'asset/resource',
                use: [{
                    loader: 'image-webpack-loader',
                    options: {
                        pngquant: {
                            quality: [.90, .95],
                        },
                    }
                }],
                generator: {
                    filename: 'images/[name]-[hash][ext]'
                }
            }
        ]
    },
    // ...snip...
};
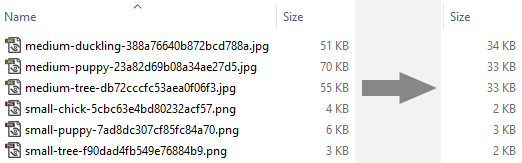
After optimization, the output images are almost half the size of the originals:
Automatically Inlining Images
We can further optimize image loading by embedding small images directly in the HTML. Image inlining improves page load time by reducing the number of requests the browser makes. Webpack 5’s Asset Module comes with built-in support for automatic inlining of small assets. We can enable it by updating our image rule:
{
    test: /\.(png|jpg)$/i,
    type: 'asset',
    // ...snip...
    parser: {
        dataUrlCondition: {
            maxSize: 10 * 1024 // Inline anything under 10kb
        }
    },
    // ...snip...
}
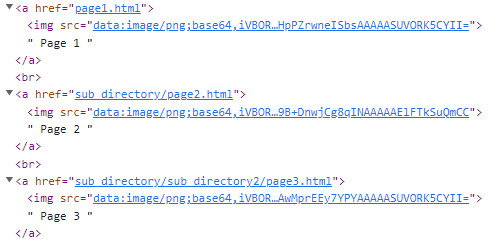
The smaller images are missing from the image output directory after this change. The only images left are too big to embed:
The missing images have been embedded directly into the HTML files:
TLDR: Final Webpack Configuration
Webpack is automatically parsing all our static HTML, optimizing referenced images, and inlining those images when it makes sense. Put together, the final Webpack configuration looks like this:
var path = require('path');
var fs = require('fs');
var HtmlWebpackPlugin = require('html-webpack-plugin');

// Look for .html files
var htmlFiles = [];
var directories = ['src'];
while (directories.length > 0) {
    var directory = directories.pop();
    var dirContents = fs.readdirSync(directory)
        .map(file => path.join(directory, file));

    htmlFiles.push(...dirContents.filter(file => file.endsWith('.html')));
    directories.push(...dirContents.filter(file => fs.statSync(file).isDirectory()));
}

module.exports = {
    mode: 'development',
    entry: './src/index.js',
    output: {
        path: __dirname + '/dist',
        clean: true
    },
    module: {
        rules: [
            {
                test: /\.html$/i,
                use: 'html-loader'
            },
            {
                test: /\.(png|jpg)$/i,
                type: 'asset',
                use: [{
                    loader: 'image-webpack-loader',
                    options: {
                        pngquant: {
                            quality: [.90, .95],
                        },
                    }
                }],
                parser: {
                    dataUrlCondition: {
                        maxSize: 10 * 1024 // 10kb
                    }
                },
                generator: {
                    filename: 'images/[name]-[hash][ext]'
                }
            }
        ]
    },
    plugins: [
        // Build a new plugin instance for each .html file found
        ...htmlFiles.map(htmlFile =>
            new HtmlWebpackPlugin({
                template: htmlFile,
                filename: htmlFile.replace(path.normalize("src/"), ""),
                inject: false
            })
        )
    ],
};
Conclusion
Our static HTML and image assets are now parsed and optimized by Webpack. Did the changes improve the performance of these pages? That’s what Request Metrics is for! Try it out for free to learn the real performance of your production website.

Oldest comments (0)