As a data scientist or ML engineer, have you ever faced the inconvenience of experimenting with the model? When we train the model, the model file is generated. Now, if you want to experiment with some different parameters or data, generally people rename the existing model file and train the model again and this process goes on.
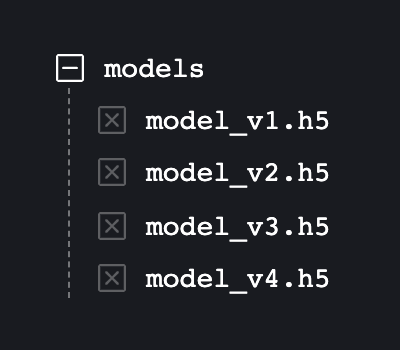
The final directory looks something as shown in the below figure 😁. The same thing goes with data as well.
Fig 1: Typical models dir after experimentation
But if we talk about code, we don't have this problem there because we have Git to version the code. I mean that I can create a separate branch for changing some code to see its behaviour without altering the previous one. What if we can get a Git kind of versioning control system for data and model? Wouldn't that be amazing? Here comes the DVC (Data Version Control) which exactly does the thing which solves this problem.
Although, DVC is much more than just data and model versioning. It also helps create end-to-end pipelines, capturing metrics related to pipelines and experimenting with ML models. But in this blog, we will see the data versioning aspect of DVC.
Installing DVC
DVC can be used as a typical Python library and can be installed using package managers like pip or conda.
To install DVC using pip, you can execute below command in the python supported terminal.
$ pip install dvc
To install DVC using conda, you need to execute below commands in conda terminal.
$ conda install -c conda-forge mamba # installs much faster than conda
$ mamba install -c conda-forge dvc
Apart from these conventional installation techniques, DVC can be installed in other different ways too as described here on the official documentation website.
Getting Started
Code versioning is not really a new thing for us because we use Git in our daily life but the problem with Git is it becomes extremely slow when the tracking file size is huge as 100 GB. That is where DVC comes in. Git tracks the changes in code whereas DVC tracks the changes in data as well as models.
The foundation of DVC consists of a few commands you can run along with Git to track large files, directories, or ML model files. In short, you can call DVC "Git for data".
Let us understand data versioning by dvc using a simple demo project. Let us assume that we want to create an end-to-end pipeline to prepare, train and evaluate the MNIST dataset and we have code as well as data available and structured as shown in the below figure.
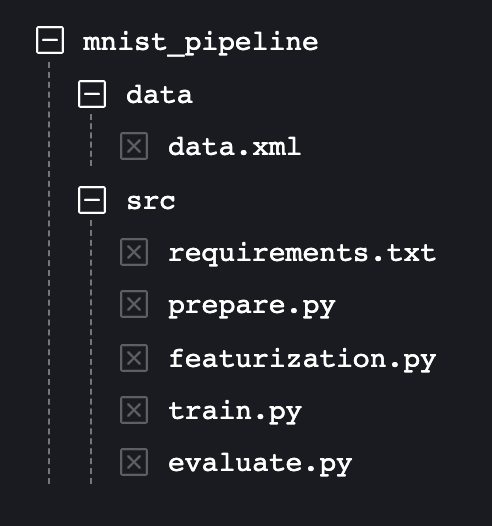
Fig 2 MNIST pipeline file structure.
By observing the file structure, we can see the MNIST dataset is stored in the data directory as a data.xml file and the code corresponding to every stage of the pipeline is stored in the src directory. Now as we understand, the code tracking (src) is the responsibility of Git and the data tracking (data) is the responsibility of DVC.
Before we version the data, we need to initialise the repository as a DVC repository. Just like we run command git init to initialise the current directory as a Git repository, we need to execute the below command which will initialise the current directory as a DVC repository.
$ dvc init
This command will create a new directory .dvc just like git init creates .git directory. Two files .gitignore and config will be generated in .dvc directory. Now, we have successfully initialized this as DVC repository.
Start Tracking
In Git, if we want it to track the changes in the code, we run a git add command which adds the code changes in the local repository. DVC has a similar command as shown below to start tracking the data files.
$ dvc add data/data.xml
Note here that a dvc add command accepts arguments which are data or model file names that you want DVC to track. All the filenames must be space-separated.
By executing this command, DVC will create two files data/data.xml.dvc and data/.gitignore.
File data/.gitignore looks something like this:
/data.xml
It means that it forces Git not to track original data.xml file which is expected because the tracking of data.xml is now responsibility of DVC and not Git.
All files ending with extension .dvc are special files which contains the information about where the actual data files will be stored and cached. If you take a look at data/data.xml.dvc, it just stores an MD5 signature as shown below.
md5: a7cd139231cc35ed63541ce3829b96db
Now looking at the complete picture, Git will not track data/data.xml because it is added in data/.gitignore but Git will track data/data.xml.dvc which will have information about where the actual data.xml is stored.
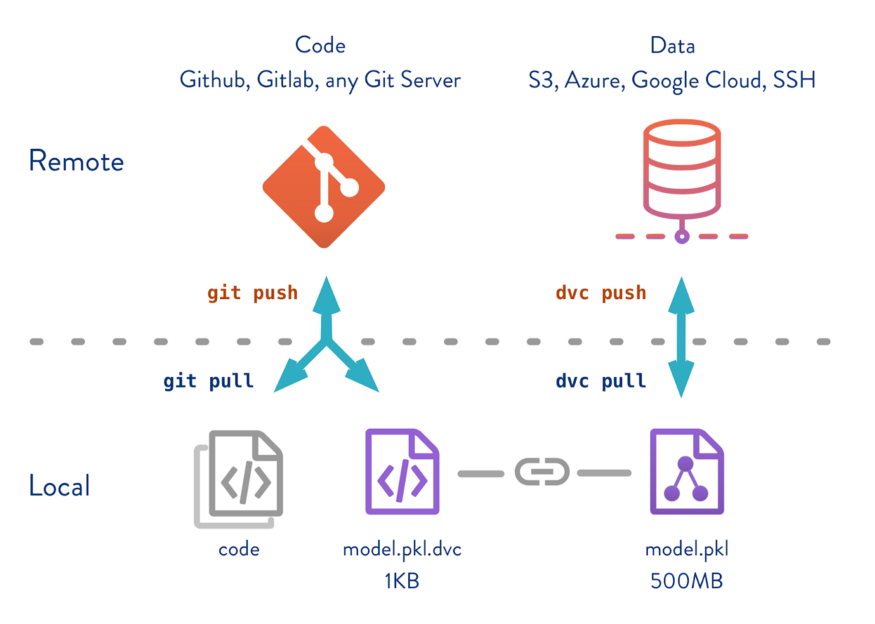
Now the Git tracked 2 files mentioned above will be stored in Git remote repository on Github, BitBucket or Gitlab and DVC tracked data file will be stored in DVC remote repository on any file system that we are going to describe in next section.
Once we do this, the directory structure for MNIST pipeline project looks something like this.
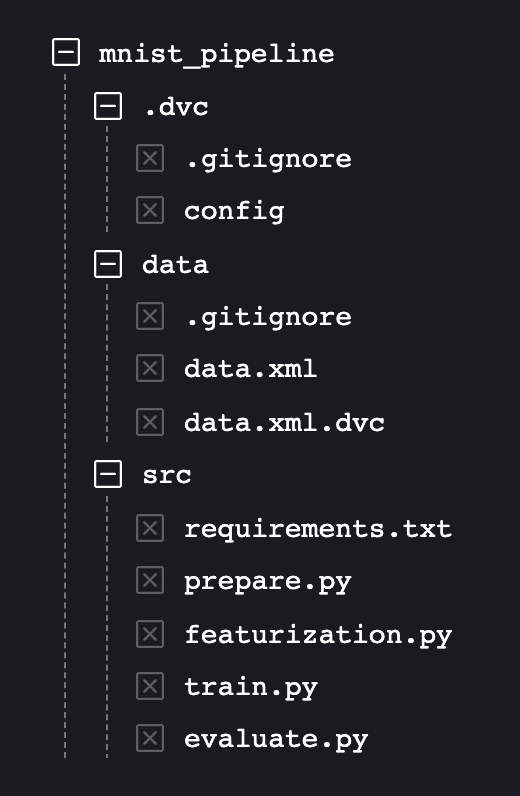
Fig 3 File structure after dvc add
Storing & Sharing
The actual data files (which are not tracked by Git) will be stored in any kind of file system which can also be called DVC repository. File system for DVC repository can be AWS S3 bucket, Google Drive, Google storage bucket, Azure storage, Object Storage Service or any custom created file system. Depending on where you will store the data, you will need to install external dependencies like dvc-s3, dvc-azure, dvc-gdrive, dvc-gs, dvc-oss, dvc-ssh. You can know more about installation here on the documentation website.
To push the data files in DVC repository, first we need to configure the remote origin of the repository where the data will be stored. We can do that using below commands.
$ dvc remote add -d storage s3://mybucket/dvcstore
$ git add .dvc/config
$ git commit -m "Configure remote storage"
dvc remote add command adds the remote origin of the DVC repository where the data will be stored. Executing this command will actually add this origin information in .dvc/config file which Git tracks. That is why we also need to commit the changes done in .dvc/config file as well.
Now, adding the remote origin doesn't automatically push the data in DVC remote repository. We can push the entire data file using below command:
$ dvc push
It pushes all the data and model files on which dvc add command is applied.
Retrieving
There is a reason behind dvc remote add stores remote origin information in .dvc/config. It does so because when next time somebody clones this Git repository, It will not have any data. It will only have MD5 signature of the data in corresponding .dvc file and it will also have DVC remote repository location information stored in .dvc/config file. So, the complete data can be pulled using below command:
$ dvc pull
It pulls all the data and model files stored in DVC remote repository.
ML Pipeline & Versioning
While working with DVC, we have to create two files dvc.yaml which contains information about the stages the ML pipeline will have and params.yaml which contains the parameters that different stages of the ML pipeline would use. You can take a look at the structure of both files on the example repository.
DVC is so flexible that you can use command dvc exp run to run the complete pipeline with just single command. The command is not only limited to this.
If you want to run your experiments with different parameters, you can mention the values of the parameters which are defined in params.yaml as shown below.
$ dvc exp run -S prepare.test_split=0.2 -S train.learning_rate=0.0001
Note here that whenever you run the experiments using the above command, DVC caches the output so well that it will only run those states which are affected by the parameters. Moreover, if you think one of the stages in the pipeline are too much time consuming and you want to checkpoint it so that in case the program crashes, it can resume from where it crashed, you can define checkpoint: true in the output of that stage in dvc.yaml file and it will keep checkpointing your results for you.
DVC keeps track of all the experiments that you perform and even you can see the history of the previously run experiments using dvc exp show. It will show you all the previously run experiments. You can filter this history as well. For example, dvc exp show --include-params=train will only show you the past experiments where any of the parameters of train stage was changed. Not just that, but you can also see the difference between two experiments' parameters and their resultant metrics as well using dvc exp diff exp-1dad0 exp-1df77. where exp-1dad0 and exp-1df77 are tags of two experiments as shown in history given by dvc exp show. Moreover, You can navigate to any previously run experiment using dvc exp apply. For example, if you run command dvc exp apply exp-1dad0, then the files will be changed as per the parameter changes specified in that particular experiment.
DVC gives us the flexibility to commit the experiment into a separate Git branch. As shown in the below command, using dvc exp branch command you can commit the experiment exp-1dad0 to separate branch my_branch.
$ dvc exp branch exp-1dad0 my_branch
Alternatively, you can also commit different experiments in different branches just by switching the branches as described below.
As we already understand switching between different versions of code by changing Git branch. Similarly, we can also change the version of the data as well.
$ git checkout experiment_v2
$ dvc checkout data/data.xml
We can observe that changing the version of data is now as simple as changing the Git branch. Note here that to switch to another version of data, we first need to switch to that particular Git branch where that version of data resides. Also, note here that you must apply dvc checkout to those files for which you want to switch the data version since git checkout only changes the code version.
How data versioning simplifies experimentation?
As described in the beginning of this blog, we don't need to keep multiple copies of model files anymore and keep renaming them. Now, we can have single model file which can be versioned using DVC during experimentation. Below image explains the same.
Fig 4 Model versioning for experimentation
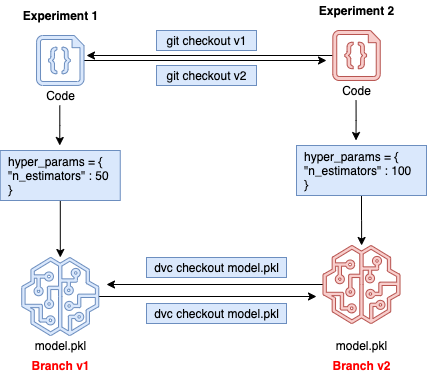
Let us suppose we are working in Git branch v1 where the hyper-parameter n_estimators to train model has value 50 and we have trained a model which is stored as model.pkl. Now, we want to experiment with value 100 for the same hyper-parameter n_estimators. So, we don't need to rename the old model file anymore. We will switch to another Git branch v2 using git checkout v2 command and we will switch to different model file version using dvc checkout model.pkl. We will change the value of hyper-parameter n_estimators to 100 now in code in v2 branch and we can train the model again. The new model.pkl file generated in v2 branch is corresponding to n_estimators = 100 and model.pkl file in v1 branch is corresponding to n_estimators = 50.
Although, this is very small experiment but the same thing can be applied in complex experimentation process. And with data versioning, the experimentation process becomes very flexible. We don't need to worry about tracking of data and model files.
Large datasets versioning
When the dataset is too large, we need very efficient mechanism in terms of space and performance to share different versions of data. That is why it is suggested to store the data in shared volume or on an external system. DVC supports both of these mechanisms as described below.
- A shared cache can be setup to store, version and access lot of data on a large shared volume efficiently.
- As we described earlier, the more advanced approach is to store and version the data directly into remote storage (ex. S3 bucket, Google Drive, GCP storage bucket etc.). You can look here to know more about how to configure external data storage for DVC.
Conclusion
With this, I hope you were able to get a quick overview of how DVC does data versioning. DVC also has features to streamline ML reproducibility and support cloud provisioning through cloud providers. This would come in handy for the entire MLOps community as now they could interact with each other without worrying about monolithic tools.
If you like to know more about how to do it and get your hands dirty, the documentations are a great way to start.
If you prefer videos then they have a youtube channel with detailed tutorials!
Happy Versioning!

Top comments (1)
In 2026, many ML engineers are moving away from manual file renaming by adopting MLOps tools like MLflow, Weights & Biases, or DVC to manage experiment versions. These platforms allow you to log parameters and metrics automatically, creating a structured history of every run without cluttering your workspace with files named "model_v2_final." For data scientists who source high-performance GPUs or specialized edge devices from global vendors, AliExpress Tracking provides the necessary transparency to monitor your hardware investments learn more. This oversight ensures your technical assets arrive on time to power your next big experiment.