What is a URL Shortener?
It is a tool that randomly assigns a set of numbers and characters to the URL you enter, considerably reducing its original length.
This article aims to create this tool while achieving as much automation as possible during development and demonstrate the use case of some AWS services.
Walkthrough
Let's start by creating a package.json with:
npm init
Next, let's add the necessary dependencies to create a lambda using typescript.
  "dependencies": {
    "@types/aws-lambda": "^8.10.95",
    "serverless": "^3.15.2",
    "serverless-plugin-typescript": "^2.1.2",
    "typescript": "^4.6.3"
  }
Don't forget to install these newly added dependencies with:
npm i
Now let's create a serverless.yml file where we will define our AWS resources as Infrastructure as Code. If you want to learn more about Serverless Framework.
service: url-shortener

plugins:
  - serverless-plugin-typescript

provider:
  name: aws
  runtime: nodejs14.x
  stage: dev

functions:
  hello:
    handler: handler.hello
    events:
      - http:
          path: /
          method: get
Create a file named handler.ts, with this boilerplate code to make a hello world lambda.
import { Handler } from 'aws-lambda';

export const hello: Handler = (event: any) => {
  const response = {
    statusCode: 200,
    body: JSON.stringify(
      {
        message: 'Go Serverless v1.0! Your function executed successfully!',
        input: event,
      },
      null,
      2
    ),
  };

  return new Promise((resolve) => {
    resolve(response)
  })
}
Is time to push our code into our repository.
git add .
git commit -m "Create boilerplate lambda"
git push
Now we can start testing our lambda if we configure our AWS credentials with aws configure and deploy our code with the command serverless deploy, but before we do that, let's automate this process using Github Actions.
GitHub Actions makes it easy to automate all your software workflows with Continuous Integration and Continuous Delivery. Build, test, and deploy your code right from GitHub.

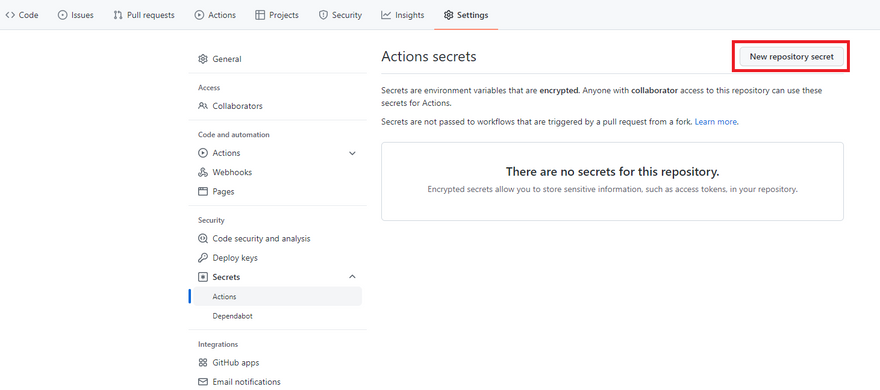
In our Github repository, click Settings on the left bar side, select Secrets then Actions. In the Actions secrets window, select New repository secret.
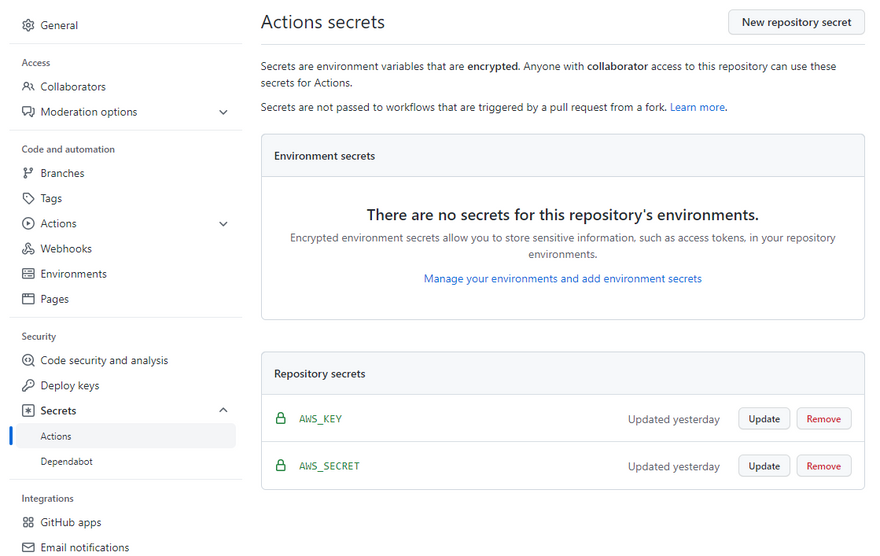
Create two secrets named AWS_KEY and AWS_SECRET, respectively. Here we will add our AWS Access Key ID and Secret Access Key. If you want to learn how to obtain these values, check this documentation.
Select Actions on the upper bar, in the Actions screen, select Set up a workflow yourself.
Clear the pre-defined template and add the following snippet. This snippet will use our previously defined secrets to authenticate and configure the necessary environment to deploy our resources into AWS.
name: Dev
on:
  push:
    branches:
      - main
jobs:
  deploy-dev:
    runs-on: ubuntu-latest
    steps:
    - uses: actions/checkout@v1
    - uses: actions/setup-node@v1
      with:
        node-version: '14.x'
    - name: Install Serverless Framework
      run: npm install -g serverless
    - name: Serverless AWS authentication
      run: sls config credentials --provider aws --key ${{ secrets.AWS_KEY }} --secret ${{ secrets.AWS_SECRET }}
    - name: Install NPM dependencies
      run: npm install
    - name: Deploy Lambda functions
      run: sls deploy
Name the file whatever you want, commit and push. Be sure to git fetch and git pull this file into your local repository. The next time we make some change in our code, it will trigger a deployment pipeline which will create our lambda in AWS.
❗ Note: If Actions won't activate, check the branch specified in:
on:
  push:
    branches:
      - master
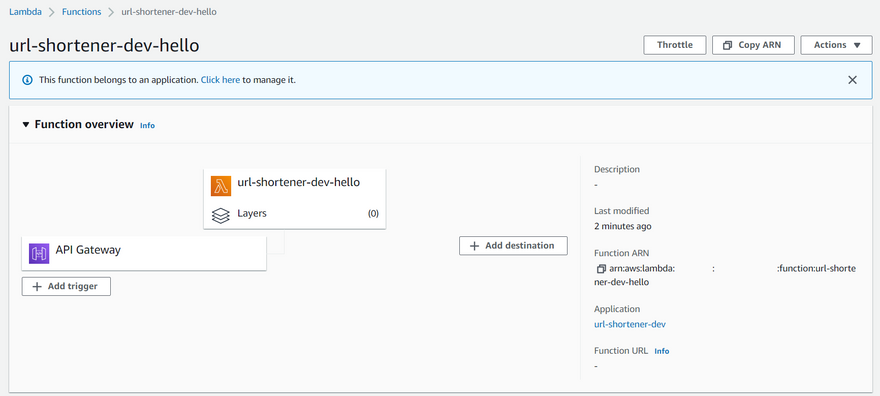
After the pipeline finishes deploying successfullya, let's check our newly created resource in AWS.
Hello Lambda in AWS

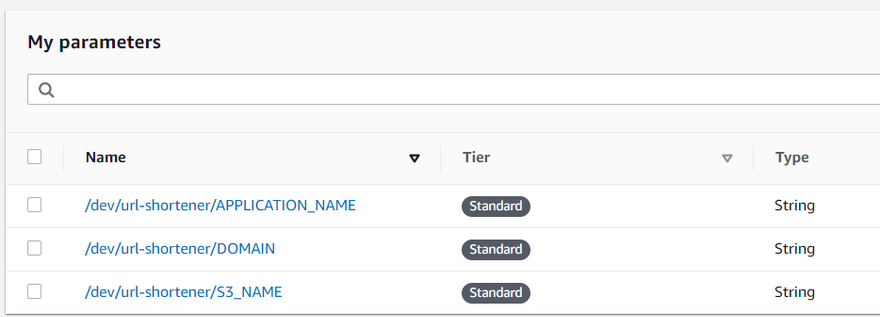
Since our CI/CD integration is working correctly, let's start coding our URL-shortener solution. First, we need to create three variables that will help us define the name of our bucket, a domain, and the name of our application. For this example, I'm going to use the following values:
/dev/url-shortener/APPLICATION_NAME : url-shortener
/dev/url-shortener/DOMAIN : http://<<add your domain here or s3 endpoint>>/
/dev/url-shortener/S3_NAME : <<add your domain or name here>>
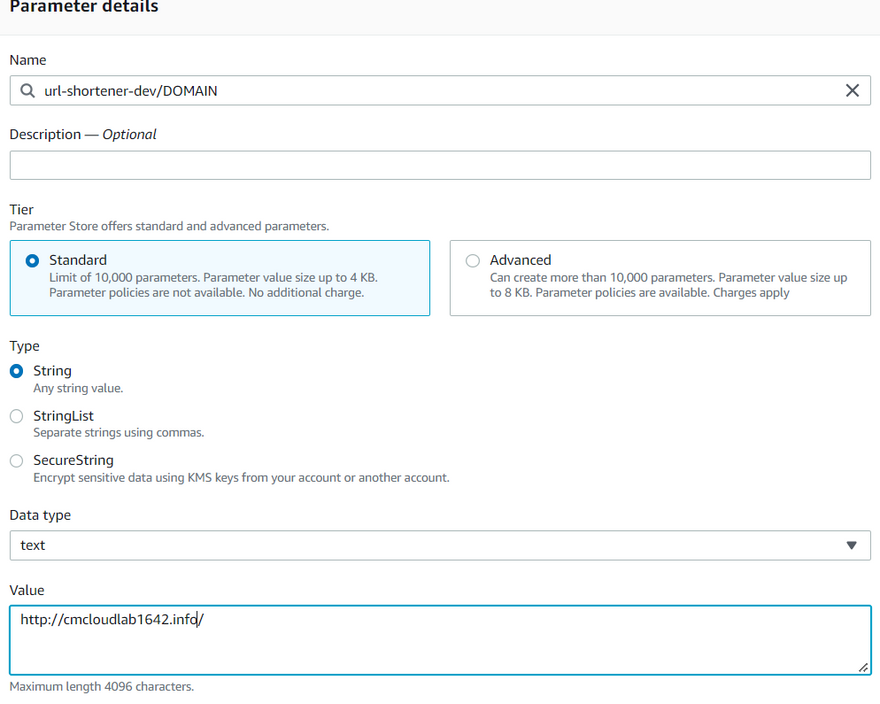
You can add any domain that you want; for the sake of the example, I will use a Route 53 domain that I had registered. If you don't have a domain, you can use the S3 endpoint of the bucket that we will create as the value for the variable DOMAIN. For the S3_NAME variable, you can also write any name. However, I will use the domain's name to register the s3 endpoint of this bucket under Route 53 as an Alias Record. For the value of the variable APPLICATION_NAME, name it the same as you defined in the service field of the serverless.yml file.
Now we proceed to modify our serverless.yml, where we are going to create a DynamoDB table named atomic_counter , an S3 Bucketwith some rules, some iam roles to give our lambda access to these resources, and we are going to change our hello lambda that used ApiGateway to a Function Url.
Let's define our added Parameter Store variables to use in our code. You can define the region where your variables are located. In this example, our variables are in us-east-1. The variable value should read as:
${ssm:/${self:provider.stage}/${self:service}/DOMAIN}
${ssm:/dev/url-shortener/DOMAIN}
As we reference, some of these values on the same serverless.yml file.
  environment:
    DYNAMO_ATOMIC: ${self:resources.Resources.atomicCounter.Properties.TableName}
    DOMAIN: ${ssm:/${self:provider.stage}/${self:service}/DOMAIN}
    APPLICATION_NAME: ${ssm:/${self:provider.stage}/${self:service}/APPLICATION_NAME}
    S3_NAME: ${ssm:/${self:provider.stage}/${self:service}/S3_NAME}
Change the handler and the event of our lambda to type url, which will create an http endpoint with a url that we can use to send a POST with the information that we need to process. You can custom the cross-origin resource sharing to whatever suits your needs.
Using Function URLs suits our use case since we don't need to create a complex REST API. We only need an HTTP endpoint that we can use in a front-end view.
functions:
  shortUrl:
    handler: handler.short
    url:
      cors: true
Next, create a DynamoDB table that will be used as an atomic counter and set an index called name.
resources:
  Resources:
    atomicCounter:
      Type: "AWS::DynamoDB::Table"
      Properties:
        TableName: atomic_counter
        AttributeDefinitions:
          - AttributeName: name
            AttributeType: S
        KeySchema:
          - AttributeName: name
            KeyType: HASH
        BillingMode: PAY_PER_REQUEST
        StreamSpecification:
          StreamViewType: NEW_AND_OLD_IMAGES
Create an S3 bucket, which will have public access, and it will serve as a static website host. We also will need a Lifecycle rule as our service will work as a redirection of the objects we will create in our bucket. We would like to expire old links that we no longer use.
    page:
      Type: AWS::S3::Bucket
      Properties:
        AccessControl: PublicRead
        BucketName: ${self:provider.environment.S3_NAME}
        WebsiteConfiguration:
          IndexDocument: index.html
        LifecycleConfiguration:
          Rules:
            -
              ExpirationInDays: 5
              Prefix: '/'
              Status: Enabled
Finally, let's give access to our lambda through IAM policies, these policies will provide access to put and update data into our s3 bucket and dynamo table.
service: url-shortener

plugins:
  - serverless-plugin-typescript

provider:
  name: aws
  runtime: nodejs14.x
  stage: dev
  environment:
    DYNAMO_ATOMIC: ${self:resources.Resources.atomicCounter.Properties.TableName}
    DOMAIN: ${ssm:/${self:provider.stage}/${self:service}/DOMAIN}
    APPLICATION_NAME: ${ssm:/${self:provider.stage}/${self:service}/APPLICATION_NAME}
    S3_NAME: ${ssm:/${self:provider.stage}/${self:service}/S3_NAME}
  iamRoleStatements:
    - Effect: "Allow"
      Action:
        - dynamodb:UpdateItem
        - logs:CreateLogGroup
        - logs:CreateLogStream
        - logs:PutLogEvents
      Resource:
        - "Fn::GetAtt":
            - atomicCounter
            - Arn
    - Effect: "Allow"
      Action:
        - s3:PutObject
        - s3:PutObjectAcl
      Resource: "arn:aws:s3:::${self:provider.environment.S3_NAME}/*"
functions:
  shortUrl:
    handler: handler.short
    url:
      cors: true
resources:
  Resources:
    atomicCounter:
      Type: "AWS::DynamoDB::Table"
      Properties:
        TableName: atomic_counter
        AttributeDefinitions:
          - AttributeName: name
            AttributeType: S
        KeySchema:
          - AttributeName: name
            KeyType: HASH
        BillingMode: PAY_PER_REQUEST
        StreamSpecification:
          StreamViewType: NEW_AND_OLD_IMAGES
    page:
      Type: AWS::S3::Bucket
      Properties:
        AccessControl: PublicRead
        BucketName: ${self:provider.environment.S3_NAME}
        WebsiteConfiguration:
          IndexDocument: index.html
        LifecycleConfiguration:
          Rules:
            -
              ExpirationInDays: 5
              Prefix: '/'
              Status: Enabled
In our handler.ts, we need to check the original inbound URL with a regex function. If the given URL doesn't have a prefix, we append the string http://. Otherwise, the WebsiteRedirectLocation function will throw an error. Next, we get the number in the DynamoDB counter, which we will encode into a shortened string. We write a zero-length file out to our S3 bucket with the appropriate metadata that will serve as a path that redirects to the desired URL. Lastly, we return the shortened URL.
import { Handler } from 'aws-lambda';
import { v4 as generator } from 'uuid';
import * as AWS from 'aws-sdk';

const s3 = new AWS.S3();
const dynamodb = new AWS.DynamoDB();

let shortName = function(counter: number): string{
    const base62: string = generator();
    const base62Length: number = base62.length;
    let shortName: string = '';

    while (counter) {
        let leftOver: number = counter % base62Length;
        counter = Math.floor(counter / base62Length);
        shortName = base62[leftOver].toString() + shortName;
    }

    return shortName;
}

let addHttpPrefix = function (url:string): string{
  if (!/^https?:\/\/(.*)/i.test(url)) {
      url = "http://" + url;
  }
  return url;
}

export const short: Handler = (event: any, context: any) => {

    let body: any = JSON.parse(event.body)
    let dynamoParams: any = {
        Key: {
            'name': {
                S: `${process.env.APPLICATION_NAME}`,
            }
        },
        TableName: `${process.env.DYNAMO_ATOMIC}`,
        UpdateExpression: 'SET counterValue = counterValue  + :increment',
        ExpressionAttributeValues: {
            ":increment": { N: "1" }
        },
        ReturnValues: "ALL_NEW"
    };

    dynamodb.updateItem(dynamoParams, function (err, data) {
        if (err) context.fail(err, err.stack);
        else {
            let s3Params = {
                Bucket: `${process.env.S3_NAME}`,
                Key: shortName(Number(data.Attributes.counterValue.N)),
                ACL: 'public-read',
                Body: '',
                ContentType: 'text/html',
                WebsiteRedirectLocation: addHttpPrefix(body.url)
            };

            s3.putObject(s3Params, function (err) {
                if (err) context.fail(err, err.stack);
                else
                    context.succeed({ "shortUrl": `${process.env.DOMAIN}` + s3Params.Key });
            });

        }

    });
}
Before we push and deploy these resources, let's update our package.json, with some libraries, like uuid, which will create a string with base62, to randomize the created URL.
  "dependencies": {
    "@types/aws-lambda": "^8.10.95",
    "@types/node": "^17.0.29",
    "aws-lambda": "^1.0.7",
    "serverless": "^3.15.2",
    "serverless-plugin-typescript": "^2.1.2",
    "typescript": "^4.6.3",
    "uuid": "^8.3.2"
  },
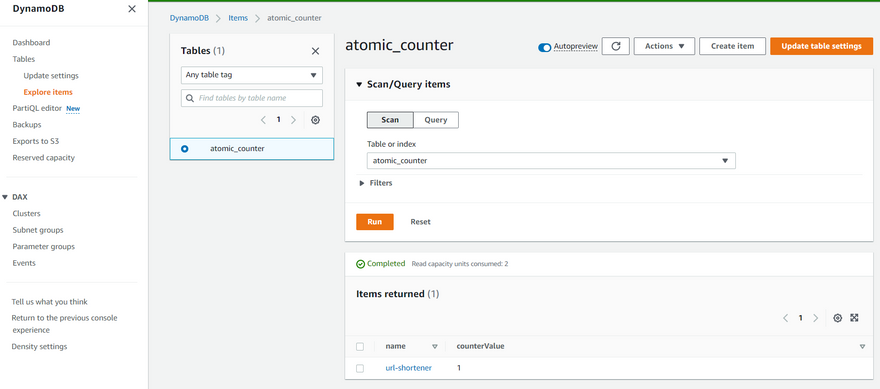
After our actions pipeline finishes deploying, create a register in the atomic_counter table with the value of 1 and the application's name, which we will use as an encoded string.
{
  "name": {
    "S": "url-shortener"
  },
  "counterValue":{
    "N": "1"
  }
}
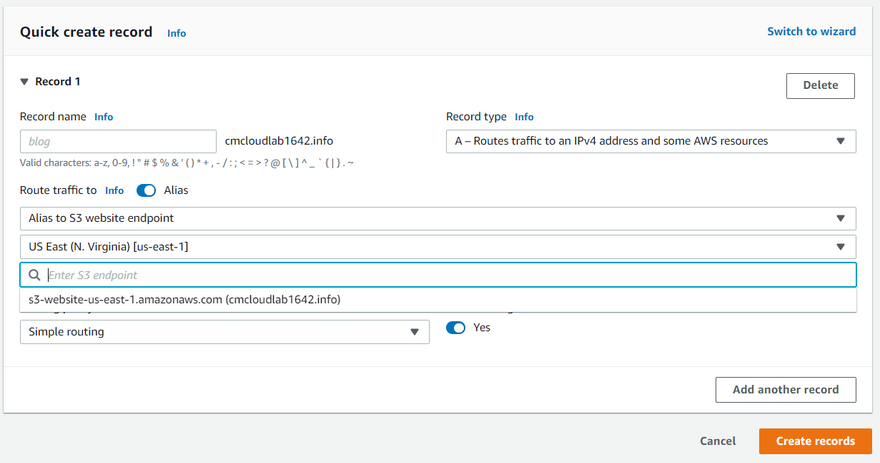
Let's wrap up by creating an alias record of our s3 endpoint in Route 53, which will be used as a domain response of our url-shortener service.
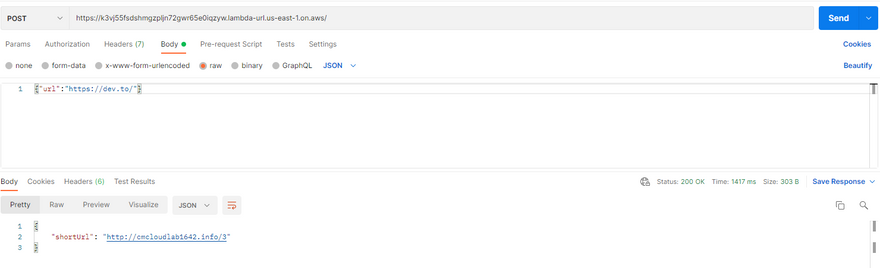
Test our endpoint, by sending an URL that we like to short, and voilà! we completed our url-shortener.
You can find the complete code here. I hope you find this article helpful.


Latest comments (2)
Great article, thanks for sharing
+1 agree!