⏰ Estimated Time: 4 minutes
This guide covers the steps to self host Redpanda on your Kubernetes cluster using Argonaut.
Redpanda is a distributed event streaming platform providing infrastructure for real-time data. It is designed to be fast, scalable, and easy to use. It is built on top of Apache Kafka and is fully compatible with the Kafka ecosystem, while being packaged as a single binary without the need for ZooKeeper or a separate control plane.
This makes for a lightweight and easily maintainable deployment. It provides a number of features that make it well-suited for modern streaming applications, including support for transactions, and a high-performance storage engine.
We will deploy both Redpanda and the Redpanda console.
Prerequisites for installation
- Argonaut account with an environment created
- AWS or GCP account connected to Argonaut
- EKS or GKE cluster provisioned by Argonaut or any other imported Kubernetes cluster
Note: This installation requires Kubernetes 1.21+. Argonaut automatically maintains Kubernetes versions.
Setup Library App in Argonaut
You can add Redpanda as a custom app from Library to Argonaut. This will then be available in your cluster under Add-Ons.
💡 Each Redpanda broker runs on its own worker node and requires a minimum of 3 nodes. This can be changed in Helm chart configuration's
podAntiAffinityrules by settingpodAntiAffinity.type: soft.
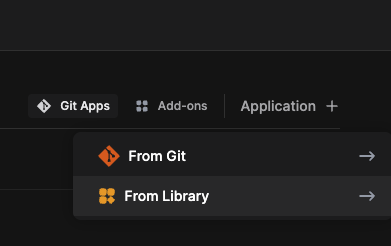
- Click on the
Application +and theFrom Librarybutton. - Choose
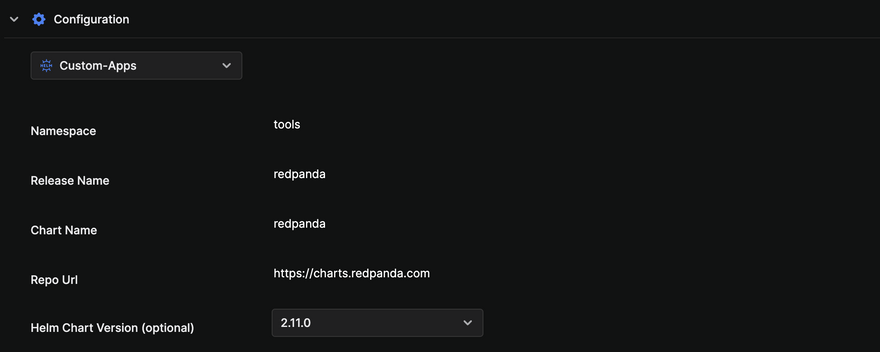
Custom-Appsunder configuration. - Ensure the selected environment is correct, then select the cluster you want to deploy the agent to. Important to ensure that the environment and region of this node is the same as all other nodes.
- Set the configuration to Custom Apps (Helm)
- Set namespace as the same name as the cluster (that's where your apps are deployed by default)
- Release Name as
redpanda - Chart Name as
redpanda - Repo Url as
https://charts.redpanda.com
-
Make the following changes to
values.yamlfile.
# Logging logging: # Log level # Valid values (from least to most logging) are warn, info, debug, trace logLevel: warn -
Notes:
- Multiple
redpandainstances running in the same cluster will need manual port tweaks to avoid conflicts. This is supported by the chart. - Secrets must be used for passwords in production environments.
- Optionally, enable SASL authentication by editing this in the
values.yamlfile.
# Authentication auth: sasl: enabled: true users: - name: superuser password: <secretpassword> - Multiple
Click on
Installto deploy the app.
Accessing Redpanda
The Kafka interface is exposed on port 9094 by default (listeners.kafka.external.default.port). The Redpanda console is exposed on port 9644 within the cluster (listeners.admin.port).
Components installed
The Redpanda Helm chart will install the following components into your Kubernetes cluster:
- A StatefulSet with three Pods.
- One PersistentVolumeClaim for each Pod, each with a capacity of 20Gi.
- A headless ClusterIP Service and a NodePort Service for each Kubernetes node that runs a Redpanda broker.


Latest comments (0)