This article originally appeared on my personal dev blog: Byte High, No Limit.
Photoshop is old. Really old. Well, in computer terms anyway. As of writing, it's currently on version 24.0. It was originally developed for the Mac in 1987 by Thomas Knoll, a PhD student at the University of Michigan, and his brother John, who worked for Industrial Light & Magic. Photoshop is a raster graphic (pixel image) editor. And because of its age, it has features for rendering 24-bit images (16 million colors) down to limited palettes, (which were a common feature of computers in the 1980s), that are missing from, or hard to use in, other image manipulation programs.
Another piece of software dating from 1987 is Image Magick. It was created by John Cristy at DuPont to convert 24-bit images to 8-bit images (256 colors). In 1990 Adobe became the publisher of Photoshop, and DuPont assigned the copyright in its tool to ImageMagick Studios LLC, a non-profit organization “dedicated to making software imaging solutions freely available”. So, if you can't afford over $200 a year for a Creative Cloud subscription just to convert 24-bit images to low color images, Image Magick is the obvious solution.
Some hardware that definitely doesn't date from 1987, but is designed as if it did, is the Chloe 280SE (the retro computer project that I will talk endlessly about if given the opportunity). The project is still in development, and at present its highest resolution graphics mode is incredibly complicated. It has a non-linear bitmap of 256×192 pixels. This is overlaid with a non-linear attribute map of 32×192 cells (each 8×1 pixels in size) that determine the foreground and background color. Each 8 pixel cell is rendered by paring a bitmap byte with an attribute byte. The attribute byte is divided into three parts. The highest two bits select one of four color look up tables (CLUTs). The middle three bits set one of 8 background colors, and the lowest three bits set one of 8 foreground colors. Background and foreground colors are defined independently. This gives 16 colors per CLUT, for a maximum of 64 colors on screen. However, it is not possible to combine colors from different CLUTs. The colors are chosen from a fixed palette of 256 colors based on half the 9-bit RGB palette (3-bits are used for red and green, but only two for blue). These are stored in GRB (MSB) order. A complete image consists of a 6K bitmap, 6K attribute map and 64 byte palette.
I said it was complicated. Fortunately, Edward Cree wrote an image conversion tool for Linux (scrplus) and Klaus Jahn made a Windows version (Image2ULAplus). These can both be used on a Mac with a suitable virtualization solution. However, the results can vary widely. This is the pre-conversion process if you have access to any version of Photoshop.
- Scale the image you want to convert to 256×192 pixels.
- Pattern dither the image to a uniform 128 colors.
Typically, Floyd-Steinberg or diffusion dither will give better results than pattern dither when reducing color depth. However, pattern dither seems to be the best method to reduce the visibility of the attribute cells. The palette has 8 levels for red and green, but only 4 for blue. Reducing the range to a uniform 128 colors translates to giving each color 5 levels in the input image. I don't know why, but that seems to give the best conversion results.
The conversion process after opening the input image in Image2ULAplus is:
- Switch off:
- Reduce colors to 8-bit.
- Use dithering
- Create HAM256 screen
- Stretch to SCREEN$ size.
- Switch on:
- Calculate palette
- CLUTs: 0, 1, 2, 3
- Create Timex screen
- Set maximum colors to 64.
- Click Render.
- Save the image in
.SCRformat.
I've got a licensed copy of Photoshop CS6 on a 2010 MacBook Air. But I don't really want to have to get that out of storage every time I need to convert an image. So here's how to use Image Magick instead. First, you have to install it (unless it's pre-installed in your Linux distro): On Ubuntu, you'd use sudo apt install imagemagick and invoke it with the convert command. On macOS, the easiest way to install it is using Homebrew with brew install imagemagick. On Windows, you can download an executable.
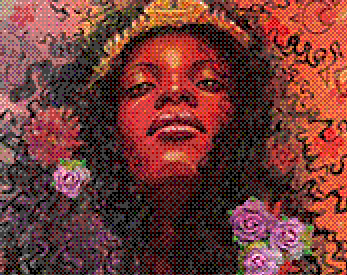
With experimentation, I've found that the best setting for conversion to the Chloe 280SE is: magick input.jpg -resize 256x192 -ordered-dither o8x8,5,5,4 output.gif. This scales the image to 256×192 and then performs an ordered (pattern) dither on the image using an 8×8 pattern (which works well with 8×1 attributes). It applies a uniform palette with 5 levels of red and green, and 4 levels of blue (128 uniform colors in Photoshop gives approximately 5 levels for each color). The results vary, but for the test image that I've used in all my tutorials, Image Magick actually does a better job than Photoshop.
Now that's just one use case. Back in my days as a tech writer, I mainly used it for making .PNG images as small as possible for inclusion in online help files. And that's barely scratching the surface of what's possible with Image Magick. Fortunately, there's good documentation and an active community.
Image: Detail from cover of “Nubia Coronation Special” by David Mack. Copyright © DC.

Latest comments (0)